Upgrade SensorSDK
This section describes the steps to take during upgrades to the SensorSDK and SystemGraph packages.
Upgrade from SensorSDK 2.0 or later
When upgrading a project from SensorSDK 2.0 or later, you can use the Package Manager directly.
Upgrade SensorSDK using the Package Manager
To upgrade SensorSDK, use the normal Package Manager procedure:
- Open your existing project that uses SensorSDK.
- In the Editor toolbar, select Window > Package Manager.
- In the Package Manager window menu, select Package: In Project.
- Select SensorSDK in the list, then select Update to.
The SystemGraph package will be updated automatically to match the version required by SensorSDK.
Delete temporary files
It's sometimes necessary to force importing the assets again and recompiling shaders after updating SensorSDK.
- Close your project.
- In your project directory, delete the following directories, if present:
Library,Logs,obj,Temp. They will be recreated automatically.
Reimport samples
If you are using the provided samples in your project, you should reimport them, as they might need modifications after updating the package.
Open your project and follow the Installation procedure.
Note
When opening your project at this point, you might see multiple errors if you are using the old samples. Ignore the errors and reimport the samples.
Upgrade SensorSDK from 2.0.5 to 2.1.0
In release 2.1.0 of SensorSDK, multiple nodes related to the Photosensor and processing its output have been simplified, giving rise to a new set of nodes, denoted with the suffix v2, for example, Photosensor v2. The photosensor now outputs a structured buffer directly, instead of a circular buffer, which simplifies subsequent nodes as they don't have to handle a read index into the circular buffer.
If you are using system graphs and Prefabs that are provided as SensorSDK samples, you have nothing to do apart from reimporting the samples.
Here is the list of affected nodes, which now have a v2 version:
- Photosensor
- PhotosensorToInstanceSegmentation
- PhotosensorToIntensity
- PhotosensorToIntensityBuffer
- PhotosensorToPointCloud
- PhotosensorToRange
- PhotosensorToSemanticSegmentation
- VelodynePhotosensorToPointCloud
If you created your own graphs using those nodes, your graphs will still work, using the original version of the nodes.
If you created your own nodes that use a PhotosensorOutputBuffer, those nodes will still work as long as they interact with the original version of the photosensor-related nodes.
If you want to update your nodes to work with the newer v2 versions of the photosensor-related nodes, compare the differences between PhotosensorToPointCloud and PhotosensorToPointCloud v2 node implementations. To summarize, the newer implementation always receive a full sensor frame as a structured buffer, instead of a circular buffer. The node is called exactly once per sensor frame, without the need to accumulate samples until a full frame is ready.
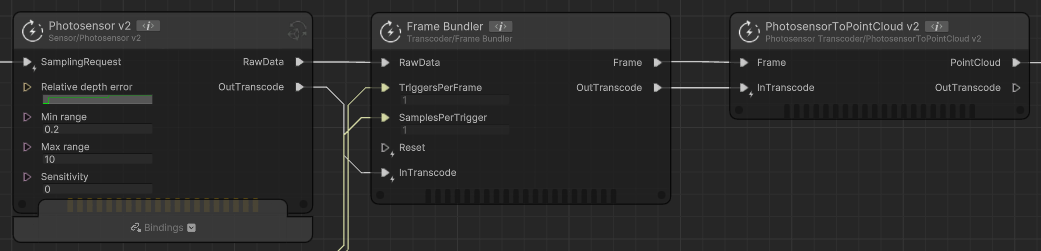
If you want to create new graphs involving a photosensor, you must now include a Frame Bundler node between the Photosensor v2 output and the photosensor transcoder inputs. The Frame Bundler accumulates samples from the Photosensor v2 and outputs full sensor frames.
In SensorSDK 2.0.5, a lidar graph would look like this:
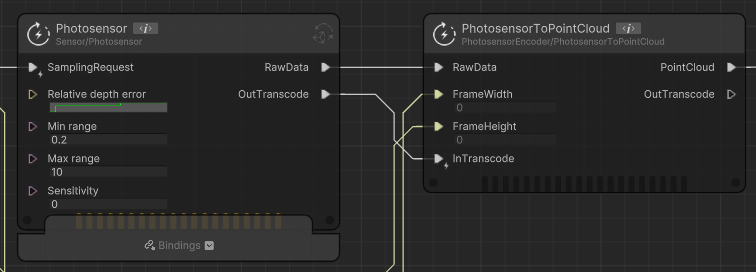
In SensorSDK 2.1.0, the same lidar now looks like this:
Upgrade SensorSDK from 1.0.5 to 2.0.1
To upgrade a project using SensorSDK 1.0, do the following:
- If it's open, close your project.
- In the
Assetsdirectory of your project, delete theLibrary,Logs,obj, andTempdirectories, if present. - In the
Assets/Samplesdirectory, delete theSensorSDKdirectory andSensorSDK.metafile. - In the
Packages/manifest.jsonfile, remove the following lines:"com.unity.render-pipelines.core": [...]"com.unity.render-pipelines.high-definition": [...]"com.unity.render-pipelines.high-definition-config": [...]"com.unity.shadergraph": [...]"com.unity.visualeffectgraph": [...]
- In the
Packages/manifest.jsonfile, change the versions of the SensorSDK and SystemGraph packages:"com.unity.sensorsdk": "2.0.1","com.unity.systemgraph": "2.0.0",
- Launch your project with Unity Editor 2022.1. When prompted to change the project version, select Continue.
- If asked to enter safe mode, select Ignore.
- Import the SensorSDK samples.
Note
If your project uses SensorSDK nodes or types without using the provided prefabs, you might still have errors, as there are some incompatibilities between versions 1 and 2 of SensorSDK.
Avoid modifications to SensorSDK samples
To simplify project upgrades, it's recommended to avoid modifying any of the sample content provided by SensorSDK, such as materials, sensors, and scenes. If you decide to modify the original samples, the upgrade will require manually reintegrating changes done in the newer release.
Upgrade your system graphs
The system graph asset format might change when upgrading the SystemGraph package. To upgrade graphs automatically, select Mechatronics > SystemGraph > Validate and Upgrade Assets.
