HTTPSの証明書の設定
前提条件
Windows
このドキュメントは Windows 上でのセットアップを前提にしています。
Chocolatey
Chocolatey は Windows で動作するパッケージマネージャーです。こちらの リンク からインストールできます。
OpenSSL
OpenSSL は堅牢で商用レベルでの利用にも耐えられる、機能豊富な Transport Layer Security(TLS) および Secure Sockets Layer(SSL)プロトコルのツールキットです。以下のコマンドでインストールできます。
choco install openssl.light
手順 1:秘密鍵を作成する
次のコマンドを実行します:
"C:\Program Files\OpenSSL\bin\openssl.exe" genrsa -des3 -out rootSSL.key 2048
パスワードを入力します:
Enter pass phrase for rootSSL.key:
パスワードを確認します
Verifying - Enter pass phrase for rootSSL.key:
手順 2:証明書ファイルを作成する
次のコマンドを実行します:
"C:\Program Files\OpenSSL\bin\openssl.exe" req -x509 -new -nodes -key rootSSL.key -sha256 -days 1024 -out rootSSL.pem
パスワードを入力します:
Enter pass phrase for rootSSL.key:
ソフトウェアを利用する国の 2 文字の国コードを入力します:
Country Name (2 letter code) [AU]:CA
ソフトウェアを利用する場所(州、都道府県など)の名称を入力します:
State or Province Name (full name) [Some-State]:Quebec
ソフトウェアを利用する地域(市区町村、郡など)の名称を入力します:
Locality Name (eg, city) []:montreal
ソフトウェアを利用する組織の名称を入力します:
Organization Name (eg, company) [Internet Widgits Pty Ltd]:Unity
組織内で所属しているビジネスユニットの名称を入力します:
Organizational Unit Name (eg, section) []:Verticals
ソフトウェアを利用するコンピューターの「完全修飾ドメイン名(FQDN)」または利用者自身のお名前を入力します:
Common Name (e.g. server FQDN or YOUR name) []:Tony
メールアドレスを入力します:
Email Address []:anthonyma@unity3d.com
手順 3:Windows で認証局(CA)を信頼する
マイクロソフト管理コンソール(mmc.exe)を検索して起動します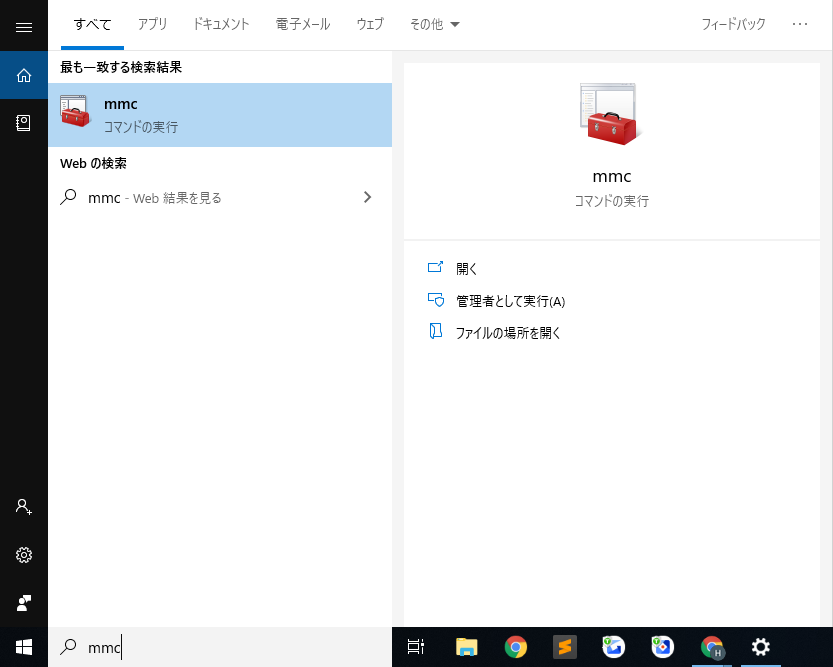
ファイル > スナップインの追加と削除...を選択します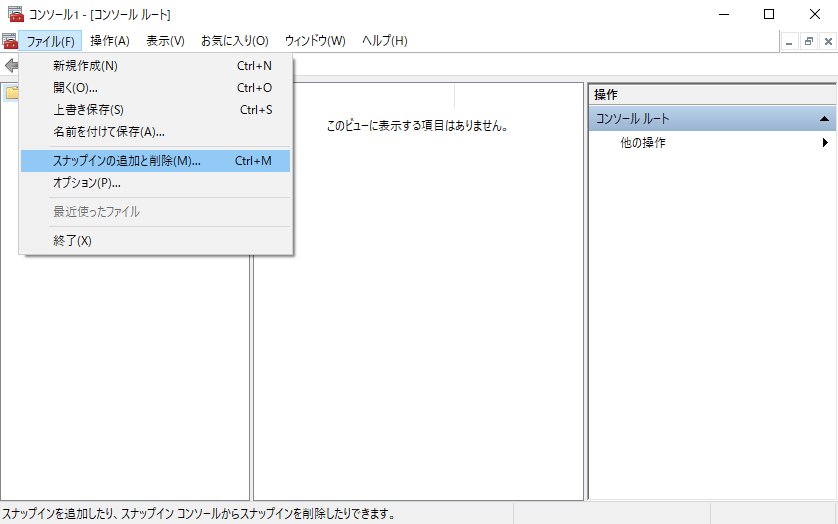
証明書をクリックして、次に追加 >をクリックします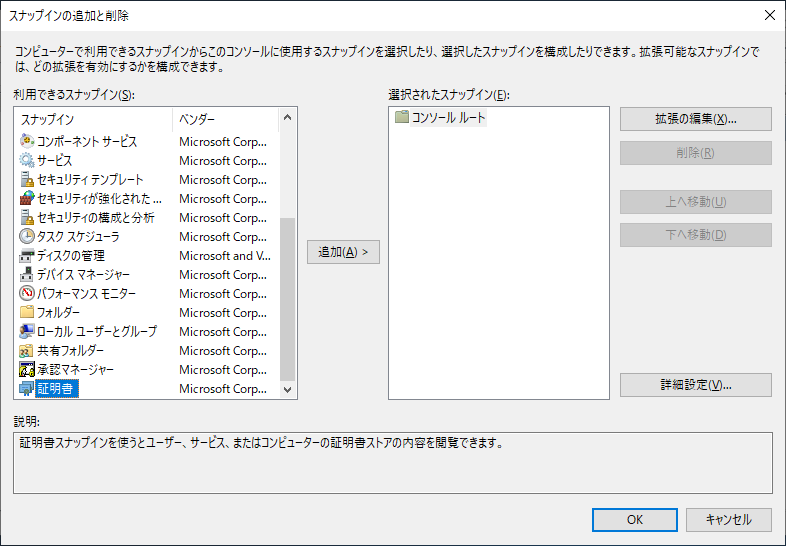
コンピューター アカウントを選択して次へ >をクリックします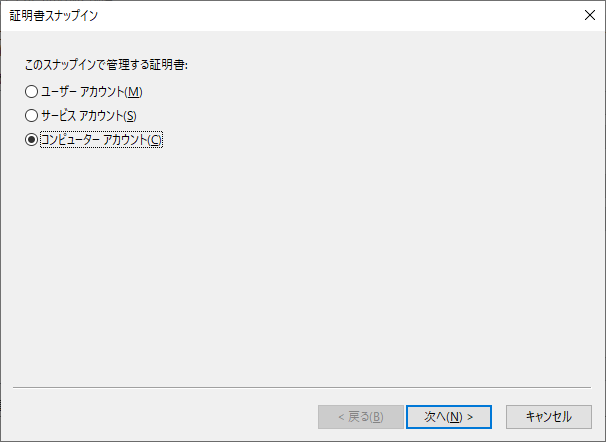
ローカル コンピューター (このコンソールを実行しているコンピューター)を選択して完了をクリックします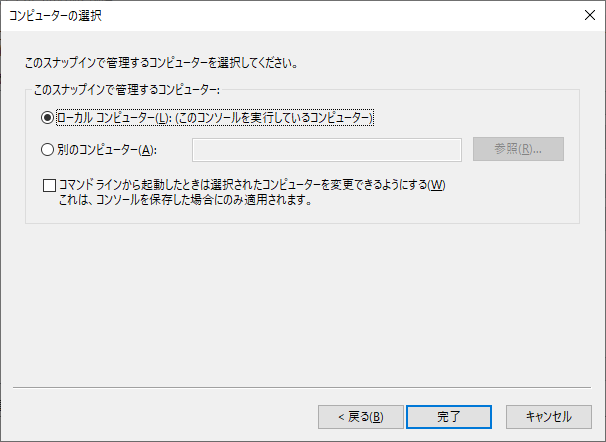
証明書が追加されたことを確認して、
スナップインの追加と削除ウィンドウのOKをクリックします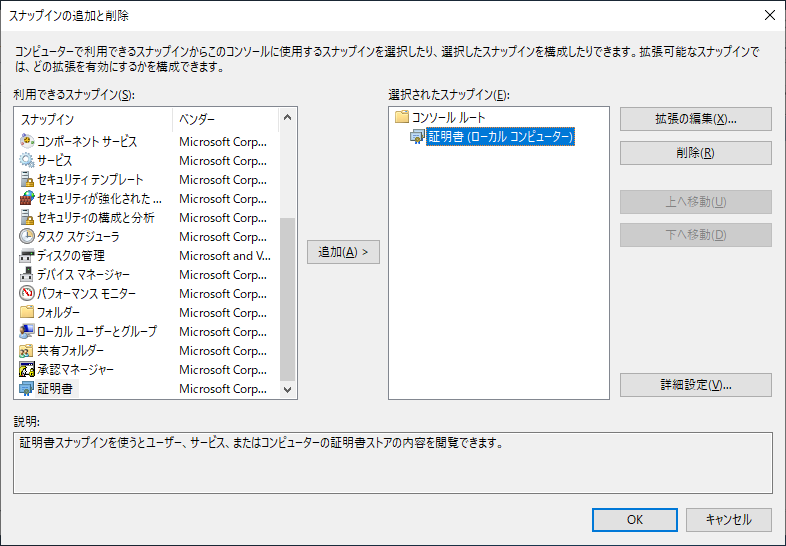
コンソール 1 - [コンソール ルート]と表示されているウィンドウの左側で、コンソール ルート > 証明書 (ローカル コンピューター)を展開します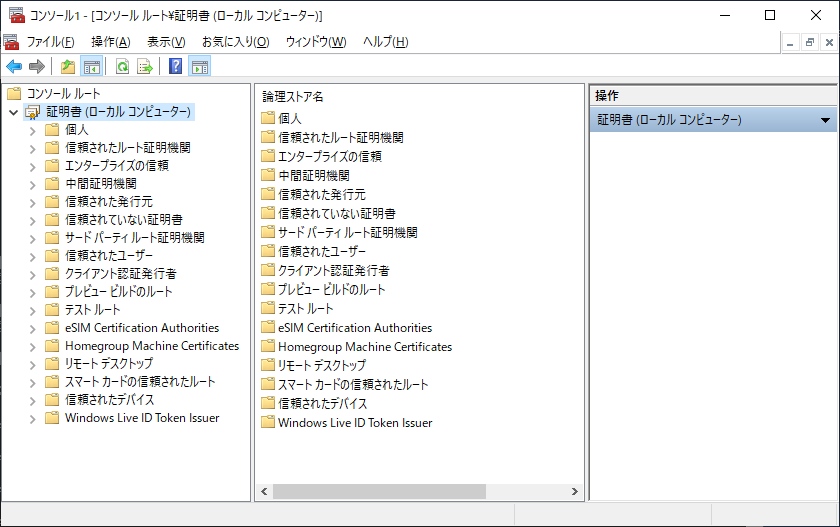
信頼されたルート証明機関を選択して、証明書を右クリックし、すべてのタスク > インポート...を選択します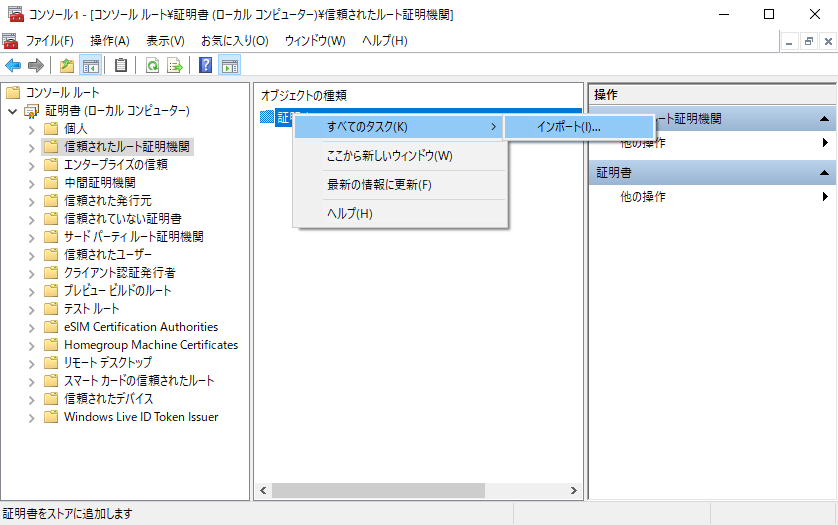
証明書のインポート ウィザードウィンドウが表示されるので次へをクリックします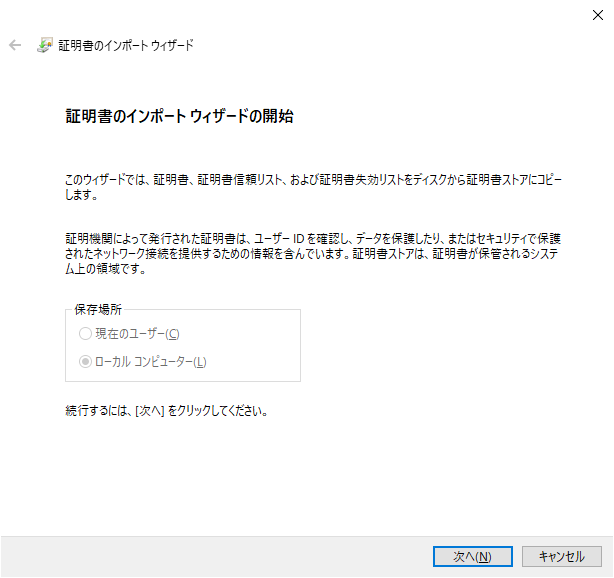
手順 2:証明書ファイルを作成する で作成した
rootSSL.pemファイルを指定して、次へをクリックします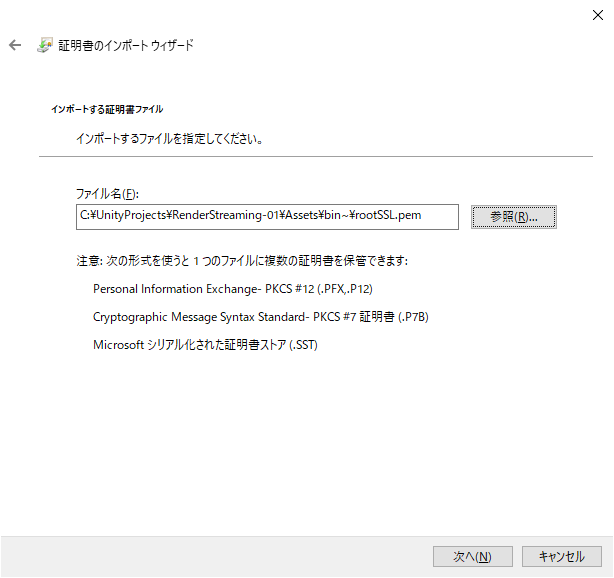
証明書をすべて次のストアに配置するを選択して、信頼されたルート証明期間が証明書ストア:フィールドの値に設定されていることを確認して、次へをクリックします。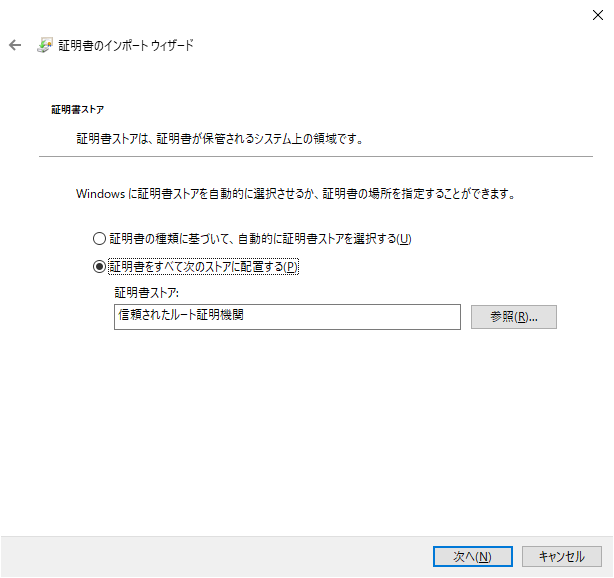
完了をクリックします。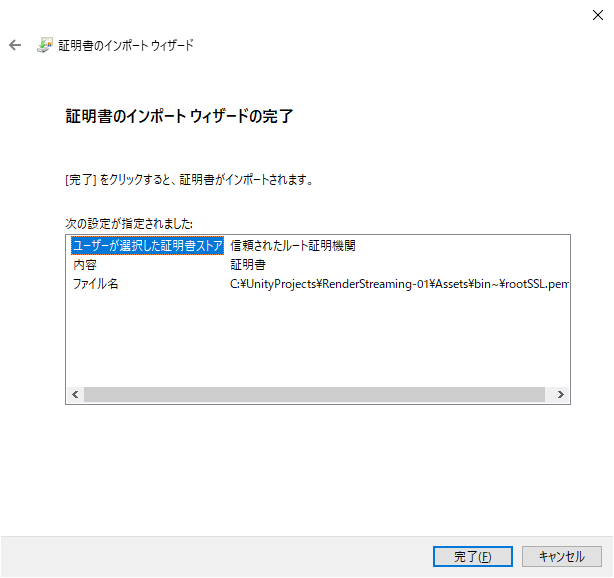
手順 4:ローカルドメインサイトを作成する
127.0.0.1 client-1.localをC:\Windows\System32\drivers\etc\hostsファイルに追加します。
# Copyright (c) 1993-2009 Microsoft Corp.
#
# This is a sample HOSTS file used by Microsoft TCP/IP for Windows.
#
# This file contains the mappings of IP addresses to host names. Each
# entry should be kept on an individual line. The IP address should
# be placed in the first column followed by the corresponding host name.
# The IP address and the host name should be separated by at least one
# space.
#
# Additionally, comments (such as these) may be inserted on individual
# lines or following the machine name denoted by a '#' symbol.
#
# For example:
#
#      102.54.94.97     rhino.acme.com          # source server
#       38.25.63.10     x.acme.com              # x client host

# localhost name resolution is handled within DNS itself.
#   127.0.0.1       localhost
#   ::1             localhost

127.0.0.1 client-1.local
# End of section
手順 5:秘密鍵(client-1.local.key)と、新しく作ったドメイン用の認証リクエスト(client-1.local.csr)を作成する
次のコマンドを実行します。なお、下記のフィールドの値は 手順 1:秘密鍵を作成する で使った値と同じであるとします。
- C=CA (国)
- ST=Quebec (州)
- L=montreal (地域)
- O=Unity (組織)
- OU=Verticals (ビジネスユニット)
- CN=Tony (ユーザー名)
- emailAddress=anthonyma@unity3d.com (メールアドレス)
"C:\Program Files\OpenSSL\bin\openssl.exe" req -new -sha256 -nodes -out client-1.local.csr -newkey rsa:2048 -keyout client-1.local.key -subj "/C=CA/ST=Quebec/L=montreal/O=Unity/OU=Verticals/CN=Tony/emailAddress=anthonyma@unity3d.com"
手順 6:新しい証明書(client-1.local.crt)を発行する
次のコマンドを実行します:
"C:\Program Files\OpenSSL\bin\openssl.exe" x509 -req -in client-1.local.csr -CA rootSSL.pem -CAkey rootSSL.key -CAcreateserial -out client-1.local.crt -days 500 -sha256 -extensions "authorityKeyIdentifier=keyid,issuer\n basicConstraints=CA:FALSE\n keyUsage = digitalSignature, nonRepudiation, keyEncipherment, dataEncipherment\n subjectAltName=DNS:client-1.local"
パスワードを入力します:
Enter pass phrase for rootSSL.key:
手順 7:webserver.exe を実行する
次のコマンドを実行します:
.\webserver.exe -s -p 443 -k client-1.local.key -c client-1.local.crt