Custom Pass
HDRP Custom Passes allow you to inject shader and C# at certain points inside the render loop, giving you the ability to draw objects, do fullscreen passes and read some camera buffers like depth, color or normal.
Here is an example of what can be achieved using custom passes:

Workflow with volumes
Custom Passes have been implemented through a volume system, but note that it's different from the builtin Volumes system in HDRP due to different design reason and usage. Therefore you can note these major differences:
- Custom Pass Volumes are can't be blend like standard volumes, you can only have a fade
- In case of overlap of multiple volumes with the same injection point, the smallest (in term of bounding volume) will be executed, all the others are ignored
- The data of the custom passes are saved in the volume GameObject in itself, not in an asset in the project
Like in volumes, there is two modes for the custom pass volume: Local and Global. The Local mode uses colliders attached to the GameObject where the custom pass is to define a zone where the effect will be executed. Global volumes are executed everywhere in your scene.
The priority is used to determine the execution order when you have multiple custom pass volumes in your scene that share the same injection point.
A fade system is also available to allow you to smooth the transition between your normal rendering and the custom pass. The control over the distance of the fade is done by the Fade Radius field in the UI of the Custom Pass Volume Component, the radius is exposed in meter and is not scaled with the object transform.
Because we give the full control over what can be done in the custom passes, the fading must be manually included in your effects. To help you, there is a builtin variable _FadeValue in the shader and CustomPass.fadeValue in the C# that contains a value between 0 and 1 representing how far the camera is from the collider bounding volume. If you want more details about the fading in script, you can jump to the scripting API tag.
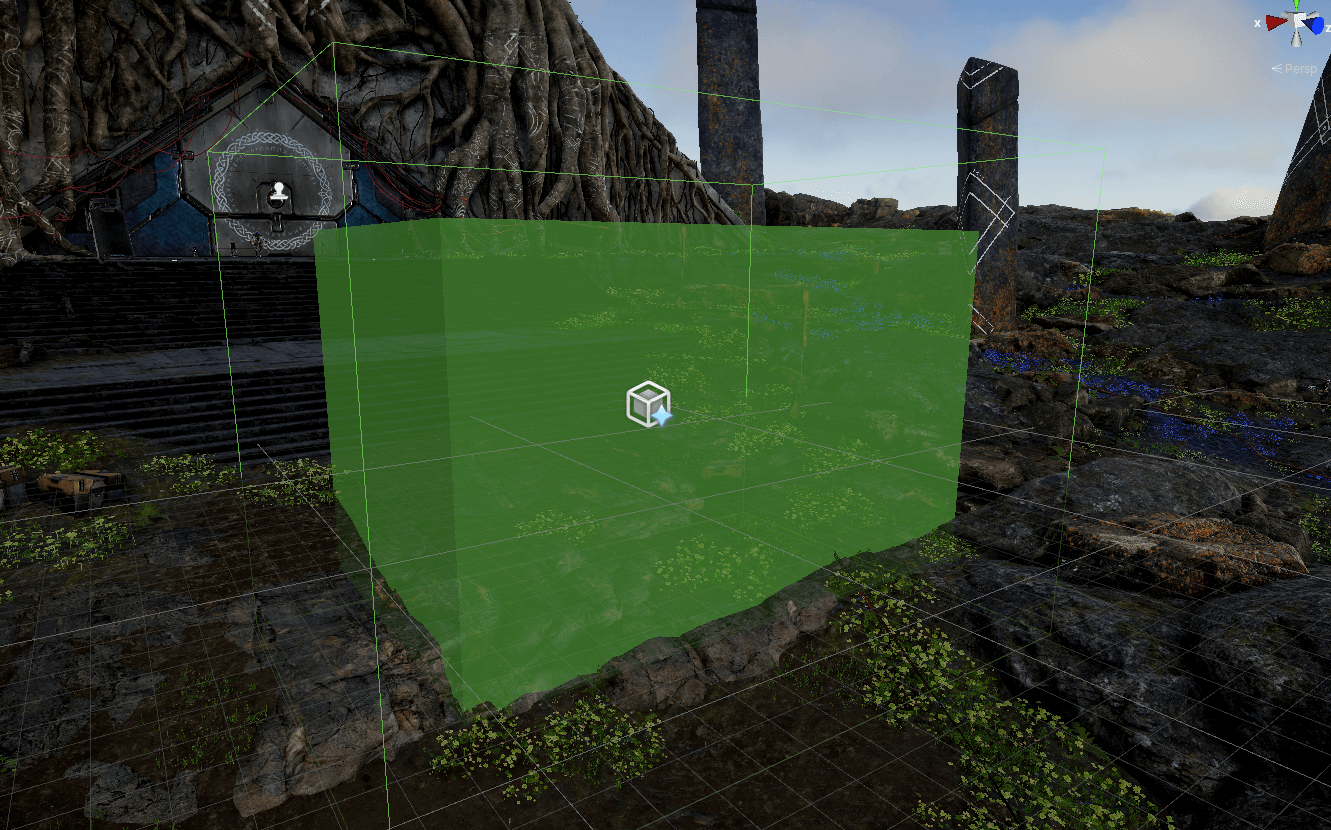
Here you can see an example of a custom pass with a box collider (solid transparent box) and the fade radius is represented by the wireframe cube.
NOTE: You can stack multiple custom pass volumes but only one per injection point can be executed, the one that will be executed is the smallest currently overlapping collider extent (without the fade radius). It means that global volumes are lower priority than local ones.
Injection Points
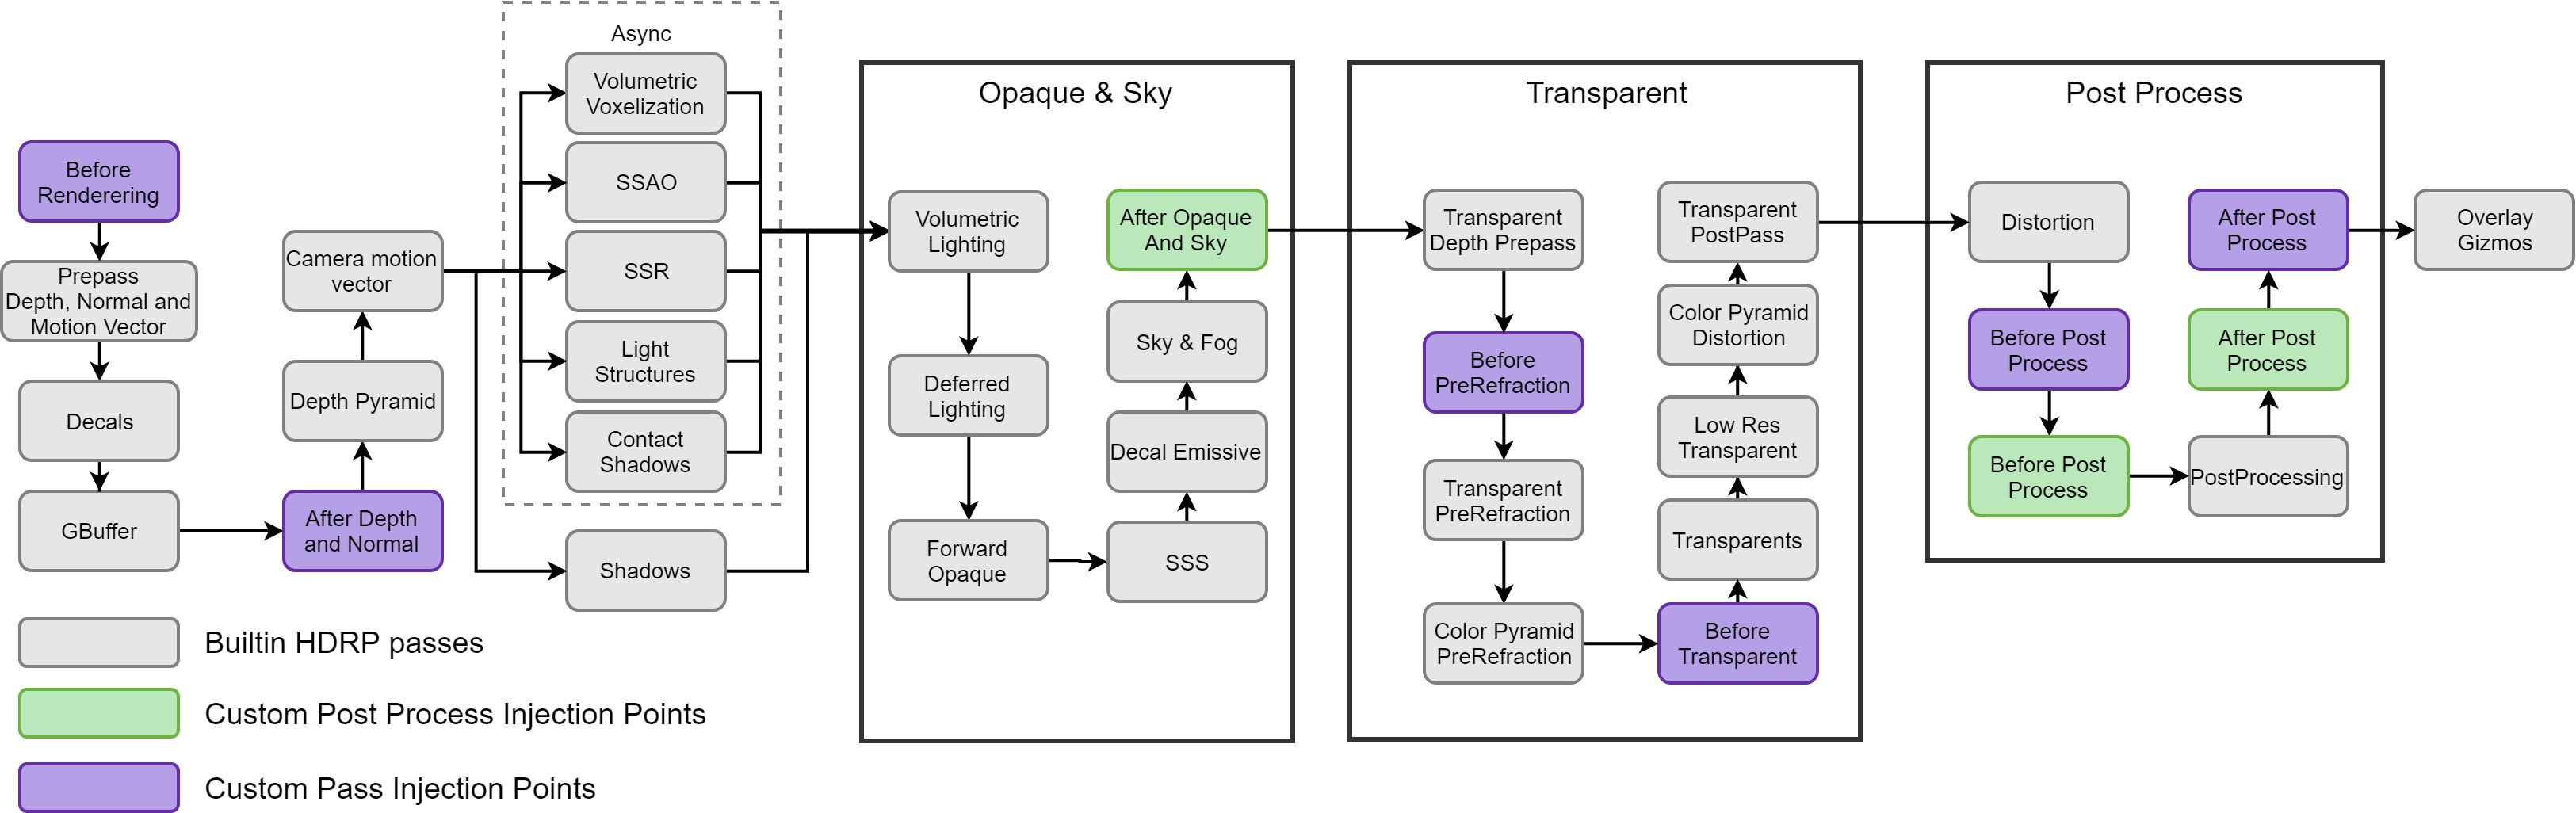
Custom passes can be injected at 6 different places. Note that these injection points don't tell you exactly where you pass will be executed, the only guarantee we give is that a certain list of buffers will be available for Read or Write and will contain a certain subset of objects rendered before your pass. Unlike Universal Render Pipeline, we don't give you the guarantee that your passes will be executed before or after any HDRP internal operation (also due to our async rendering). However we guarantee that the injection points will be triggered from top to bottom in this order in a frame:
| Name | Available Buffers | Description |
|---|---|---|
| BeforeRendering | Depth (Write) | Just after the depth clear, you can write to the depth buffer so Z-Tested opaque objects won't be rendered. It's useful to mask a part of the rendering. Here you can also clear the buffer you allocated or the Custom Buffer |
| AfterOpaqueDepthAndNormal | Depth (Read | Write), Normal + roughness (Read | Write) | Buffers will contain all opaque objects. Here you can modify the normal, roughness and depth buffer, it will be taken in account in the lighting and the depth pyramid. Note that normals and roughness are in the same buffer, you can use DecodeFromNormalBuffer and EncodeIntoNormalBuffer functions to read/write normal and roughness data. |
| BeforePreRefraction | Color (no pyramid | Read | Write), Depth (Read | Write), Normal + roughness (Read) | Buffers will contain all opaque objects plus the sky. Use this point to render any transparent objects that you want to be in the refraction (they, will end up in the color pyramid we use for refraction when drawing transparent objects). |
| BeforeTransparent | Color (Pyramid | Read | Write), Depth (Read | Write), Normal + roughness (Read) | Here you can sample the color pyramid we use for transparent refraction. It's useful to do some blur effects but note that all objects rendered at this point won't be in the color pyramid. You can also draw some transparent objects here that needs to refract the scene (like water for example). |
| BeforePostProcess | Color (Pyramid | Read | Write), Depth (Read | Write), Normal + roughness (Read) | Buffers contains all objects in the frame in HDR. |
| AfterPostProcess | Color(Read | Write), Depth (Read) | Buffers are in after post process mode, it means that the depth is jittered (So you can't draw depth tested objects without having artifacts). |
You can see here on this diagram where the custom passes are injected inside an HDRP frame.
Custom Pass List
The main part of the Custom Pass Volume component is the Custom Passes reorderable list, it allow you to add new custom pass effects and configure then. There are two custom passes that are builtin to HDRP, the FullScreen and the DrawRenderers custom pass.
In this screenshot, you can see a FullScreen render pass:

There are some settings that you will find by default on every custom pass, here are their significations:
| Name | Description |
|---|---|
| Name | name of the pass, it will be used as the name of the profiling marker for debugging |
| Target color buffer | The target buffer where the color will be written |
| Target depth buffer | The target buffer where the depth and stencil will be written and tested |
| Clear flags | When the render targets above are bound for rendering, how do you want them to be cleared |
Note: by default the target buffers are set to the camera buffers but you can also select the custom buffer. It is another buffer allocated by HDRP where you can put everything you want, you can then sample it in custom pass shaders. You can choose the format of the custom buffer in the HDRP asset settings under the Rendering section.

In the HDRP asset you can also disable the the custom passes, that will disable the custom buffer allocation as well. Additionally, in the frame settings you can choose whether or not to render custom passes, note that it will not affect the custom buffer allocation.
FullScreen Custom Pass
When you add a FullScreen pass, it will be rendered with the FullScreen Material provided in the field in the UI. To create a material compatible with the FullScreen pass, first you need to create a shader using the menu Create/Shader/HDRP/Custom FullScreen Pass and the right click above this shader and create a new Material.
Then when you add the material to the field FullScreen Material field in the inspector you'll see a dropdown called Pass Name that allow you to choose which pass of the shader will be used to draw the FullScreen quad, this is especially useful if you want to do multiple variants of one effect and switch between them.
Now that the custom pass is setup, you can start to edit the shader of the FullScreen Material. By default in the template you have a FullScreenPass function where you'll add your code:
float4 FullScreenPass(Varyings varyings) : SV_Target
{
    float depth = LoadCameraDepth(varyings.positionCS.xy);
    PositionInputs posInput = GetPositionInput(varyings.positionCS.xy, _ScreenSize.zw, depth, UNITY_MATRIX_I_VP, UNITY_MATRIX_V);
    float3 viewDirection = GetWorldSpaceNormalizeViewDir(posInput.positionWS);
    float4 color = float4(0.0, 0.0, 0.0, 0.0);

    // Load the camera color buffer at the mip 0 if we're not at the before rendering injection point
    if (_CustomPassInjectionPoint != CUSTOMPASSINJECTIONPOINT_BEFORE_RENDERING)
        color = float4(CustomPassLoadCameraColor(varyings.positionCS.xy, 0), 1);

    // Add your custom pass code here

    // Fade value allow you to increase the strength of the effect while the camera gets closer to the custom pass volume
    float f = 1 - abs(_FadeValue * 2 - 1);
    return float4(color.rgb + f, color.a);
}
In this snippet, we fetch a lot of useful input data that you might need in your effect like the depth, the view direction, position in world space, ect. By default we also uses the _FadeValue variable which will affect the effect if there is fade radius set on the custom pass volume.
| ⚠️ WARNING: There are some gotchas that you need to be aware of when writing FullScreen Shaders |
|---|
| You can't read and write to the same render target. i.e you can't sample the camera color, modify it and then write the result back to the camera color buffer, you have to do it in two passes with a secondary buffer. |
| The Depth buffer might not contains what you expect. The depth buffer never contains transparent that writes depth and it is always jittered when TAA is enabled (meaning that rendering after post process objects that needs depth will cause wobbling) |
Sampling the camera color with lods is only available in after and before post process passes. Calling CustomPassSampleCameraColor at before rendering will only return black. |
| DrawRenderers Pass chained with FullScreen Pass: In multi-pass setups where you draw objects in the camera color buffer and then read it from a fullscreen custom pass, you'll not see the objects you've drawn in the passes before your fullscreen pass (unless you are in Before Transparent). |
MSAA: When dealing with MSAA, you must check that the Fetch color buffer boolean is correctly setup because it will determine whether or not you'll be able to fetch the color buffer in this pass or not. |
| Before Pre-Refraction and After post-process: On these injection points, the camera color buffer set as the target for the fullscreen pass is the same as the one you can access inside the shader. Because the camera color buffer is the target, and because of read/write restrictions on certain platforms, you cannot directly sample from the camera color buffer inside the shader. Instead, you need to split your effect into two passes and use the custom color buffer as an intermediate buffer. This avoids reading and writing simultaneously to the same buffer. |
DrawRenderers Custom Pass
This pass will allow you to draw any objects in a certain layer, note that the layer don't require to be visible by the camera to be rendered in this pass. Here is how the inspector for the DrawRenderers pass looks like:

Filters allow you to select which objects will be rendered, you have the queue which all you to select which kind of materials will be rendered (transparent, opaque, etc.) and the layer which is the GameObject layer.
By default, the objects are displayed with their material, you can override the material of everything in this custom pass by assigning a material in the Material slot. There are a bunch of choices here, both unlit ShaderGraph and unlit HDRP shader works and additionally there is a custom unlit shader that you can create using Create/Shader/HDRP/Custom Renderers Pass.
⚠️ Note that not all kind of materials are supported by every injection point. Here is the compatibility table:
| Injection Point | Material Type |
|---|---|
| Before Rendering | Unlit forward but without writing to the camera color |
| After Opaque Depth And Normal | Unlit forward |
| Before PreRefraction | Unlit + Lit forward only |
| Before Transparent | Unlit + Lit forward only with refraction |
| Before Post Process | Unlit + Lit forward only with refraction |
| After Post Process | Unlit + Lit forward only with refraction |
If you try to render material in an unsupported configuration, it will result in an undefined behavior. For example rendering lit objects during After Opaque Depth And Normal will produce unexpected results.
The pass name is also used to select which pass of the shader we will render, on a ShaderGraph or an HDRP unlit material it is useful because the default pass is the SceneSelectionPass and the pass used to render the object is ForwardOnly. You might also want to use the DepthForwardOnly pass if you want to only render the depth of the object.
To create advanced effects, you can use the Custom Renderers Pass shader that will create an unlit one pass HDRP shader and inside the GetSurfaceAndBuiltinData function you will be able to put your fragment shader code:
// Put the code to render the objects in your custom pass in this function
void GetSurfaceAndBuiltinData(FragInputs fragInputs, float3 viewDirection, inout PositionInputs posInput, out SurfaceData surfaceData, out BuiltinData builtinData)
{
    float2 colorMapUv = TRANSFORM_TEX(fragInputs.texCoord0.xy, _ColorMap);
    float4 result = SAMPLE_TEXTURE2D(_ColorMap, s_trilinear_clamp_sampler, colorMapUv) * _Color;
    float opacity = result.a;
    float3 color = result.rgb;

#ifdef _ALPHATEST_ON
    DoAlphaTest(opacity, _AlphaCutoff);
#endif

    // Write back the data to the output structures
    ZERO_INITIALIZE(BuiltinData, builtinData); // No call to InitBuiltinData as we don't have any lighting
    builtinData.opacity = opacity;
    builtinData.emissiveColor = float3(0, 0, 0);
    surfaceData.color = color;
}
If you need to modify the vertex shader, you can uncomment the ApplyVertexModification() code block just above the `` function:
#define HAVE_MESH_MODIFICATION
AttributesMesh ApplyMeshModification(AttributesMesh input, float3 timeParameters)
{
    input.positionOS += input.normalOS * 0.0001; // inflate a bit the mesh to avoid z-fight
    return input;
}
For reference, here is the definition of the AttributesMesh struct:
struct AttributesMesh
{
    float3 positionOS   : POSITION;
    float3 normalOS     : NORMAL;
    float4 tangentOS    : TANGENT; // Store sign in w
    float2 uv0          : TEXCOORD0;
    float2 uv1          : TEXCOORD1;
    float2 uv2          : TEXCOORD2;
    float2 uv3          : TEXCOORD3;
    float4 color        : COLOR;
};
Note that all the transformation in this function are made in object space
A very important thing to be aware of is the ATTRIBUTES_NEED and VARYINGS_NEED system, there are a list of defines that controls which data is going to be sent to the vertex and fragment shader. ATTRIBUTES_NEED are for the vertex data and VARYINGS_NEED are for the fragment, so for example if you want to sample uvs in the fragment shader, you need to define both ATTRIBUTES_NEED_TEXCOORD0 and VARYINGS_NEED_TEXCOORD0. Note that by default you have access to UV 0 and normals.
Here is the list of all the defines you can enable
#define ATTRIBUTES_NEED_NORMAL
#define ATTRIBUTES_NEED_TANGENT
#define ATTRIBUTES_NEED_TEXCOORD0
#define ATTRIBUTES_NEED_TEXCOORD1
#define ATTRIBUTES_NEED_TEXCOORD2
#define ATTRIBUTES_NEED_TEXCOORD3
#define ATTRIBUTES_NEED_COLOR

#define VARYINGS_NEED_POSITION_WS
#define VARYINGS_NEED_TANGENT_TO_WORLD
#define VARYINGS_NEED_TEXCOORD0
#define VARYINGS_NEED_TEXCOORD1
#define VARYINGS_NEED_TEXCOORD2
#define VARYINGS_NEED_TEXCOORD3
#define VARYINGS_NEED_COLOR
#define VARYINGS_NEED_CULLFACE
Note that you can also override the depth state of the objects in your pass. This is especially useful when you're rendering objects that are not in the camera culling mask (they are only rendered in the custom pass). Because in these objects, opaque ones will be rendered in Depth Equal test which only works if they already are in the depth buffer. In this case you may want to override the depth test to Less Equal.
⚠️ Be careful when rendering Opaque objects if you're in deferred: All objects rendered within custom passes are rendered in Forward. It means that you'll need to set your HDRP settings Lit Shader Mode to 'Both' in case you encounter issues when building in release.
Scripting API
To do even more complex effect, that may require more than one buffer or even Compute Shaders, you have a Scripting API available to extend the CustomPass class.
Every non abstract class that inherit from CustomPass will be listed when you click on the + button of the custom passes list.

C# Template
To Create a new C# Custom pass go to Create/Rendering/C# Custom Pass, it will generate a C# file containing a class like this one:
class #SCRIPTNAME# : CustomPass
{
    protected override void Setup(ScriptableRenderContext renderContext, CommandBuffer cmd) {}

    protected override void Execute(CustomPassContext ctx) {}

    protected override void Cleanup() {}
}
To code your custom pass, you have three entry point:
Setupto allocate all the resources you'll need to render your pass (RTHandle / render textures, Material, Compute Buffers, etc.).Cleanuplet you release every resources you have allocated in theSetupfunction. Be careful to not forget one resource or it will leak (especially RTHandle which can be pretty heavy in term of memory).Executeis where you'll write everything you need to be rendered during the pass.
In the Setup and Execute functions, we gives you access to the ScriptableRenderContext and a CommandBuffer, these two classes contains everything you need to render pretty much everything but here we will focus on these two functions ScriptableRenderContext.DrawRenderers and CommandBuffer.DrawProcedural.
Important: if the shader is never referenced in any of your scenes it won't get built and the effect will not work when running the game outside of the editor. Either add it to a Resources folder or put it in the Always Included Shaders list in
Edit -> Project Settings -> Graphics. Be careful with this especially if you load shaders usingShader.Find()otherwise, you'll end up with a black screen.Pro Tips:
- To allocate a render target buffer that works in every situation (VR, camera resize, ...), use the RTHandles system like so:
CSharp RTHandle myBuffer = RTHandles.Alloc(Vector2.one, TextureXR.slices, dimension: TextureXR.dimension, colorFormat: GraphicsFormat.R8G8B8A8_SRGB, useDynamicScale: true, name: "My Buffer");- Don't forget release the buffer afterwards using
myBuffer.Release();- To create materials, you can use the
CoreUtils.CreateEngineMaterialfunction and destroy it withCoreUtils.Destroy.- When scripting your pass, the destination render target will be set to what is defined in the UI. It means that you don't need to set the render target if you only use one.
- MSAA: when you enable MSAA and you want to render objects to the main camera color buffer and then in a second pass, sample this buffer, you'll need to resolve it first. To do so you have this function
CustomPass.ResolveMSAAColorBufferthat will resolve the MSAA camera color buffer into the standard camera color buffer.- If you don't want your effect to executed in the Scene View, then you can override the protected
executeInSceneViewboolean to false.
Now that you have allocated your resources you're ready to start doing stuff in the Execute function.
CustomPassUtils API functions
The CustomPassUtils class contains powerful utility functions to help you build your effects, to learn more, check out the Custom Pass API User Manual.
Calling a FullScreen Pass in C#
To do a FullScreen pass using a material, we uses CoreUtils.DrawFullScreen which under the hood call DrawProcedural on the Command Buffer. So when we do a FullScreen Pass the code looks like this:
SetCameraRenderTarget(cmd); // Bind the camera color buffer along with depth without clearing the buffers.
// Or set the a custom render target with CoreUtils.SetRenderTarget()
CoreUtils.DrawFullScreen(cmd, material, shaderPassId: 0);
Where cmd is the command buffer and shaderPassId is the equivalent of Pass Name in the UI but with indices instead. Note that in this example the SetCameraRenderTarget is optional because the render target bound when the Execute function is called is the one set in the UI with the Target Color Buffer and Target Depth Buffer fields.
Alternatively, you can also use HDUtils.DrawFullScreen function which takes in parameter the buffer you want to write to, like this:
HDUtils.DrawFullScreen(cmd, material, targetBuffer, shaderPassId: shaderPassId);
Calling DrawRenderers in C#
Calling the DrawRenderers function on the ScriptableRenderContext require a lot of boilerplate code and to simplify this, the CustomPassUtils class provides a function that takes less arguments:
CustomPassUtils.DrawRenderers(in CustomPassContext ctx, LayerMask layerMask, CustomPass.RenderQueueType renderQueueFilter = CustomPass.RenderQueueType.All, Material overrideMaterial = null, int overideMaterialIndex = 0)
But because it is simpler, it is also less flexible so you'll probably need more controls and in this case you can use this more complex syntax:
var result = new RendererListDesc(shaderTags, cullingResult, hdCamera.camera)
{
    rendererConfiguration = PerObjectData.None,
    renderQueueRange = RenderQueueRange.all,
    sortingCriteria = SortingCriteria.BackToFront,
    excludeObjectMotionVectors = false,
    layerMask = layer,
};

HDUtils.DrawRendererList(renderContext, cmd, RendererList.Create(result));
One of the tricky thing here is the shaderTags, it is a filter for which object is going to be rendered (a bit like the layer filter) but it is based on the name of the pass in the shaders that are currently rendered. It means that if a material in the view have a shader that contains one of these tags in these passes names, then it will pass the test, otherwise it will not be rendered.
For the renderQueueRange, you can use the GetRenderQueueRange function in the CustomPass class that converts CustomPass.RenderQueueType (which is what you have in the ui to configure the render queue) into a RenderQueueRange that you can use in RendererListDesc.
⚠️ WARNING: Be careful with the override material pass index: when you call the DrawRenderers with an override material, then you need to select which pass you're going to render using the override material pass index. But in build, this index can be changed after that the shader stripper removed passes from shader (like every HDRP shaders) and that will shift the pass indices in the shader and so your index will become invalid. To prevent this issue, we recommend to store the name of the pass and then use
Material.FindPasswhen issuing the draw.⚠️ WARNING: Opaque objects may not be visible if they are rendered only during the custom pass, because we assume that they already are in the depth pre-pass, we set the
Depth TesttoDepth Equal. Because of this you may need to override theDepth TesttoLess Equalusing thedepthStateproperty of the RenderStateBlock.
Scripting the volume component
You can retrieve the CustomPassVolume in a script using GetComponent and access most of the things available from the UI like isGlobal, fadeRadius and injectionPoint.
You can also dynamically change the list of Custom Passes executed by modifying the customPasses list.
Scripting Custom Pass UI
To customize the UI of custom passes, we use a similar pattern to the MonoBehaviour Editor, but the attributes are different, for example here is a part of the FullScreen Custom Pass Drawer:
[CustomPassDrawerAttribute(typeof(FullScreenCustomPass))]
public class FullScreenCustomPassDrawer : CustomPassDrawer
{
    protected override void Initialize(SerializedProperty customPass)
    {
        // Initialize the local SerializedProperty you will use in your pass.
    }

    protected override void DoPassGUI(SerializedProperty customPass, Rect rect)
    {
        // Draw your custom GUI using `EditorGUI` calls. Note that the Layout functions don't work here
    }

    protected override float GetPassHeight(SerializedProperty customPass)
    {
        // Return the number of vertical height in pixel that you used in your DoPassGUI.
        // Can be dynamic.
        return (EditorGUIUtility.singleLineHeight + EditorGUIUtility.standardVerticalSpacing) * X;
    }
}
When you create a custom pass drawer, even if your DoPassGUI is empty, you'll have a default UI for all common settings to the pass (name, target buffers, clearflags). If you don't want it you can override the commonPassUIFlags property to remove some of them. For example here we only keep the name and the target buffer enum:
protected override PassUIFlag commonPassUIFlags => PassUIFlag.Name | PassUIFlag.TargetColorBuffer;
Troubleshooting
Scaling issues
They can appear when you have two cameras that are not using the same resolution (most common case in-game and scene views) and can be caused by:
- Calls to CommandBuffer.SetRenderTarget() instead of CoreUtils.SetRenderTarget(). Note that the CoreUtils one also sets the viewport.
- In the shader, a missing multiplication by
_RTHandleScale.xyfor the UVs when sampling an RTHandle buffer.
Shuriken Particle System
When you render a particle system that is only visible in the custom pass and your particles are facing the wrong direction it's probably because you didn't override the AggregateCullingParameters. The orientation of the particles in Shuriken is computed during the culling so if you don't have the correct setup it will not be rendered properly.
Decals
Decals applied on objects rendered with custom passes will only be applied to transparent objects rendered after the After Depth and Normal injection point. Decals will be ignored with Opaque objects.
Culling issues
Sometimes you want to render objects only in a custom pass and not in the camera. To achieve this, you disable the layer of your objects in the camera culling mask, but it also means that the cullingResult you receive in the Execute function won't contain this object (because by default this cullingResult is the camera cullingResult). To overcome this issue, you can override this function in the CustomPass class:
protected virtual void AggregateCullingParameters(ref ScriptableCullingParameters cullingParameters, HDCamera camera) {}
it will allow you to add more layers / custom culling options to the cullingResult you receive in the Execute function.
How to debug ?
When writing your effect, you'll probably arrive at a point where you want to debug and analyze what's going on.
The frame debugger is here to help you, enabling it in the game view allow you to examine every draw calls you issued in the custom pass. To find your pass, you just need to search for the name of custom pass you set in the UI.
For example, in this image I'm debugging the outline pass which I called "My Outline Pass" in the inspector:

You can now clearly see the steps executed by the custom pass:
Clearon the 'Outline Buffer'RenderLoopNewBatcher.Drawis a call to DrawRenderers, it will draw meshes we selected using the SRP Batcher.Draw Proceduralis our fullscreen pass which takes the outline buffer in parameter and blits the outline to our camera color buffer.
Example: Glitch Effect (without code)
To apply a glitch effect on top of objects, we can use ShaderGraph with custom passes:
First, we create an Unlit HDRP ShaderGraph and add some nodes to sample the scene color with a random x offset, to create the distortion like effect. We also have an external parameter to control the strength of the effect called offset.
Do not forget to put the ShaderGraph in transparent mode otherwise the HD Scene Color Node will return black

When we're done with this shader, we can create a Material from it by selecting the shader in the project view, right click and Create/Material.
Then, we can create a new GameObject and add a Custom pass volume component. Select Before Post Process injection point and add a new DrawRenderers custom pass configured like this:

Note that we use the ForwardOnly pass of our ShaderGraph because we want to render the object color.
The Selection Layer here will be used to render the objects with a glitch.
Then you just have to put GameObjects in the Selection layer and voila !

Scripting Example: Outline Pass
First, we create a Custom Pass C# Script called Outline:
using UnityEngine;
using UnityEngine.Rendering.HighDefinition;
using UnityEngine.Rendering;
using UnityEngine.Experimental.Rendering;

class Outline : CustomPass
{
    public LayerMask    outlineLayer = 0;
    [ColorUsage(false, true)]
    public Color        outlineColor = Color.black;
    public float        threshold = 1;

    // To make sure the shader will ends up in the build, we keep it's reference in the custom pass
    [SerializeField, HideInInspector]
    Shader                  outlineShader;

    Material                fullscreenOutline;
    RTHandle                outlineBuffer;

    protected override void Setup(ScriptableRenderContext renderContext, CommandBuffer cmd)
    {
        outlineShader = Shader.Find("Hidden/Outline");
        fullscreenOutline = CoreUtils.CreateEngineMaterial(outlineShader);

        outlineBuffer = RTHandles.Alloc(
            Vector2.one, TextureXR.slices, dimension: TextureXR.dimension,
            colorFormat: GraphicsFormat.B10G11R11_UFloatPack32, // We don't need alpha for this effect
            useDynamicScale: true, name: "Outline Buffer"
        );
    }

    protected override void Execute(CustomPassContext ctx)
    {
        // Render meshes we want to outline in the outline buffer
        CoreUtils.SetRenderTarget(ctx.cmd, outlineBuffer, ClearFlag.Color);
        CustomPassUtils.DrawRenderers(ctx, outlineLayer);

        // Setup outline effect properties
        ctx.propertyBlock.SetColor("_OutlineColor", outlineColor);
        ctx.propertyBlock.SetTexture("_OutlineBuffer", outlineBuffer);
        ctx.propertyBlock.SetFloat("_Threshold", threshold);

        // Render the outline as a fullscreen alpha-blended pass on top of the camera color
        CoreUtils.SetRenderTarget(ctx.cmd, ctx.cameraColorBuffer, ClearFlag.None);
        CoreUtils.DrawFullScreen(ctx.cmd, fullscreenOutline, ctx.propertyBlock, shaderPassId: 0);
    }

    protected override void Cleanup()
    {
        CoreUtils.Destroy(fullscreenOutline);
        outlineBuffer.Release();
    }
}
In the setup function, we allocate a buffer to render the objects that are in the outlineLayer layer.
The Execute function is pretty straightforward, we render the objects and then do a fullscreen pass which will perform the outline. When we draw the objects, we don't use an override material here because we want the effect to be working with alpha clip and transparency.
For the shader, it's the classic way of doing an outline: sample the color in the outline buffer, if it's below the threshold, then it means that we're maybe in an outline. To check if it's the case, we perform a neighbour search and if we find a pixel above the threshold, then we outline it.
To be more efficient, we use a transparent fullscreen pass with a blend mode that will replace pixels that needs to be outlined.
Shader "Hidden/Outline"
{
    HLSLINCLUDE

    #pragma vertex Vert

    #pragma target 4.5
    #pragma only_renderers d3d11 playstation xboxone vulkan metal switch

    #include "Packages/com.unity.render-pipelines.high-definition/Runtime/RenderPipeline/RenderPass/CustomPass/CustomPassCommon.hlsl"

    TEXTURE2D_X(_OutlineBuffer);
    float4 _OutlineColor;
    float _Threshold;

    #define v2 1.41421
    #define c45 0.707107
    #define c225 0.9238795
    #define s225 0.3826834

    #define MAXSAMPLES 8
    // Neighbour pixel positions
    static float2 samplingPositions[MAXSAMPLES] =
    {
        float2( 1,  1),
        float2( 0,  1),
        float2(-1,  1),
        float2(-1,  0),
        float2(-1, -1),
        float2( 0, -1),
        float2( 1, -1),
        float2( 1, 0),
    };

    float4 FullScreenPass(Varyings varyings) : SV_Target
    {
        UNITY_SETUP_STEREO_EYE_INDEX_POST_VERTEX(varyings);

        float depth = LoadCameraDepth(varyings.positionCS.xy);
        PositionInputs posInput = GetPositionInput(varyings.positionCS.xy, _ScreenSize.zw, depth, UNITY_MATRIX_I_VP, UNITY_MATRIX_V);
        float4 color = float4(0.0, 0.0, 0.0, 0.0);
        float luminanceThreshold = max(0.000001, _Threshold * 0.01);

        // Load the camera color buffer at the mip 0 if we're not at the before rendering injection point
        if (_CustomPassInjectionPoint != CUSTOMPASSINJECTIONPOINT_BEFORE_RENDERING)
            color = float4(CustomPassSampleCameraColor(posInput.positionNDC.xy, 0), 1);

        // When sampling RTHandle texture, always use _RTHandleScale.xy to scale your UVs first.
        float2 uv = posInput.positionNDC.xy * _RTHandleScale.xy;
        float4 outline = SAMPLE_TEXTURE2D_X_LOD(_OutlineBuffer, s_linear_clamp_sampler, uv, 0);
        outline.a = 0;

        if (Luminance(outline.rgb) < luminanceThreshold)
        {
            for (int i = 0; i < MAXSAMPLES; i++)
            {
                float2 uvN = uv + _ScreenSize.zw * _RTHandleScale.xy * samplingPositions[i];
                float4 neighbour = SAMPLE_TEXTURE2D_X_LOD(_OutlineBuffer, s_linear_clamp_sampler, uvN, 0);

                if (Luminance(neighbour) > luminanceThreshold)
                {
                    outline.rgb = _OutlineColor.rgb;
                    outline.a = 1;
                    break;
                }
            }
        }

        return outline;
    }

    ENDHLSL

    SubShader
    {
        Pass
        {
            Name "Custom Pass 0"

            ZWrite Off
            ZTest Always
            Blend SrcAlpha OneMinusSrcAlpha
            Cull Off

            HLSLPROGRAM
                #pragma fragment FullScreenPass
            ENDHLSL
        }
    }
    Fallback Off
}