Install the ML-Agents Toolkit
Set up your system to use the ML-Agents Toolkit to train and run machine-learning agents in Unity projects.
This process includes installing Unity, configuring Python, and installing the ML-Agents packages. Follow the steps in order to ensure compatibility between Unity and the ML-Agents components.
Install Unity
Install Unity 6000.0 or later to use the ML-Agents Toolkit.
To install Unity, follow these steps:
- Download Unity.
- Use Unity Hub to manage installations and versions. Unity Hub makes it easier to manage multiple Unity versions and associated projects.
- Verify that the Unity Editor version is 6000.0 or later.
Install Python 3.10.12 using Conda
Use Conda or Mamba to install and manage your Python environment. This ensures that ML-Agents dependencies are isolated and version-controlled.
To install Python, follow these steps:
conda create -n mlagents python=3.10.12 && conda activate mlagents
- On Windows, install PyTorch separately to ensure CUDA support:
pip3 install torch~=2.2.1 --index-url https://download.pytorch.org/whl/cu121
If prompted, install Microsoft Visual C++ Redistributable. For more installation options and versions, refer to the PyTorch installation guide.
Install ML-Agents
You can install ML-Agents in two ways:
- Package installation: Recommended for most users who want to use ML-Agents without modifying the source code or using the example environments.
- Advanced installation: For contributors, developers extending ML-Agents, or users who want access to the example environments.
Install ML-Agents (Package installation)
Use this method if you don’t plan to modify the toolkit or need the example environments.
Install the ML-Agents Unity package
To install the package, follow these steps:
- In Unity, open Window > Package Manager.
- Select + > Add package by name.
- Enter
com.unity.ml-agents. - Enable Preview Packages under the Advanced drop-down list if the package doesn’t appear.
If the package isn’t listed, follow the Advanced Installation method instead.
Install the ML-Agents Python package
Install the ML-Agents Python package to enable communication between Unity and your machine learning training environment.
Using a Python virtual environment helps isolate project dependencies and prevent version conflicts across your system. Virtual environments are supported on macOS, Windows, and Linux. For more information, refer to Using Virtual Environments.
Before installing ML-Agents, activate the Conda environment you created.
Install the ML-Agents Python package from the Python Package Index (PyPI):
python -m pip install mlagents==1.1.0
Make sure to install a Python package version that matches your Unity ML-Agents package version. For information on compatible versions, refer to the ML-Agents release history.
- If you encounter an error while building the
grpciowheel, install it separately before reinstallingmlagents:
conda install "grpcio=1.48.2" -c conda-forge
This step resolves dependency conflicts that can occur with older versions of grpcio.
- When the installation completes successfully, all the required Python dependencies listed in the setup.py file, including PyTorch are automatically configured.
Install ML-Agents (Advanced Installation)
Use the advanced installation method if you plan to modify or extend the ML-Agents Toolkit, or if you want to download and use the example environments included in the repository.
Clone the ML-Agents repository
Clone the ML-Agents repository to access the source code, sample environments, and development branches.
To clone the latest stable release, run:
git clone --branch release_23 https://github.com/Unity-Technologies/ml-agents.git
The --branch release_23 flag checks out the latest stable release.
If you omit this option, the develop branch is cloned instead, which may contain experimental or unstable changes.
If the release branch does not work as expected, switch to the develop branch. It may include fixes for dependency or compatibility issues.
To clone the bleeding-edge development version (optional), run:
git clone https://github.com/Unity-Technologies/ml-agents.git
If you plan to contribute your changes, clone the develop branch (omit the --branch flag) and refer to the Contribution Guidelines for details.
Add the ML-Agents Unity package
After cloning the repository, add the com.unity.ml-agents Unity package to your project.
To add the local package, follow these steps:
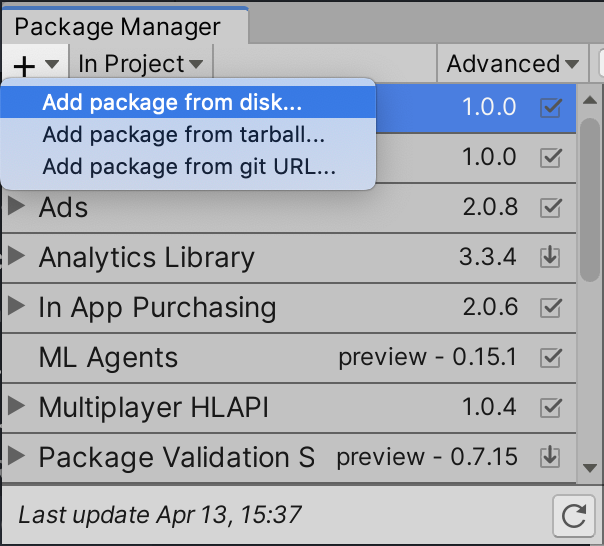
- In the Unity Editor, go to Window > Package Manager.
- In the Package Manager window, select +.
- Select Add package from disk.
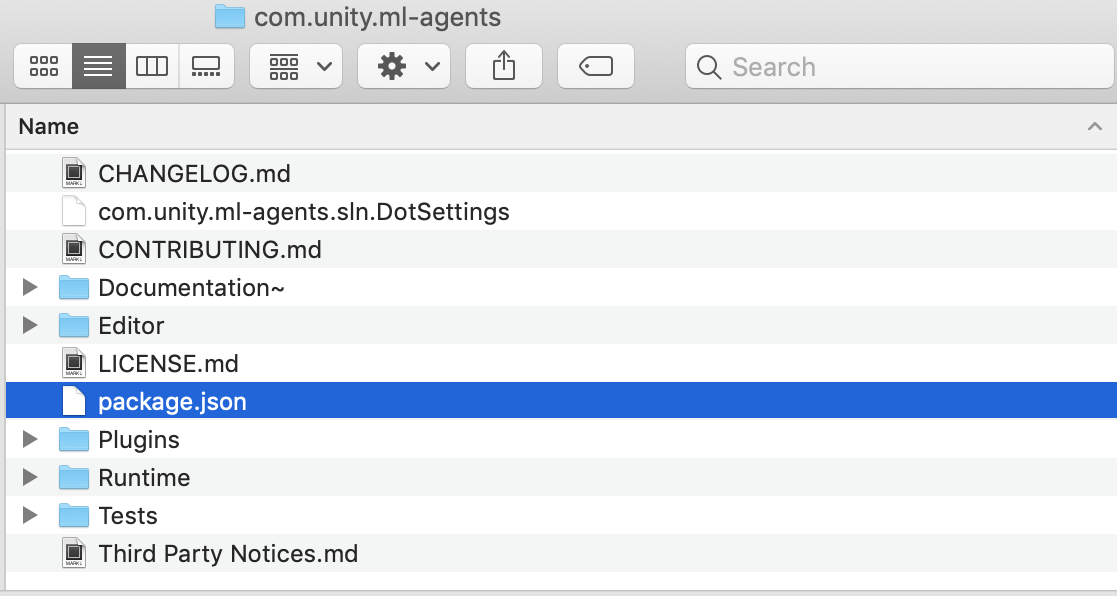
- Navigate to the cloned repository and open the
com.unity.ml-agentsfolder. - Select the
package.jsonfile.
Unity adds the ML-Agents package to your project.
Note
If you plan to use the example environments provided in the repository, open the Project folder in Unity to explore and experiment with them. Refer to Configure example environments for full set up instructions.
Install the ML-Agents Python package
Install the Python packages from the cloned repository to enable training and environment communication.
- From the root of the cloned repository, activate your virtual environment and run:
cd /path/to/ml-agents
python -m pip install ./ml-agents-envs
python -m pip install ./ml-agents
This installs the ML-Agents packages directly from the cloned source, not from PyPi.
- To confirm a successful installation, run:
mlagents-learn --help
If the command lists available parameters, your setup is complete.
- If you plan to modify the ML-Agents source code or contribute changes, install the packages in editable mode. Editable installs let you make live changes to the Python files and test them immediately.
From the repository’s root directory, run:
pip3 install torch -f https://download.pytorch.org/whl/torch_stable.html
pip3 install -e ./ml-agents-envs
pip3 install -e ./ml-agents
Note
Install the packages in this order because the mlagents package depends on mlagents_envs.
Installing them in the order will download mlagents_envs from PyPi, which can cause version mismatches.