Installation
PackageManager
まず、**MeshSync DCC Plugins ** パッケージを取得する。
- パッケージマネージャーを開く。
- + ボタンをクリックし、Add package from git URL を選択する。
com.unity.meshsync.dcc-pluginsを記入する。
DCC ツールのセットアップ
Maya
- ファイルエクスプローラーで
Packages/MeshSync DCC Plugins/Editor/Plugins~フォルダーを開き、 該当の Maya 用の zip ファイルを解凍する。 プラグインをコピーする
- Windows:
MAYA_APP_DIRの環境変数が設定されている場合はそこにコピーする。
ない場合は%USERPROFILE%\Documents\maya( Explorer のアドレスバーへコピペで直行) に modules ディレクトリをそのままコピーする。 - Mac:
/Users/Shared/Autodesk/modules/mayaに UnityMeshSync ディレクトリと UnityMeshSync.mod ファイルをコピーする。 - Linux:
~/maya/<maya_version>に modules ディレクトリをそのままコピーする。
- Windows:
Maya を起動し、Windows -> Settings/Preferences -> Plug-in Manager を開く。
- MeshSyncClient の Loaded にチェックを入れてプラグインを有効化する。
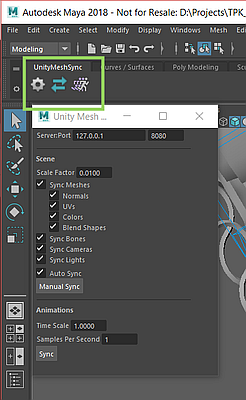
- シェルフ UI に UnityMeshSync が追加されているはずです。
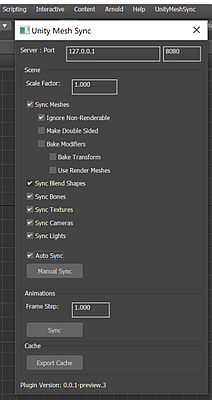
歯車アイコンで設定メニューを開き、MeshSync と色々遊んでみましょう。
3ds Max
- ファイルエクスプローラーで
Packages/MeshSync DCC Plugins/Editor/Plugins~フォルダーを開き、 該当の 3ds Max 用の zip ファイルを解凍する。 - 3ds Max を起動する。
- 下記のどちらかのフォルダーに、使用されている 3ds Max のバージョンに該当する MeshSyncClient3dsMax.dlu をコピーする。
- (推奨) 追加されたプラグイン用のパス。このメニューで追加できます:
- 3ds Max 2019 以前: Customize -> Configure System Paths をクリックし、3rd Party Plug-Ins タブを選択する。
- 3ds Max 2020: Customize -> Configure User and System Paths をクリックし、3rd Party Plug-Ins タブを選択する。
- 3ds Max のインストールパスの下にあるプラグイン用のパス。
例:C:\Program Files\Autodesk\3ds Max 2019\Plugins
- (推奨) 追加されたプラグイン用のパス。このメニューで追加できます:
- 3ds Max を再起動する。
- メインメニューバーに "UnityMeshSync" が追加されたのを確認する。
それの "Window" から設定ウィンドウを開けます。
- メニューバーを編集する場合、Action に "UnityMeshSync" カテゴリが追加 されているので、そちらから MeshSync の機能にアクセスできます。
MotionBuilder
- ファイルエクスプローラーで
Packages/MeshSync DCC Plugins/Editor/Plugins~フォルダーを開き、 該当の MotionBuilder 用の zip ファイルを解凍する。 - MotionBuilder を起動する。
- Settings -> Preferences -> SDK メニューをクリックし、プラグイン用のパスを追加する
- プラグイン用のパスに、使用されている MotionBuilder のバージョンに該当する MeshSyncClientMotionBuilder.dll をコピーする。
- MotionBuilder を再起動する。
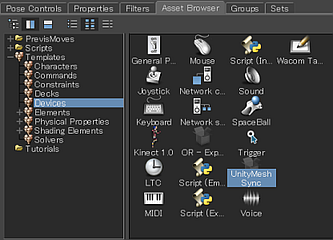
- Asset Browser 内の Templates -> Devices フォルダーに "UnityMeshSync" が追加されたのを確認する。
- "UnityMeshSync" をシーンに追加する。
- Navigator 内の Devices -> UnityMeshSync を選択することで、MeshSync の各種設定や機能にアクセスできます。
Blender
- ファイルエクスプローラーで
Packages/MeshSync DCC Plugins/Editor/Plugins~フォルダーを開き、 該当の Blender 用の zip ファイルを解凍する。 - Blender を起動する。
Blender のバージョンによって、インストールする方法が少々違います
- Blender 2.79:
- File -> User Preferences -> Add-ons を開く。
- 画面下部の "Install Add-on from file" を押し、blender-2.79.zip を指定する。
- "Import-Export: Unity Mesh Sync" が追加されたのを確認する。
Blender 2.80 以降:
- Edit -> User Preferences を開く。
- ウィンドウの右上の "Install" をクリックし、該当の blender-2.xx.zip を指定する。
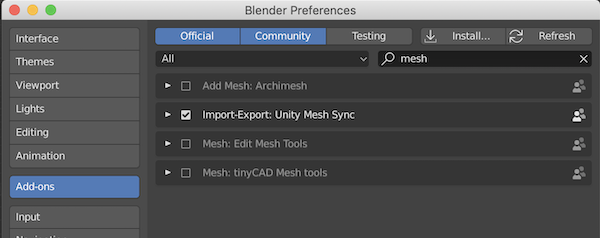
- "Import-Export: Unity Mesh Sync" が "Add-ons" タブに追加されたのを確認する。
- Blender 2.79:
"Import-Export: Unity Mesh Sync" をチェックし、有効化する。
- MeshSync パネルが追加されたのを確認する。
注意
Blender のプラグインをインストールする時、古いバージョンのプラグインがあれば、それを事前にアンインストールしておく必要があります。
アンインストールの手順:
- Add-ons メニューから "Import-Export: Unity Mesh Sync" を選択。
- "Remove" ボタンをクリック。
- Blender を再起動。
- Mac OSX の場合、下記のフォルダーにインストールされたプラグインのファイルを削除 :
~/Library/ApplicationSupport/Blender/2.xx/scripts/addons/MeshSyncClientBlender
Metasequoia
- ファイルエクスプローラーで
Packages/MeshSync DCC Plugins/Editor/Plugins~フォルダーを開き、 該当の Metasequoia 用の zip ファイルを解凍する。 - Metasequoia を起動する。
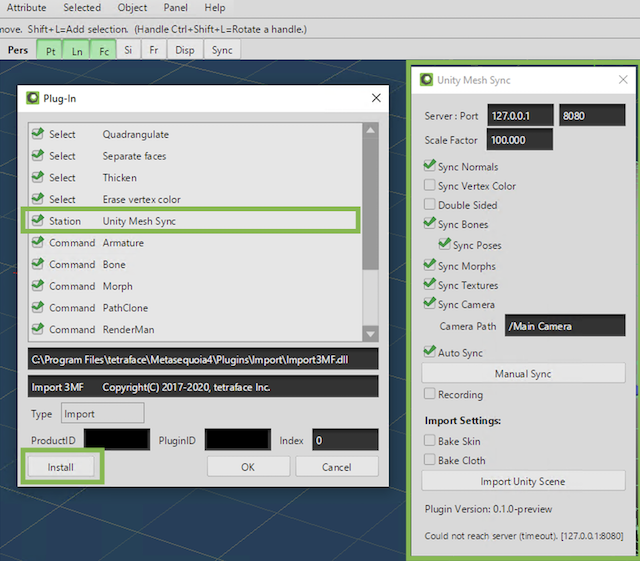
- Help -> About Plug-ins を開き、ウィンドウの左下の "Install" をクリックする。
- 解凍した zip ファイルの中から、該当するプラグインファイルを指定する。
例:MeshSyncClientMQ472.plugin - Panel -> Unity Mesh Sync を開く。
このメニューが見つからない場合、 Plug-in ウィンドウに "Unity Mesh Sync" がチェックされているかを確認する。
Modo
- Building Plugins
を参考に、Modo 用の MeshSync プラグインをビルドする。
Modo のライセンスにより、現在手動のビルドが必要です。 - Modo を起動する。
- System -> Add Plug-in をクリックし、Modo のバージョンと該当する MeshSyncClientModo.lx を選択する。
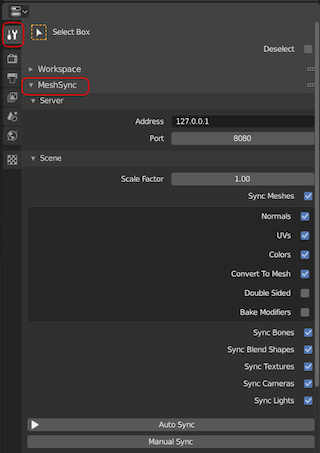
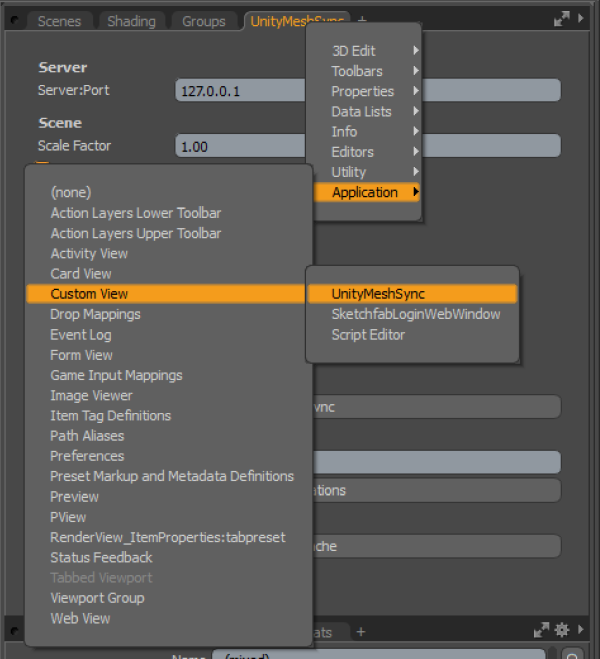
- Modo のタブ UI で、+ をクリックし、Application -> Custom View -> UnityMeshSync を選択する。
- UnityMeshSync のビューが追加されたのを確認する。
注意
古いバージョンのプラグインがあれば、事前にそれを削除する必要があります。
削除の手順:
- 開いた UnityMeshSync のビューをすべて閉じる。
- Modo を再起動する。
上記の手順をやったにもかかわらず、新しいバージョンのプラグインをインストールできない場合は、 Modo を終了してから、手動の削除を試して下さい。
- Windows の場合:
- テキストエディターで設定ファイルを開く。
例:C:\Users\<user_name>\AppData\Roaming\Luxology\MODO<modo_version>.CFG - 下記のような UnityMeshSync の項目を削除する:
<hash type="Server" key="12345678-abcd-1234-abcd-111122223333:UnityMeshSync"> <atom type="Module">C:\ModoPlugins\Modo14\MeshSyncClientModo.lx</atom> <atom type="Direct">1</atom> </hash> - 設定ファイルを保存し、Modo を起動する。
- テキストエディターで設定ファイルを開く。