Proxy forces
Proxy forces allow you to express a web of flexible spring-like forces that pull your proxy into its final position. These forces are often a combination of aligning relative to other objects and to surrounding surfaces. You can use them to model common placement scenarios like calculating how to create a space between objects, or how to pull an object towards and in front of the user.
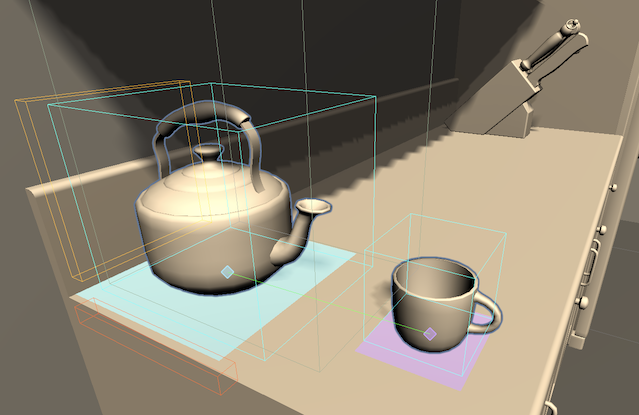
The screenshot above shows a kettle that has multiple forces applied. It occupies space, sits on a surface, should be near a vertical wall and horizontal edge, and there is padding (there shouldn't be anything) immediately above and in front of the snout. The mug occupies space, should be on a surface, and is aligned to the kettle.
The following section presents concepts and workflows around using Proxy forces in your application. It shows the steps to create, configure, and solve arrangements on basic forces, and also includes a real-world example you can use to get started. After reading this, you should have the necessary knowledge to incorporate Proxy forces into your Unity MARS application.
You can find some examples further down the page, as well as a video.
Force components
For more information about the available MARS components for proxy forces you can refer to the Forces reference guide
Examples
There are two examples below:
- A simple workflow for making an avatar look towards you from a surface
- A larger "Dinner for two" example walkthrough
Getting started: Making an avatar look towards you from a surface
Proxy forces are Unity MARS components that get added to Proxies. You can achieve different effects, depending on the combination of components you have. Proxy forces are useful for detailed alignments such as objects keeping spacing between each other and aligning relative to nearby edges, walls, and other objects. They are commonly used along with plane conditions to refine the placement within a plane.
This section shows you how to make a simple model attached to a proxy that looks at and follows the camera.
Setting up a Proxy (before adding forces)
Before using proxy forces, you need to set up a proxy where your avatar will reside. To do this, create a horizontal plane Proxy. You can do this from either the:
- MARS Panel (click the Horizontal Plane button).
- Hierarchy view (right-click and select MARS > Presets > Horizontal Plane from the contextual menu).
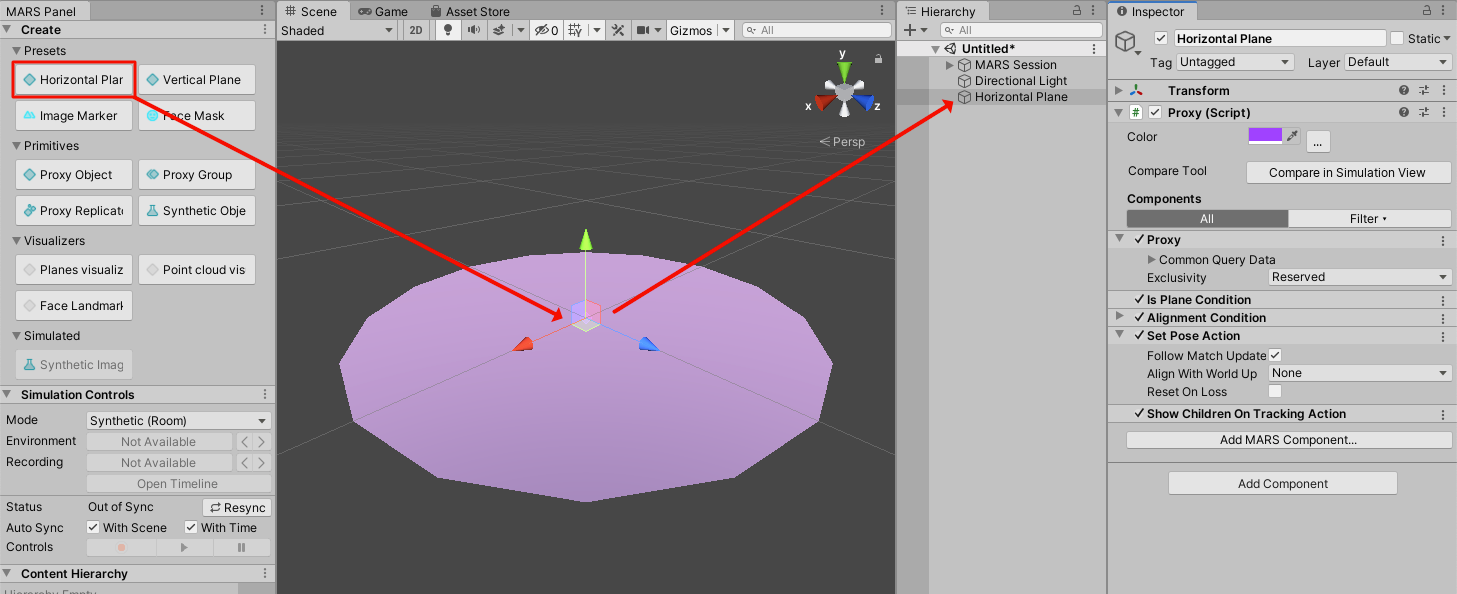
Next, add a model to the Horizontal Plane Proxy as a child of the Proxy. Because the Show Children on Tracking Action option is enabled, this model will only be visible when there is a match.
![]()
Adding forces to the Proxy
Now that you have set up your model, you can start adding forces to it. To have your model avatar face the camera, you need two forces:
- A force that moves the avatar to face towards the camera
- A force that constricts the avatar to the plane the Proxy is attached to
To do this, follow these steps:
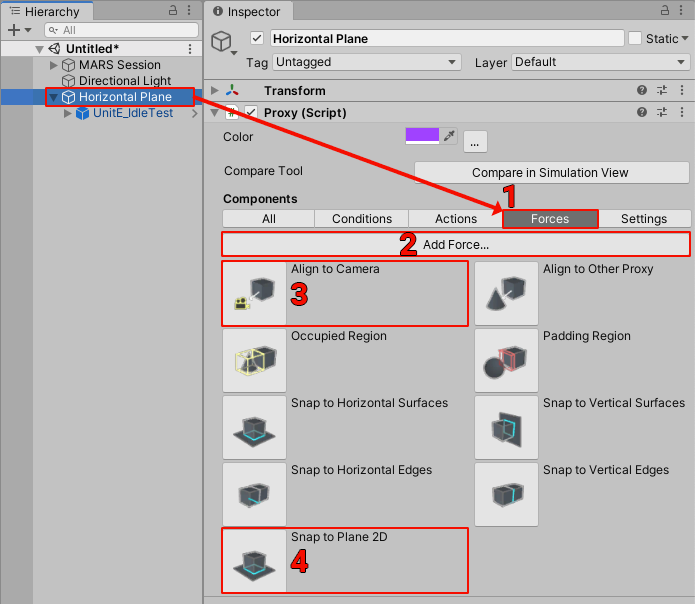
- Select the horizontal plane Proxy.
- In the Forces tab, clic the Add force button, then click the Align to Camera button.
- Click Add force again, then click the Snap to Plane 2D button.
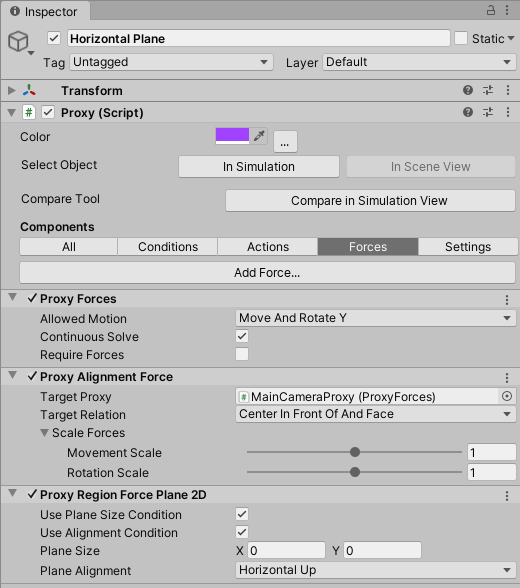
Your Proxy now has three components:
ProxyForces, which configures general force settings such as movementProxyAlignmentForce, which aligns your Proxy to the cameraProxyRegionForcePlane2D, which constrains the avatar to the plane
Testing created forces
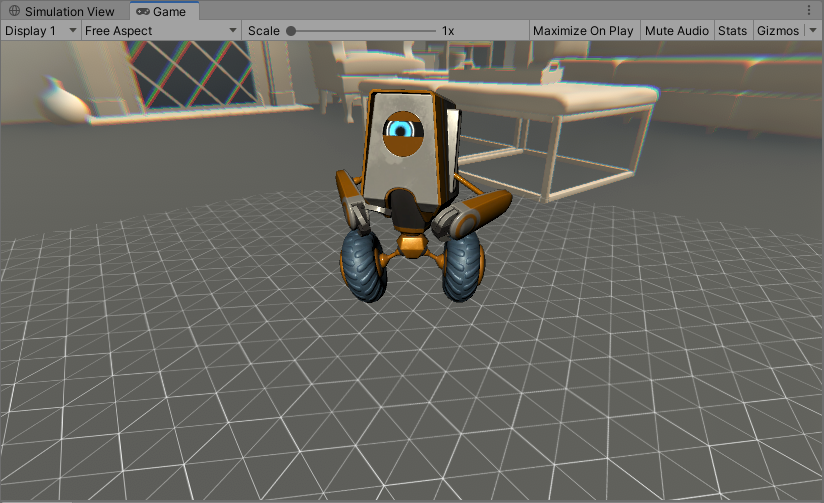
To try out your setup, click the Play button and start scanning any loaded environment. Your avatar should get placed on the first scanned plane and look towards the camera.
Conclusions
If you followed these steps, you should now have a simple Proxy that shows up on any scanned plane. This Proxy contains an avatar that faces towards the camera while being constrained to the plane because of the forces that affect it.
This tutorial uses the Align to Camera and Snap to Plane 2D forces, but you can also try other forces. For example:
- Occupied Region, which keeps the object from overlapping with other objects
- Snap to Vertical Surfaces, which defines a region on the object that is attracted to horizontal surfaces (on an object)
- Align to Other Proxy, which aligns objects to other objects (for example, a control panel that tries to place itself near your base item).
As mentioned before, forces in Unity MARS are components that can be added to Proxies. You can achieve different effects depending on how you combine these forces. To understand how each component affects your Proxies, see the Force components section on this page, which provides a detailed explanation of each force.
Example: Dinner for two using forces
This tutorial walks you through the setup for placing all the cutlery, pots, and wine for an AR dinner for two, using forces to place all objects.
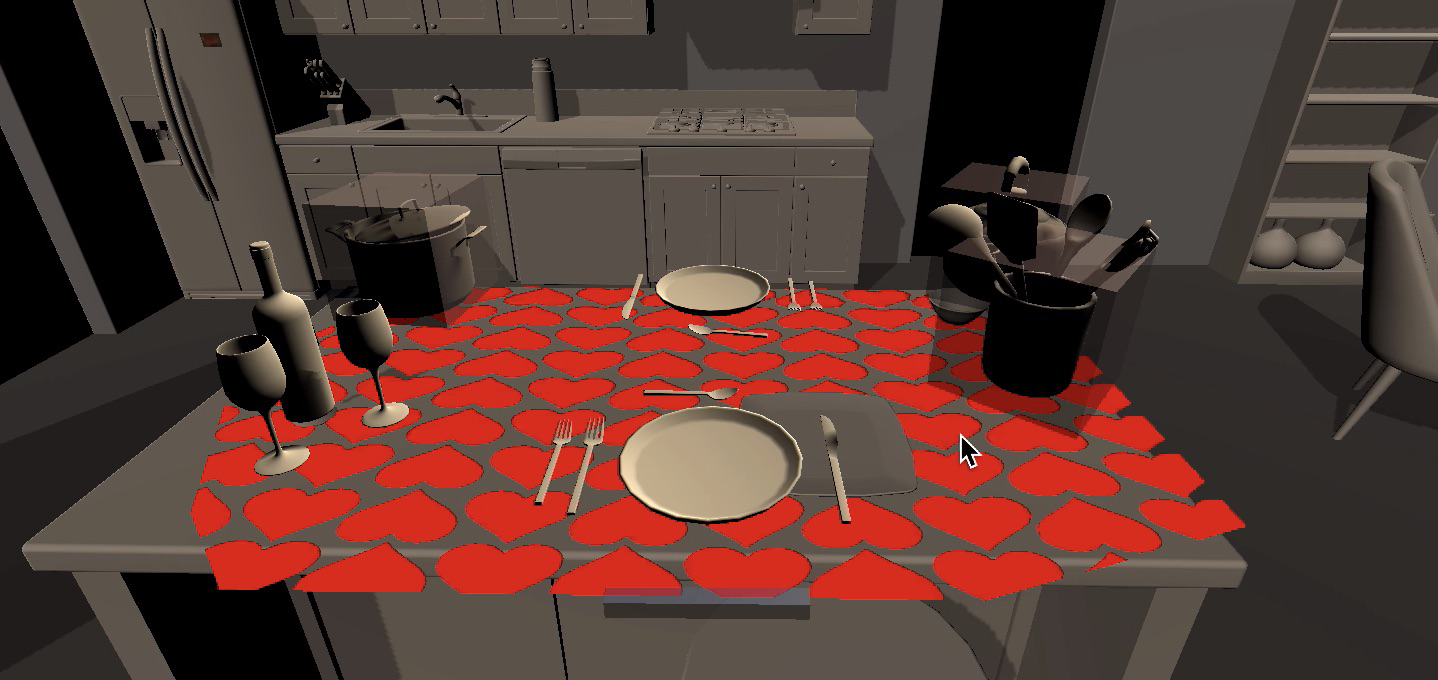 The thumbnail above links to a video of the "Dinner for two" example that uses Proxy forces in Unity MARS.
Set up the basic scene environment
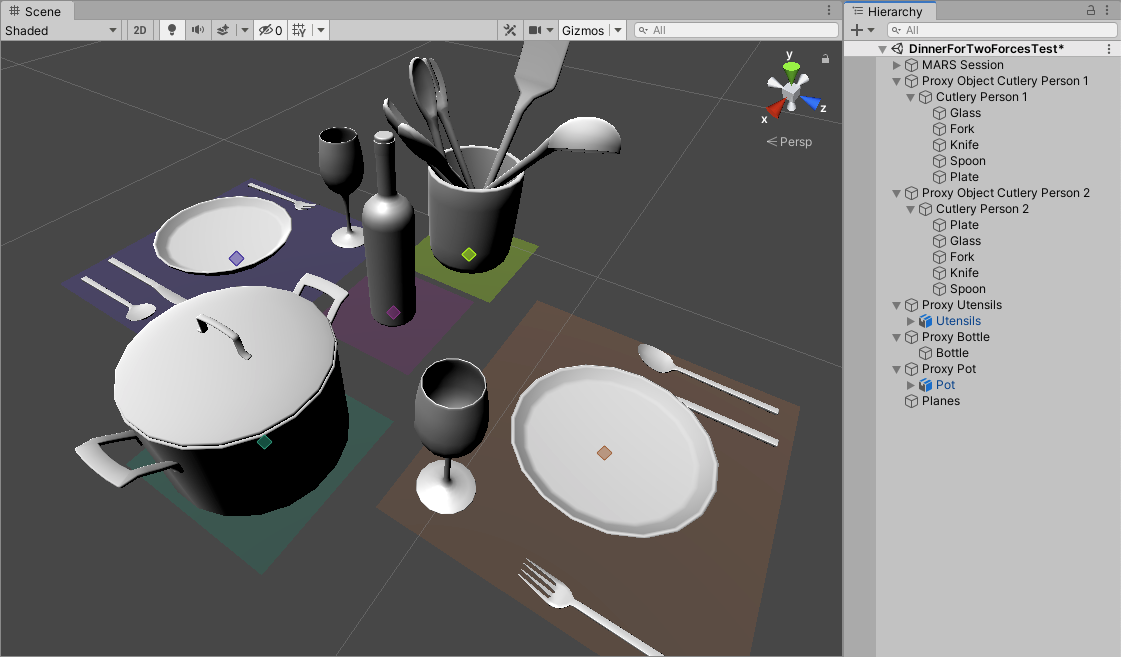
Start by creating the basic table setup for the dinner. Add the meshes of a plate for you and your partner, and the surrounding cutlery.
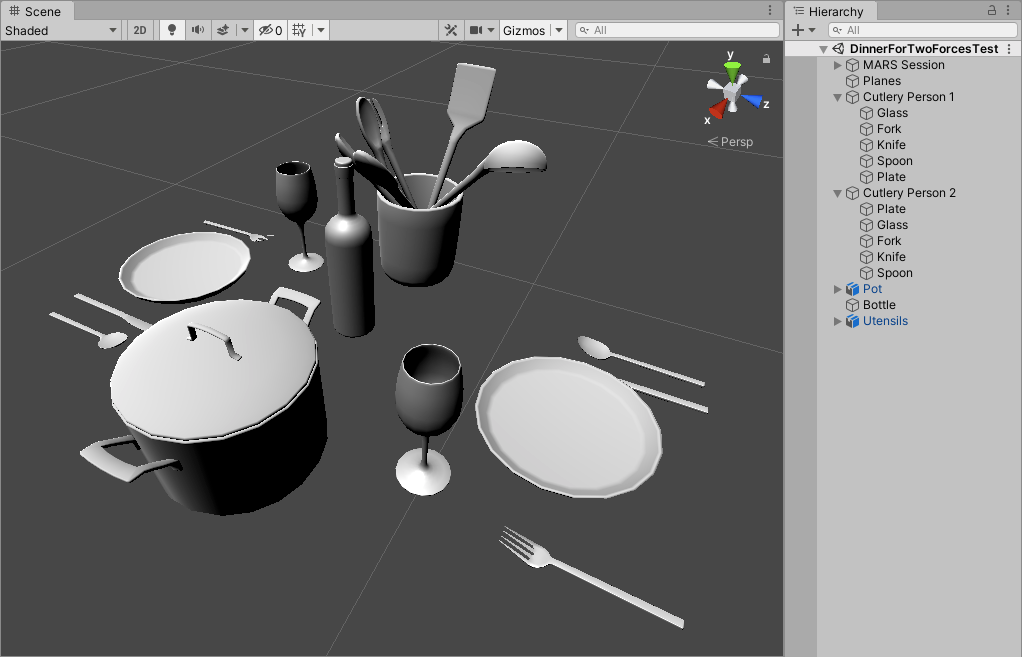
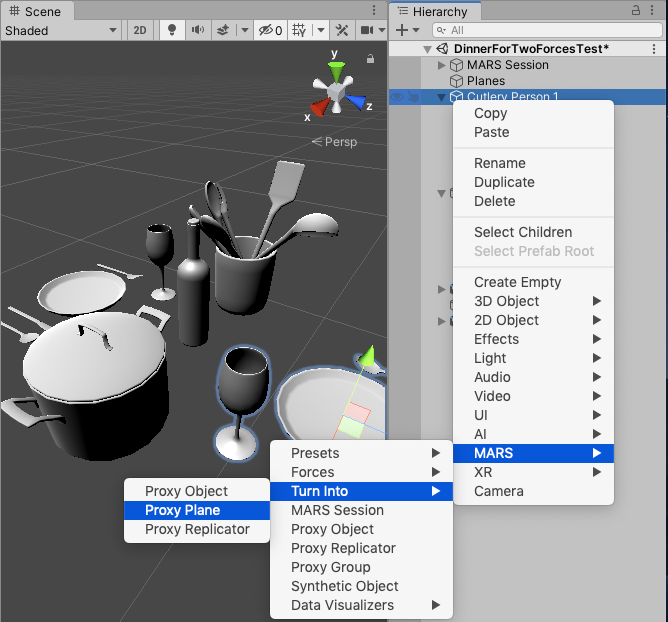
After you've set all your meshes, convert them into Proxy planes. To do this, right-click on each of your GameObjects and select MARS > Turn Into > Proxy Plane from the contextual menu.
Finally, attach Plane conditions to your Proxies on all the GameObjects that will be placed for the dinner. Make sure the plane size condition planes have the maximum size disabled and the minimum size set to cover the base of the object.
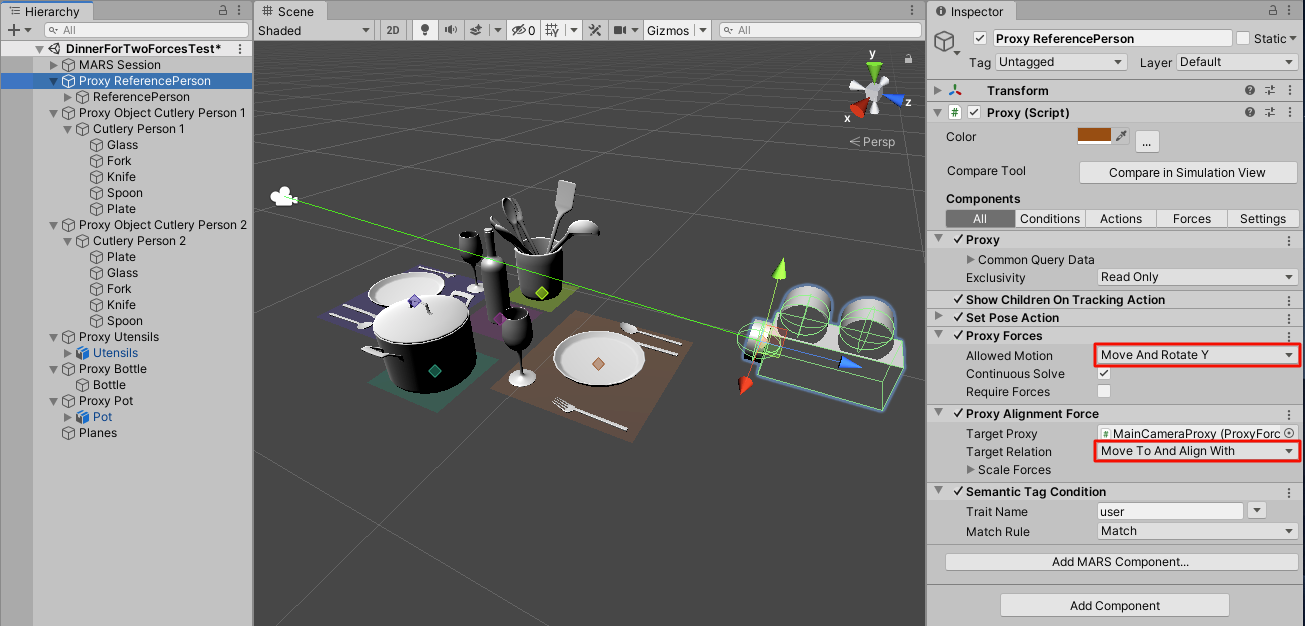
To be able to move the camera around freely, follow these steps:
- Create a Reference Person GameObject.
- Convert it to a Proxy plane.
- Add an Align to camera force.
- Make sure that Allowed motion is set to Move And Rotate Y, and the Target Relation is set to Move To And Align With.
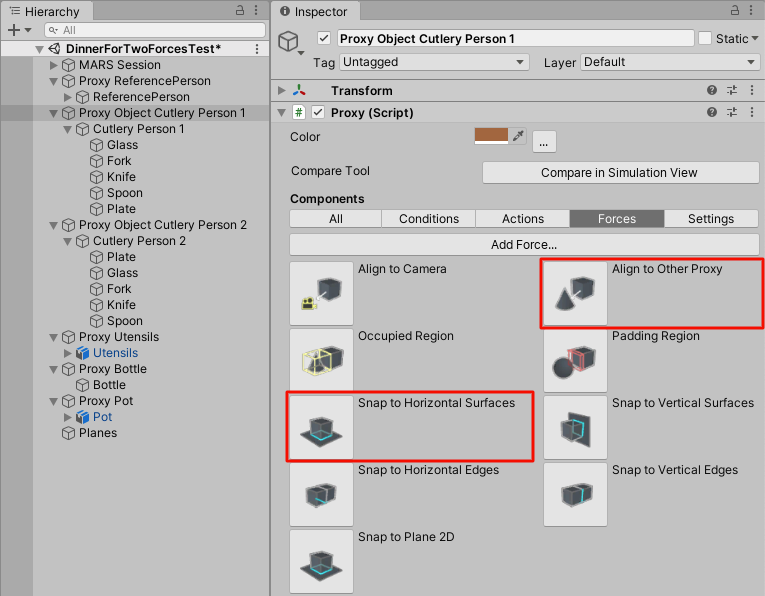
Organize the dishes
After having the basic setup of all the plates, add Align to other proxy and Snap to Horizontal Surfaces forces to the first plate.
Set the Target Proxy on the first plate to be the Proxy Reference Person you created earlier. A green line will appear between the two Proxies.
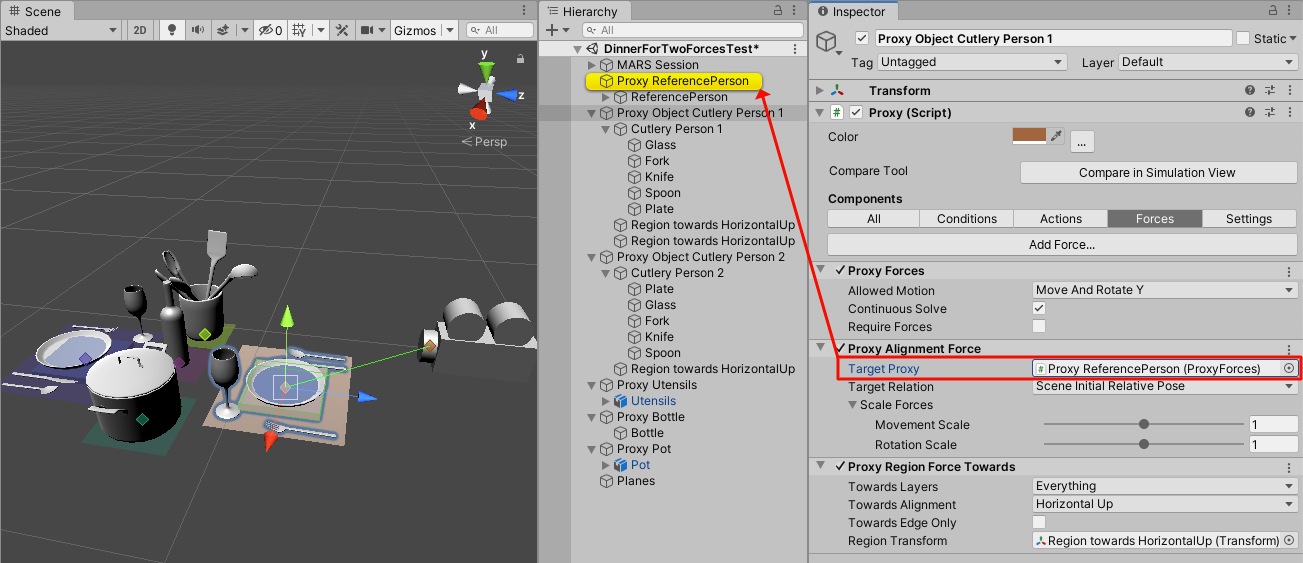
Repeat the steps above for the second plate, but set the Target Proxy to be the first plate. Also, make sure that the Target Relation is set to Scene Initial Relative Pose.
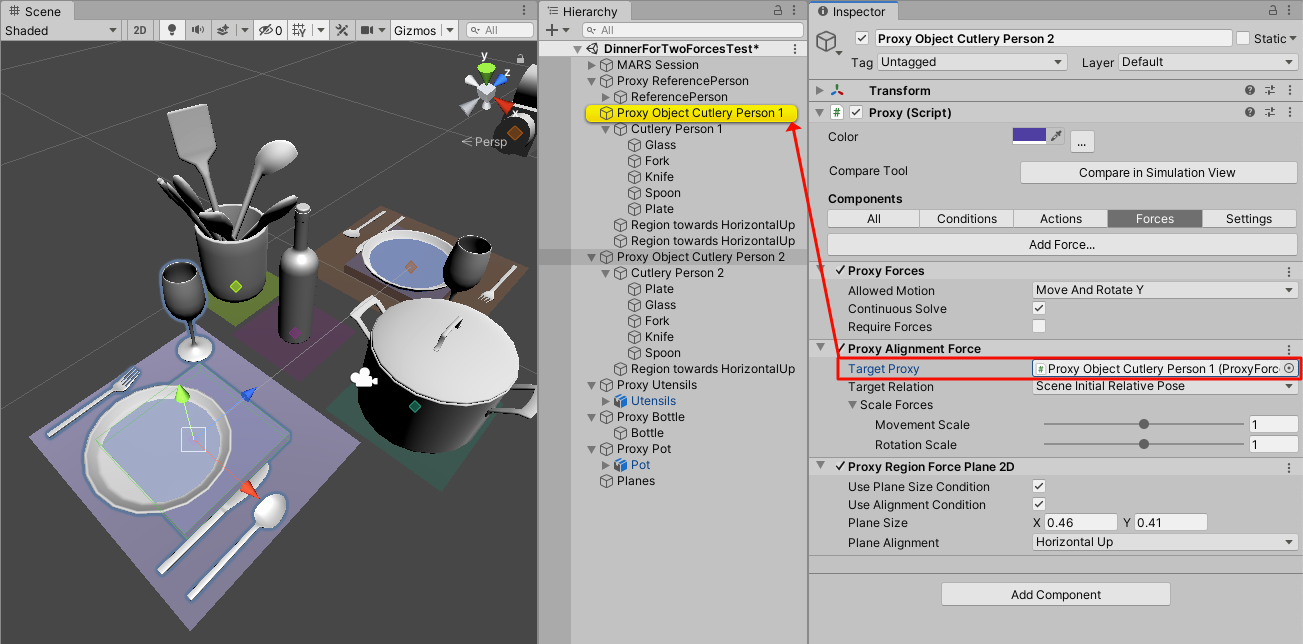
Configure settings for all the cutlery
For all the cutlery, make sure that all the Proxies have the following conditions and forces:
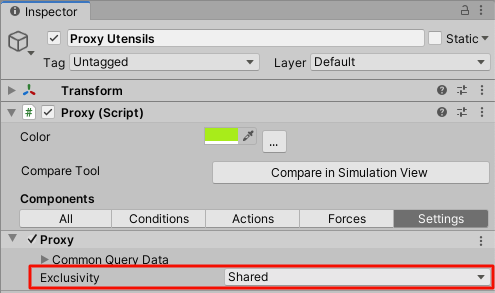
Proxy Exclusivity set to Shared, so all proxies can be placed in the same detected plane.
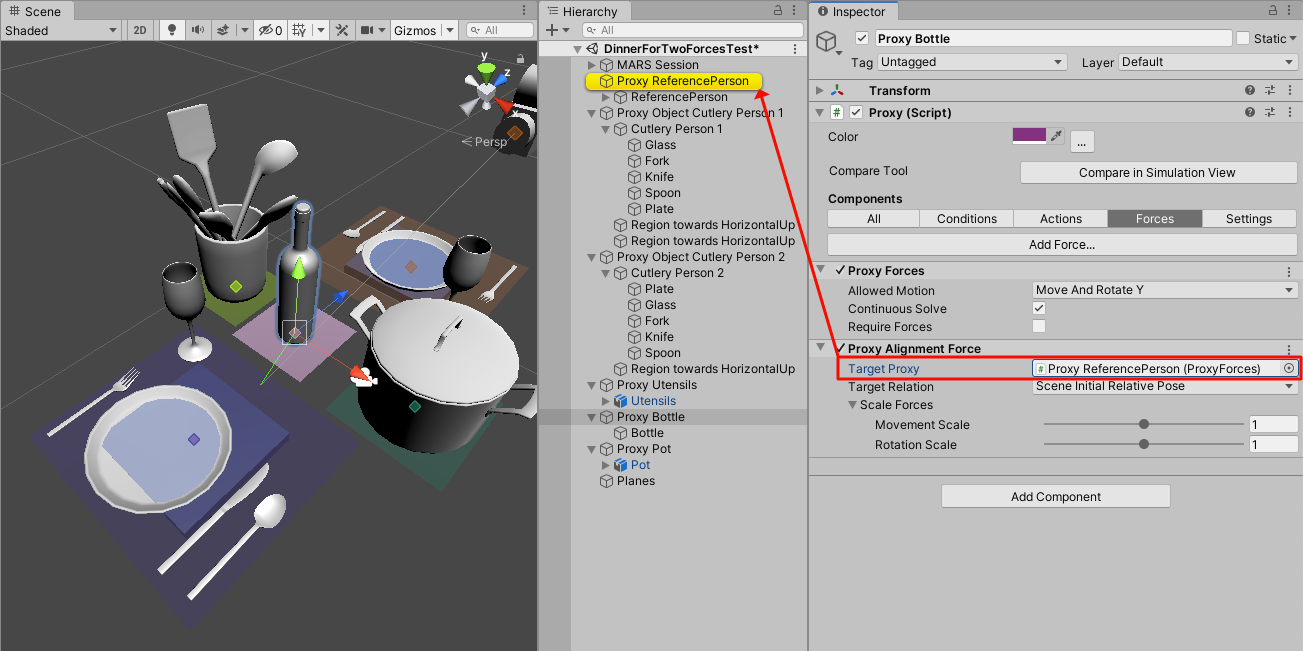
Align to other Proxy set to the Proxy Reference Person, so each GameObject is in the correct position relative to the user.
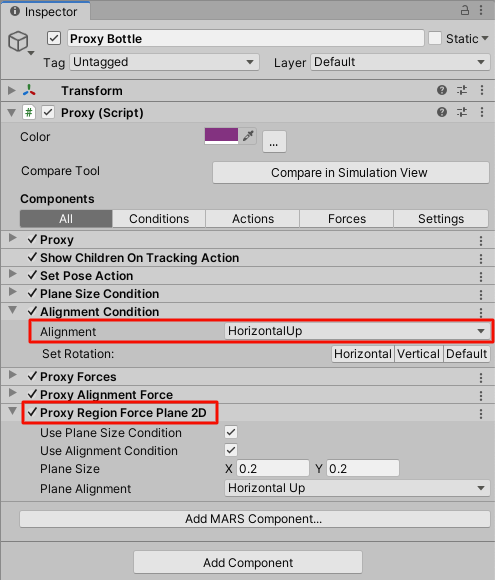
Add an Alignment Condition (if it doesn't already exist) and make sure it's set to Horizontal Up. Also add a Snap to Plane 2D force.
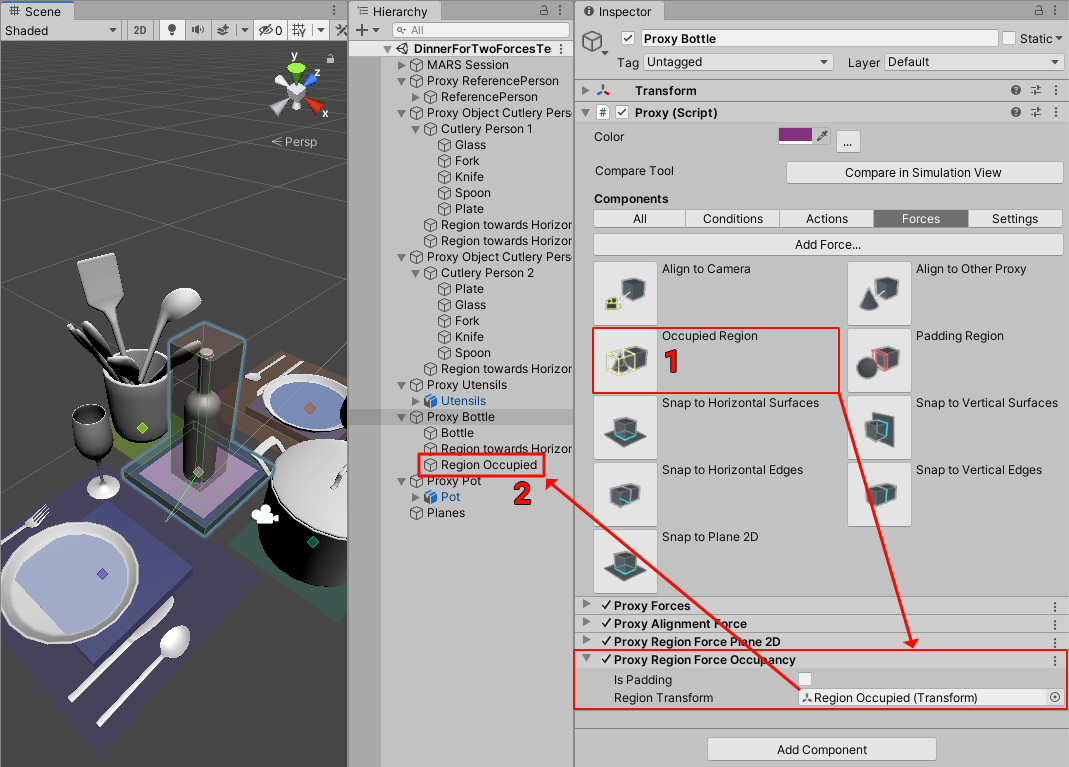
Finally, add an Occupied Region force (1) to all the Proxies so they don't overlap with each other. To do this, click the Occupied Region force. This creates a Region Occupied GameObject (2). To set up the occupied volume, modify the Scale of the Region Occupied GameObject.
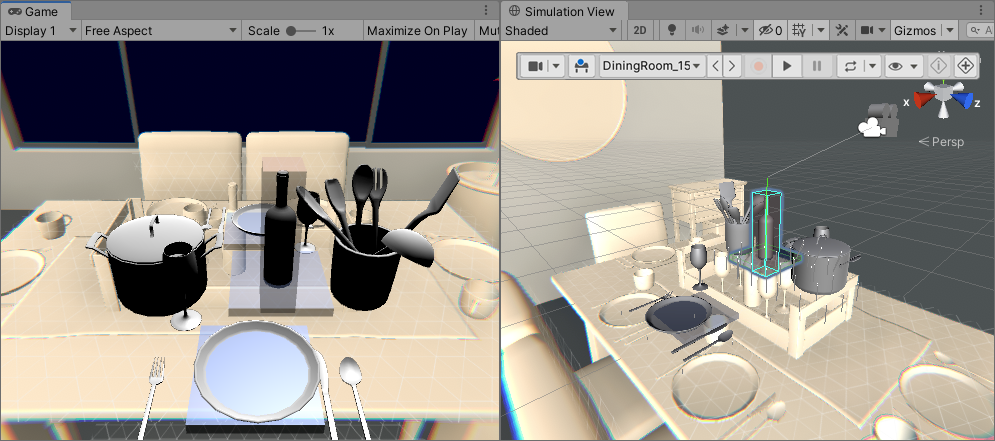
Click the Play button and look for an empty table in the loaded environment. You should see the objects get placed in front of you.
Conclusions
This tutorial covered the steps for placing multiple GameObjects on the surface a user is directly looking at. These GameOBjects accomodate themselves to the surface using forces. As you've seen, forces can be helpful when you want multiple objects to arrange themselves in relation to each other in a given space.
As an exercise, you can disable Continuous Solve on all Proxy forces to make the objects stay where they are after they were first placed.
Troubleshooting this example
If only one object appears at a time, try setting all related Proxies' Exclusivity to Shared (that is, they all "share" the same surface).
To avoid objects overlapping, add a Region Occupancy force to each object above and adjust it.
To have a little room between the plates and cutlery, you can add a Region Padding force and adjust the amount of empty space as you prefer.
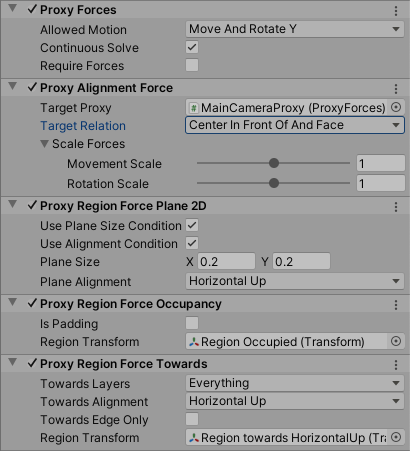
For reference, the screenshot below shows the common configuration for all the major force types:
Using forces without Proxies
You can use forces in Unity MARS without a Proxy. This is only recommended for advanced users.
To use forces without a Proxy, add a ProxyForces component and its associated forces to an empty GameObject instead of a Proxy. The forces will be enabled from the start.
In contrast, forces on a Proxy will only run after their associated Proxy has found a match, and only be applied while the match is active. They will also update the Proxy's pose before it reaches the SetPose and other actions.
Important considerations regarding Proxy forces
Because Proxy forces don't depend on Unity's physics system, the region transform of any Proxy force is determined by a transform and the scale mandates the bounds of said transform. If you want to modify the bounds of a Proxy force's region transform, you must modify the linked transform's scale to set said volume.
Troubleshooting / FAQ
- I get "jittery" motion as my camera moves.
- Solution: Disable Set Pose Action and set Follow Match Updates to false. If the object appears to be jumping around as you're scanning, this might be because the Set Pose Action updates the object as the "center" of the detected plane as you move.
- I want two or more objects on the same surface.
- Solution: Set the Proxy's Exclusivity to Shared rather than Exclusive. Shared allows multiple Proxies to share the same data plane, but you might want to use Occupancy Regions to ensure the Proxies don't overlap. Reserved is the default and ensures that only one Proxy at a time can use any particular piece of data. Read Only causes objects to be placed without checking if any other Proxies are reserving or sharing that data.
- I want objects to not move after being placed.
- Solution: Disable real-time force solving (set the Proxy Forces / Continuous Solve option to false).
- A static object didn't solve into the correct location.
- Solution: The easiest method to fix this is via scripting. Either call
ProxyForces.TrySingleSolve, or enable and disableProxyForces.continuousSolve. Also, user interaction to correct the pose is often suggested and can be used while continuous solving is enabled.
- Solution: The easiest method to fix this is via scripting. Either call