Proxy Forces
ProxyForces allow you to express a web of flexible spring-like forces that pull your proxy into a final position. These forces are often a combination of aligning relative to other objects and to surrounding surfaces. You can use them to model common placement scenarios like figuring out how to create a space between objects, or how to pull an object towards and in front of the user.
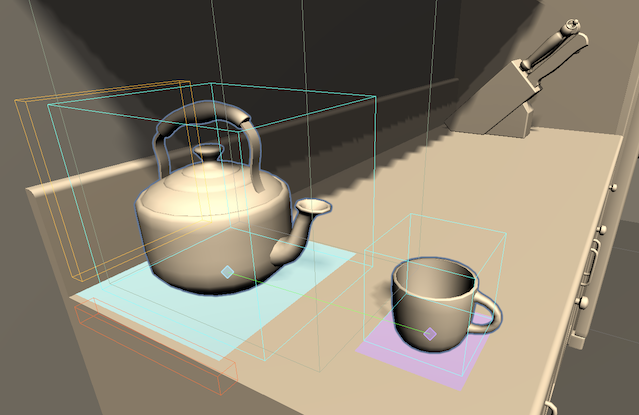
The screenshot above shows a kettle that has numerous forces applied. It occupies space, sits on a surface, should be near a vertical wall and horizontal edge, and there is padding (there shouldn't be anything) immediately above and in front of the snout. The mug occupies space, should be on a surface, and is aligned to the kettle.
This section presents concepts and workflows around using ProxyForces in your application. It shows the steps to create, configure, and solve arrangements on basic forces, and also includes a real-world example you can use to get started. After reading this you should have the necessary knowledge to incorporate ProxyForces into your MARS application.
Force components
Below are the key concepts, types, and main properties used in the ProxyForces system of MARS:
Forces (
ProxyForces): Collects and applies the forces below onto this object. One per GameObject. If you enabled the Require Forces* option, set forces to act as starting conditions to filter out invalid starting states.
Alignment (
ProxyAlignmentForce): Applies a force that aligns this object relative to another object. This supports multiple target relation. Depending on the purpose of your application, they work as follows:
- Move To And Align With: Moves and rotates to align with the target object
- Move To And Face: Moves to the target object and faces it (Faces towards the Z axis).
- Center In Front Of And Face: Moves in front of the object and faces it (Faces towards the Z axis) regardless of the distance.
- Scene Initial Relative Pose: Saves the initial alignment (in the scene) from the target to this object, and applies a force to regain that alignment.
- Scene Initial Relative Angle: Saves the initial angle (in the scene) from the target to this object, and applies a force to regain that angle.
Scale forces control the amount of force applied towards the goal pose; set it to 0 to make the force have no effect and 1 to apply full force.
Region - Occupancy (
ProxyRegionForceOccupancy): Describes how the object occupies space and applies a force to keep it from colliding with other occupied spaces. By default, MARS assigns a unit cube to the region transform and creates this cube as a child of the Proxy. This transform defines the region's shape and pose.Note That proxy forces don't depend on Unity's physics system, hence to change the region transform of any proxy force you just need to change the scale of the transform assigned in the Region Transform object field.

- Is Padding: Padding regions are used to model empty/negative space around the object. They can overlap with other paddings but will collide with occupied regions. When enabled the proxy will avoid occupied regions but will allow overlap with other padded areas.
Region - Towards (
ProxyRegionForceTowards): Describes a region that is attracted towards other objects (an attach-shape, or snap-point). A "towards" region is often used to describe parts of objects that should be in contact with a surface such as a wall, the floor, or both.
- Towards Layers: Filters the attraction to only the selected layers.
- Towards Alignment: Filters the attraction to the set alignment (vertical, horizontal up, etc.)
- Towards Edge Only: Attraction can be only towards the edge of the object, useful when defining corner alignments, etc.
- Region Transform: Describes the shape of the attachment/attraction region relative to the proxy.
Region - Plane2D (
ProxyRegionForcePlane2D): Describes a flat 2D region at the object origin that is attracted towards other planes and provides a way to automatically pull the size and alignment of this region from other Conditions on the Proxy.
- Use Plane Size Condition: When enabled, gets the region size from a plane size condition available at start.
- Use Alignment Condition: When enabled, gets the region's alignment from an alignment condition available at start.
- Plane Size: Size of the 2D plane in X and Y/Z axes (can automatically pull from associated PlaneSizeConditon)
- Plane Alignment: Defines which planes to align with (like only horizontal up) (This can automatically pull from an associated AlignmentCondition )
Examples
Below we have a Getting Started, and a larger "Dinner for two" example walkthroughs:
Getting Started: Making an avatar look towards you from a surface
Proxy forces are MARS components that get added to Proxies; depending on the combination of components you have, different effects can be achieved. Proxy forces are useful for detailed alignments such as objects keeping spacing between each other and aligning relative to nearby edges, walls, and other objects. They are commonly used along with plane conditions to refine the placement within a plane.
This section shows you how to make a simple model attached to a proxy that looks at and follows the camera.
Setting up a proxy (before adding forces)
Before using proxy forces, we need to set up a proxy where our avatar will reside, to do this, just create a horizontal plane proxy (MARS Panel > Horizontal Plane) or from the Hierarchy view, right-click and on the (contextual menu > MARS > Presets > Horizontal Plane).
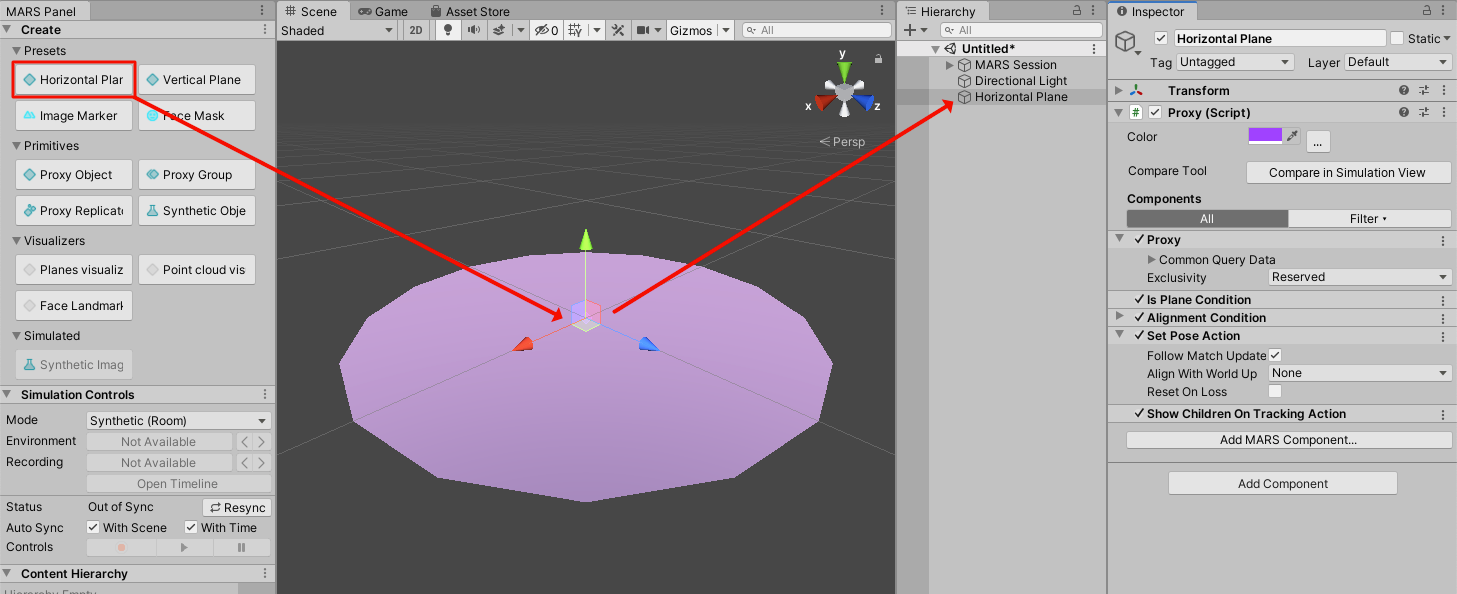
Now let's add a model to the "Horizontal Plane" Proxy - a child of the Proxy which will be visible only when there is a match (due to the "Show Children on Tracking Action").
![]()
Adding forces to the proxy
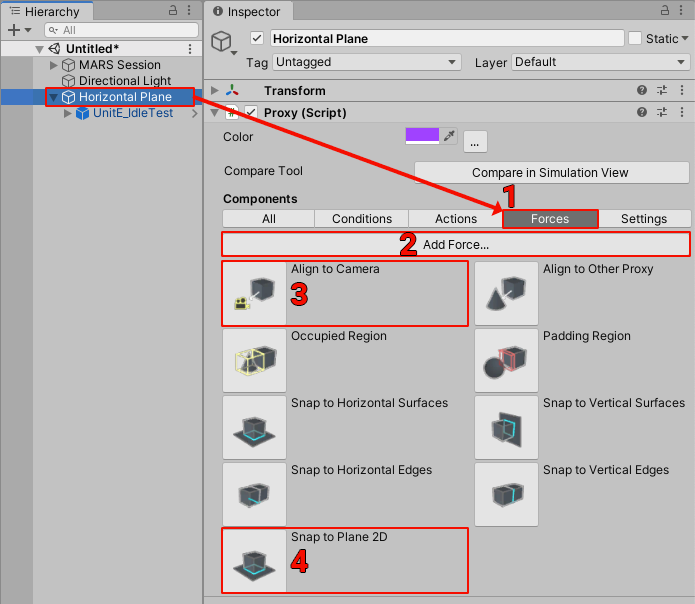
Now that we have set up our model we can continue by adding the forces. To have our model avatar face the camera we need two forces. One (1) force that moves the avatar to face towards the camera and another (2) force that constricts the avatar to the plane the proxy is attached to.
To do this; select the Horizontal Plane Proxy and go to the Forces tab, click on the "Add force..." button and then click on the Align to Camera button and then again "Add force..." and Snap to Plane 2D button.
With this, our Proxy will have three new components added: the ProxyForces (which configures general force settings such as movement), ProxyAlignmentForce (Which aligns our proxy to the camera) and ProxyRegionForcePlane2D (which constraints the avatar to the plane).
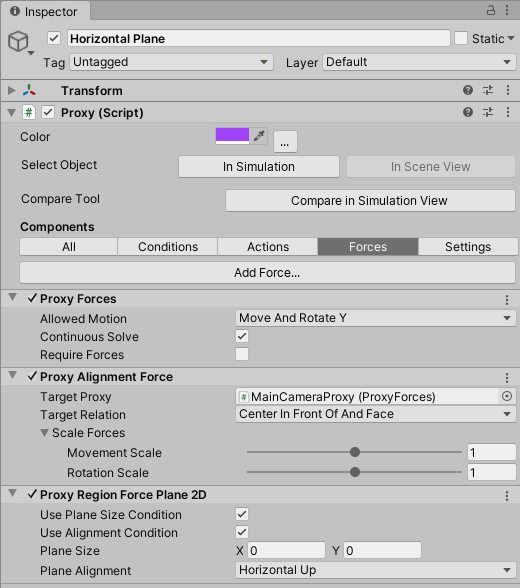
Testing created forces
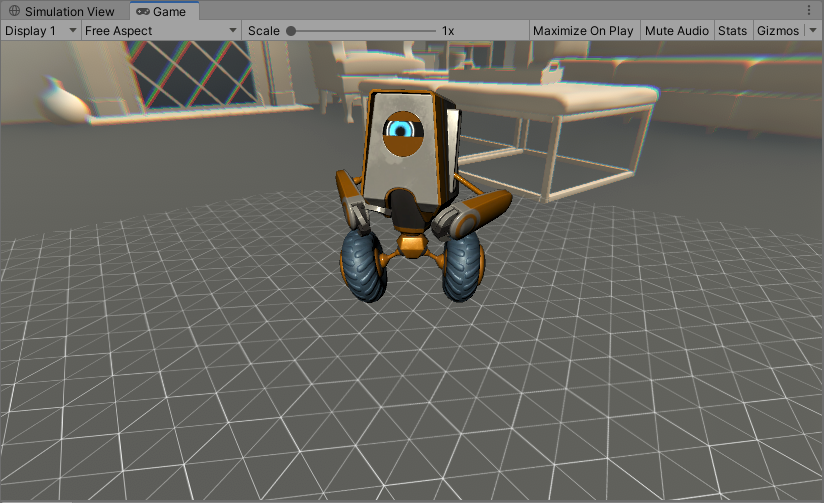
To try out the created setup, simply press the Play button and start scanning any loaded environment and notice how the avatar gets placed on the first scanned plane and looks towards the camera.
Conclusions
We have created a simple Proxy that shows up on any scanned plane; said proxy contains an avatar that by using forces faces towards the camera while being constrained to the floor.
We used the Align to Camera and Snap to Plane 2D forces for the getting started tutorial but you can also try out other fancier forces like the Occupied Region force which keeps the object from overlapping with other objects or the Snap to Vertical Surfaces force that defines a region on the object that is attracted to horizontal surfaces (on an object) or the Align to Other Proxy Force that its goal is to align objects to others. For instance, a control panel that tries to place itself near your base item.
As mentioned before, forces in MARS are components that can be added to Proxies. Different effects can be achieved depending on the combination of the force components you have. To understand how each component affects your proxies you can check the Force Components section on this page where detailed information of each force is explained.
Example: Dinner for two using Forces
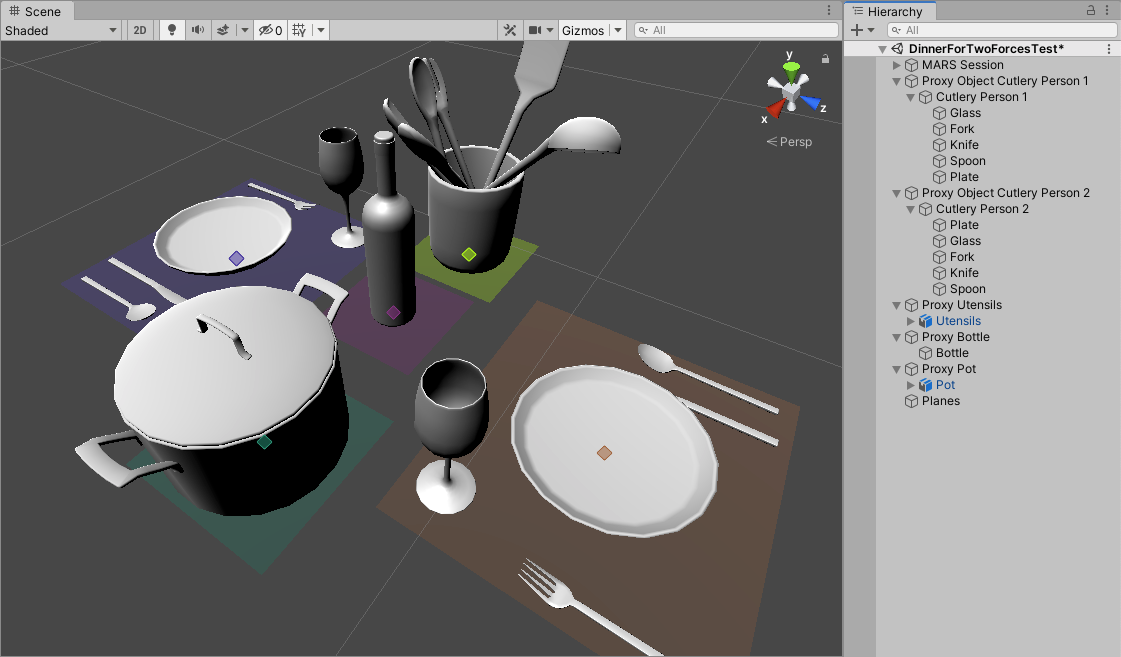
In this tutorial, we are going to go through the setup for placing all the cutlery, pots, and wine for an AR dinner for two, leveraging the placement of the dishware with forces.
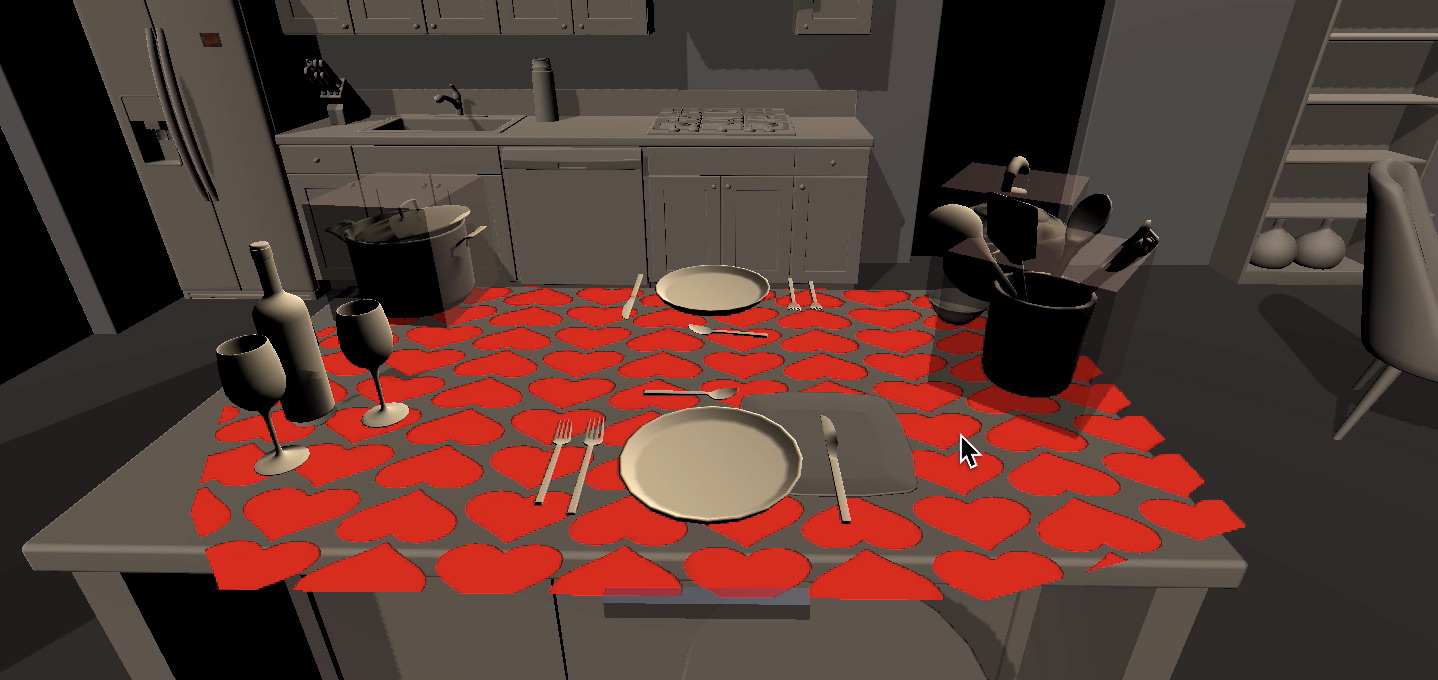 Above: Video of 'Dinner for Two' example using Proxy Forces in MARS
Setting up the basic scene environment.
Start by creating the basic table setup for the dinner, add the meshes of a plate for you, your partner, and the surrounding cutlery.
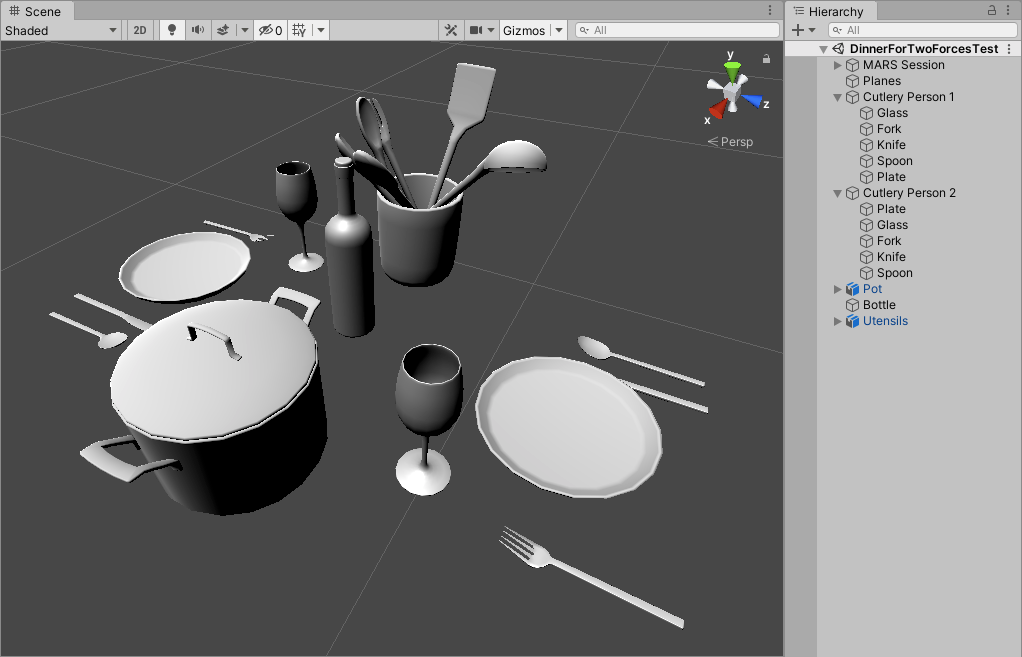
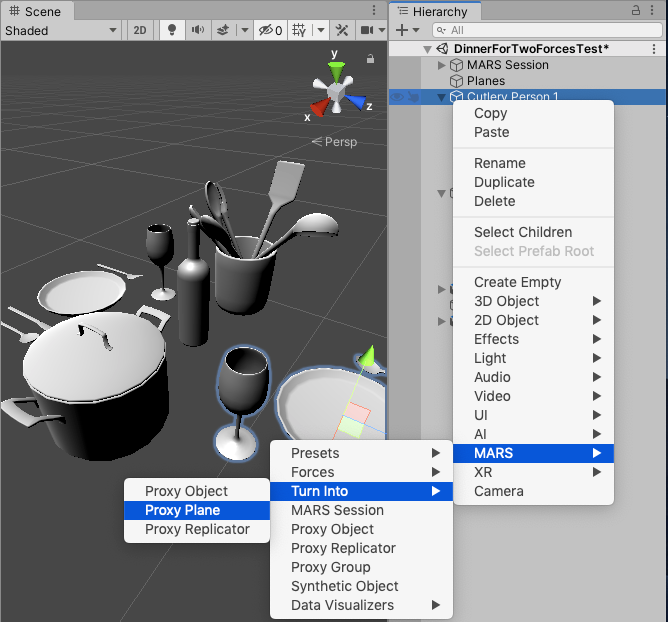
After having all your meshes set, proceed to convert your meshes into Proxy planes by right-clicking on your game objects > MARS > Turn Into > Proxy Plane. Do this for all your game objects.
Finally, your scene should have Plane conditions attached to your proxies on all the dishware that is going to be placed for the dinner. Make sure the plane size condition planes have the maximum size turned off and the minimum size set to cover the base of the object.
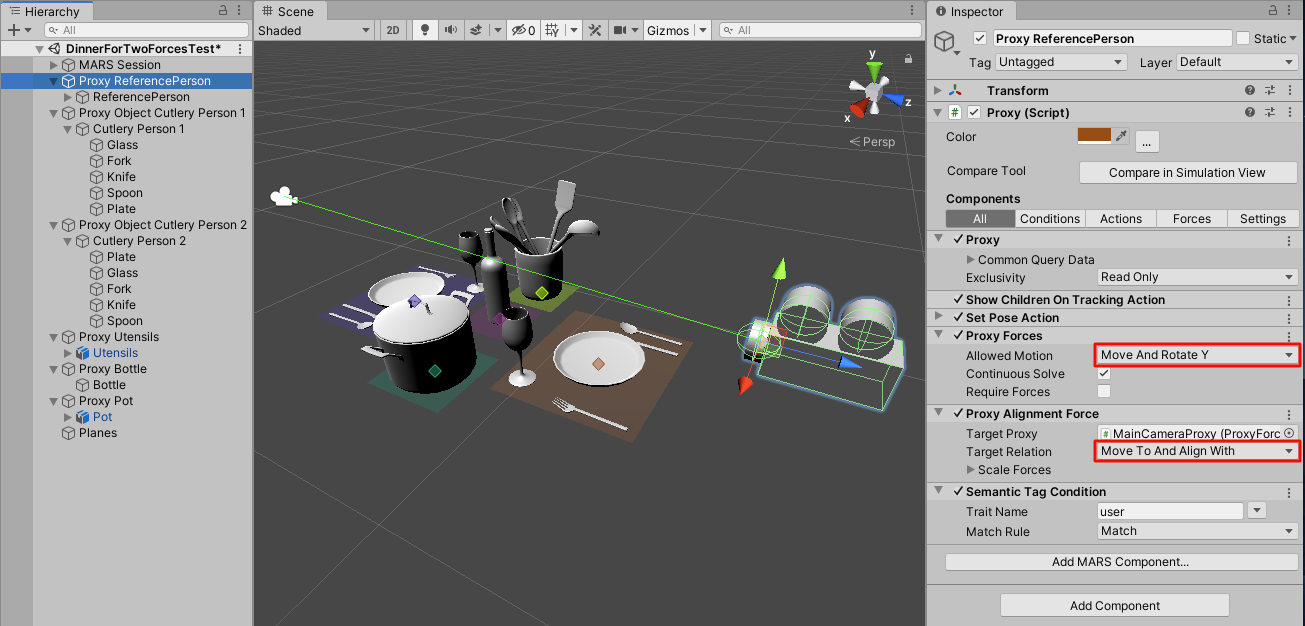
To be able to move freely the camera around, create a "Reference Person" game object, convert it to a proxy plane, add an Align to camera force and make sure the Allowed motion is set to Move And Rotate Y and the Target Relation is set to Move To And Align With.
Organizing dishware
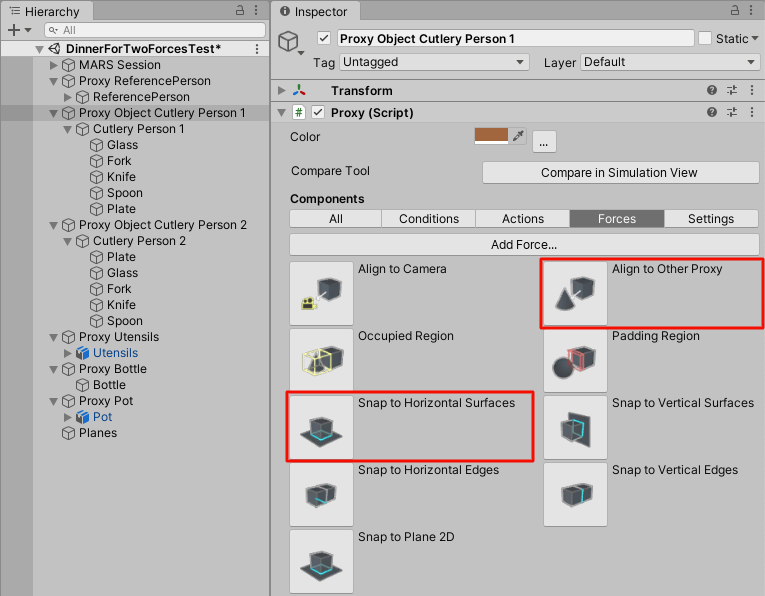
After having the basic setup of all the plates, add Align to other proxy and Snap to Horizontal Surfaces forces to the first plate.
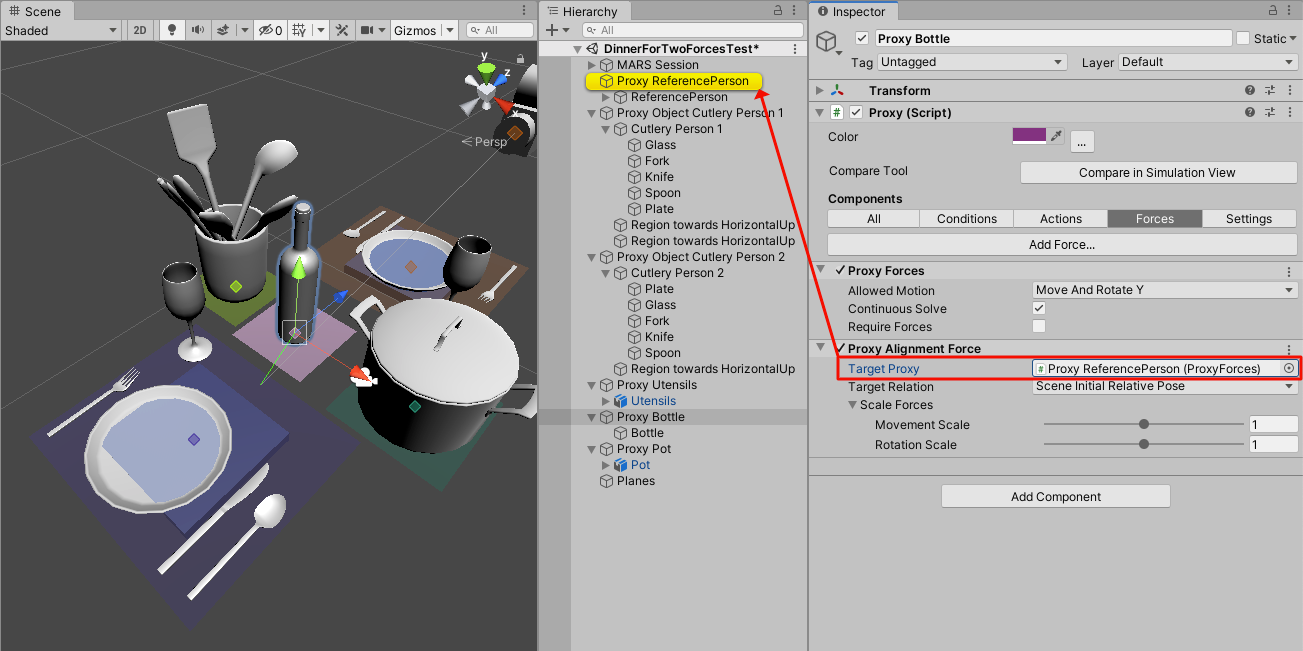
Set the Target Proxy on the first plate to be the "Proxy Reference Person". You will notice how a green line appears between the Proxies.
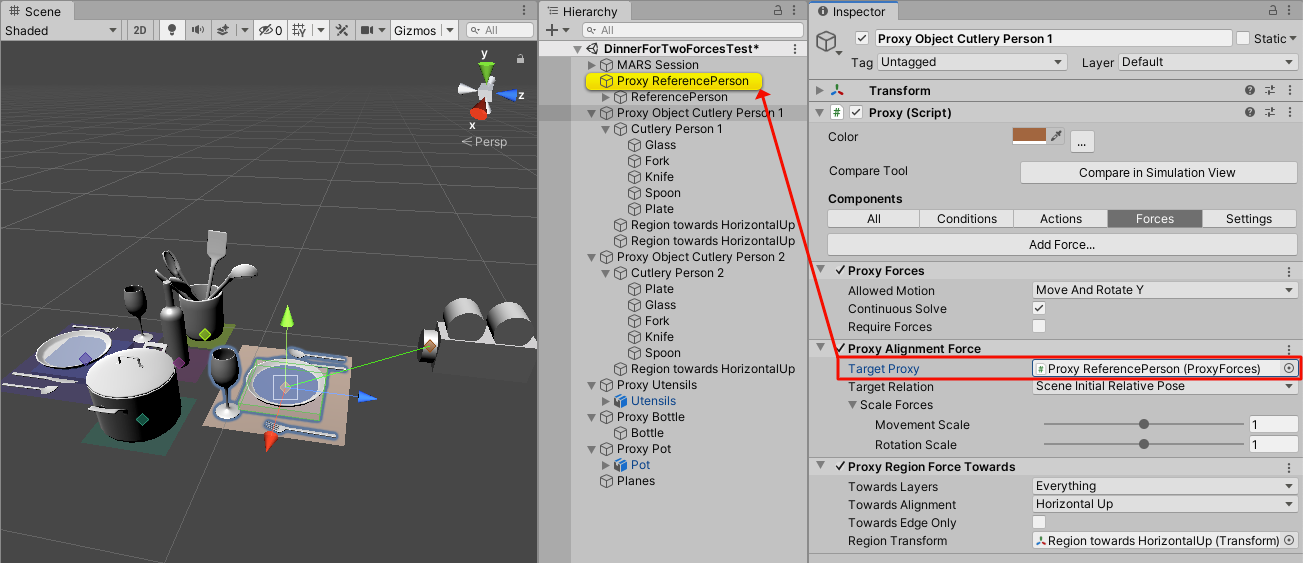
For the second plate, repeat the same procedure (add two forces, Align to other Proxy and Snap To Horizontal Surfaces) but set the Target Proxy on said plate to be the first plate. Make sure also that the Target Relation is set to Scene Initial Relative Pose
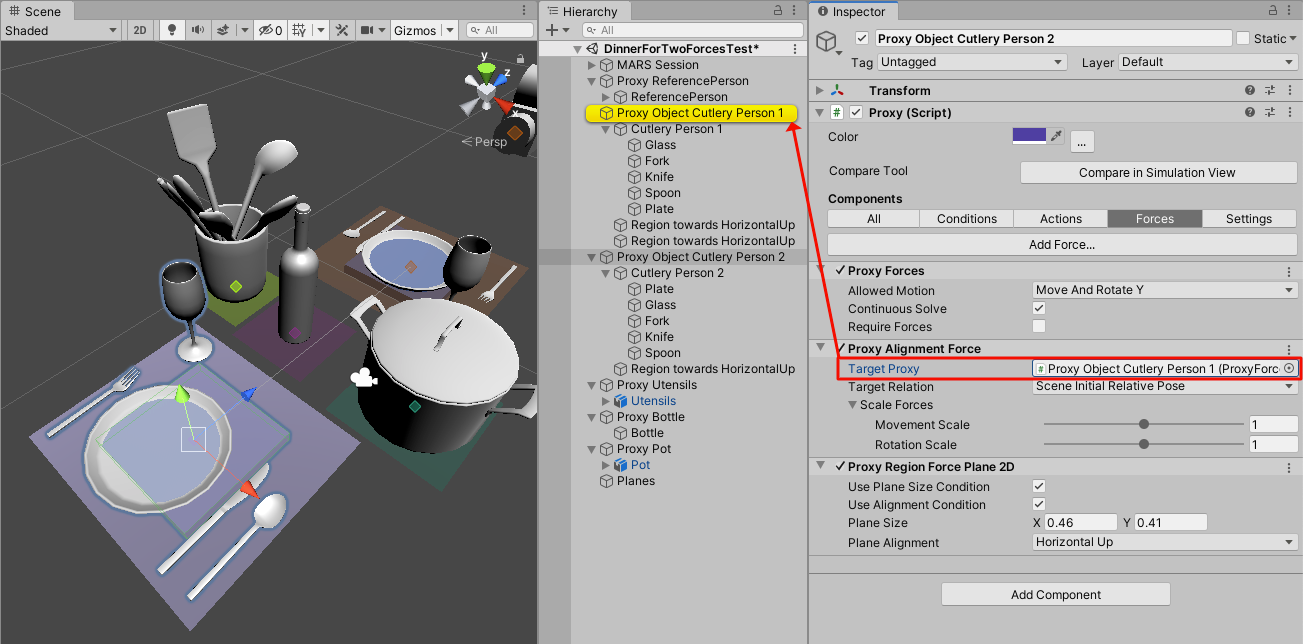
Config settings for all the cutlery.
For all the cutlery make sure that all the Proxies have the following conditions and forces:
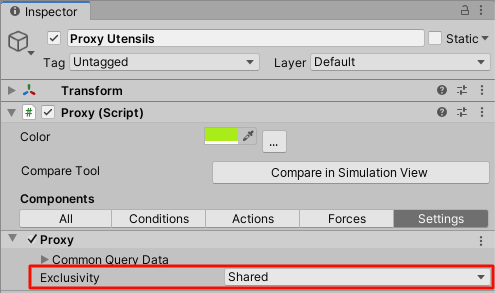
Proxy Exclusivity set to Shared, so all proxies can be placed in the same detected plane.
Align to other Proxy set to the Proxy Reference Person so that each object knows where it should be relative to the user.
Add (if not already added) an Alignment Condition and make sure it is set to Horizontal Up and a Snap to Plane 2D force.
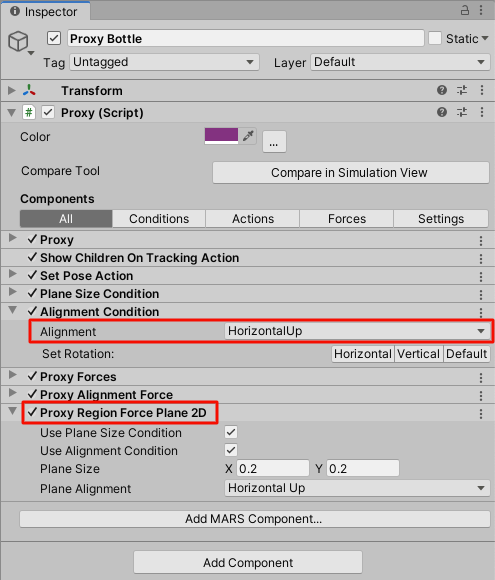
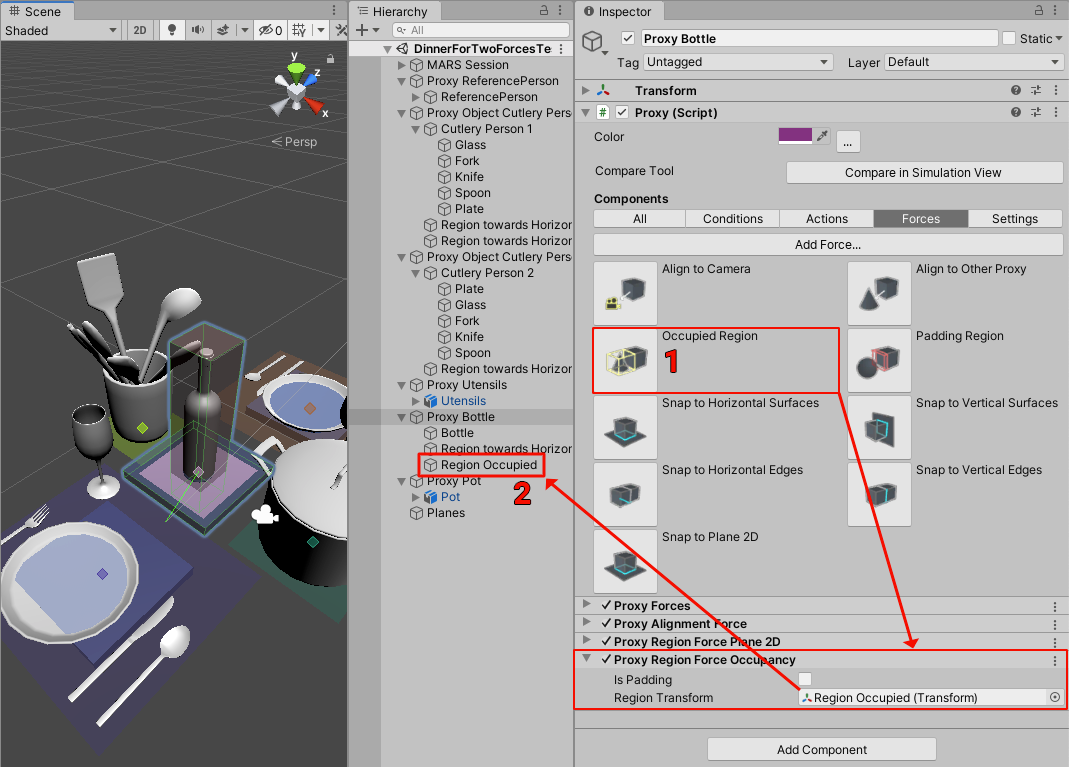
Finally, add an Occupied Region force (1.) to all the Proxies so they don't overlap with each other. To do this, click on the Occupied Region force and set up the occupied volume by modifying the scale of the Region Occupied (2.) game object that gets created after clicking the Occupied Region button.
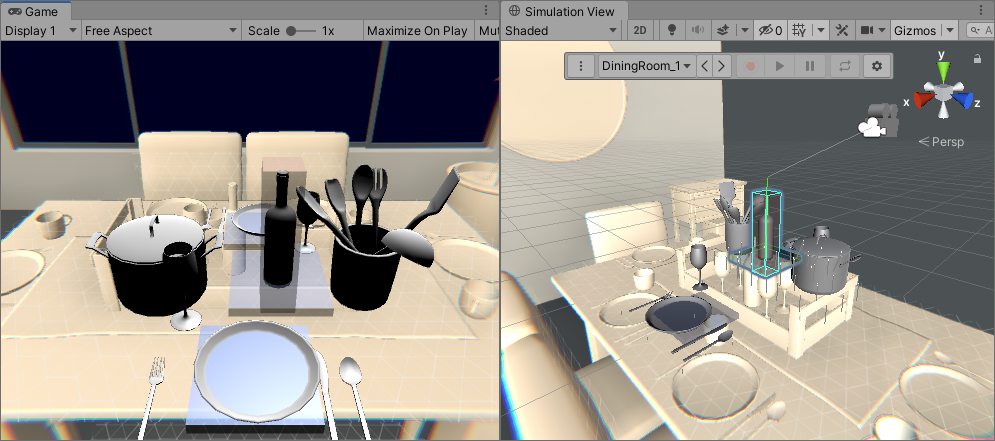
Press play and look for an empty table; you will see how the objects get placed in front of you.
Conclusions
On this tutorial a run through the required steps to place augmented cutlery in a surface was presented; said contents get placed directly where the user is looking at and accommodates itself to the surface using forces. As one can see, forces can be really helpful for self-organizing stuff in any given space.
As an exercise to the reader, you can disable Continuous Solve on all the ProxyForces to make the objects stay where they are after placing them.
Troubleshooting the dinner for two setup
If only one object appears at a time, try setting all related Proxy's Exclusivity to Shared (i.e. they all "share" the table).
To avoid objects overlapping, add a Region Occupancy force to each object above and tune to taste.
To give a little room between the plates and cutlery you can add a Region Padding force and tune the amount of empty space that feels comfortable.
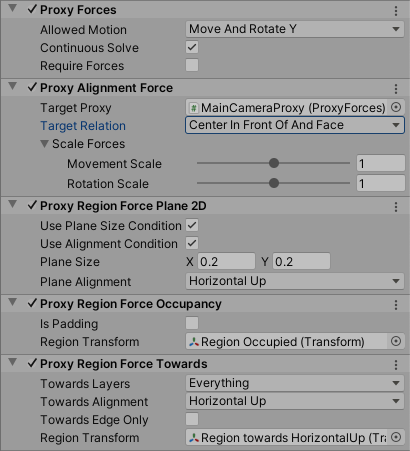
As a point of reference, you can see the common configuration for all the major force types:
Using Forces without Proxies
It is possible to use the Forces system without a proxy. To do this, which is only recommended for advanced users, simply add a ProxyForces component and associated forces to an empty game object instead of a Proxy, and the forces will be enabled from start. When used on a Proxy the forces will only be applied while their associated Proxy has a match, they will also update the pose before it reaches the SetPose and other actions, and run after the match has been made.
Important Considerations regarding Proxy Forces
Proxy forces don't depend on Unity's physics system, hence the forces' region transform of any proxy force is determined by a transform and the scale mandates the bounds of said transform. In the case you want to modify the bounds of a region transform of a Proxy force, you will have to modify the linked transform's scale to set said volume.
Common issues with Forces
- I get jittery" motion as my camera moves.
- Solution: Disable Set Pose Action / Follow Match Updates to false - if the object appears to be jumping around as the user is scanning, this may be due to the Set Pose Action updating the object as the "center" of the found plane moves. For best use with forces, disable this option.
- I want two or more objects on the same surface:
- Solution: Set Proxy / Exclusivity to Shared rather than Exclusive . Shared allows multiple proxies to share the same data plane (probably want to use Occupancy Regions to ensure they don't overlap), Reserved is the default and ensures that only one Proxy at a time can use any particular piece of data, also Read Only can be used to place objects without checking if any other Proxies are reserving/sharing that data.
- I want objects to not move after being placed
- Solution: Disable real-time force solving (set the Proxy Forces / Continuous Solve option to
false).
- Solution: Disable real-time force solving (set the Proxy Forces / Continuous Solve option to
- A static object didn't quite solve into the correct location.
- Solution: The easiest method to fix this is via scripting to either call ProxyForces.TrySingleSolve or to enable and disable ProxyForces.continuousSolve. Also, user interaction to correct the pose is often suggested and can be used while continuous solving is enabled.