About MARS Companion Mobile
Using MARS Companion Mobile
You can obtain the Unity MARS Companion App for Smartphones by invite from TestFlight or Google Play.
(Coming Soon) Official builds of the Unity MARS Companion App will be available on the iOS App Store and Google Play
There are four main workflows in the MARS Mobile Companion app, which you can use to:
Linking your Unity account to the Companion App
The first time you run the app, you will be prompted to sign in. In order to access cloud storage and sync assets with the Editor, you will need to sign in with a Unity account that is entitled to a MARS subscription. To sign in, follow these steps:
- Tap Login
- You will be redirected to a browser where you can follow the normal Unity sign in process using your e-mail and password or your preferred authentication provider
- If login is successful, you will be returned to the app and proceed to Project List
If you cannot connect to the internet, or if you just want to try the Unity MARS Companion App without signing in, you can tap Skip to use the app in offline mode. You will not be able to link your project or access cloud storage for any existing linked projects, but you will be able to create and manage resources in local storage.
Your sign-in will be valid for 30 days, and during this time the app will automatically bypass the Sign In screen. After 30 days, simply tap Login and repeat the browser sign in process.
Linking your project to the Companion App
From the Project List screen, you can either create a new project, or, if you are signed in, import a project from the Editor.
To create a new project and start capturing data, tap New Project.
If you have a project open in the Editor, or a Project ID, tap Import Project, which opens the following screen:

In the Unity Editor, click the QR Code button in the Companion Resources Window to display the Project ID QR Code, then scan this code. When the scan is successful, the Project ID will display in the MARS Mobile Companion app, and the project title will replace the instructions:
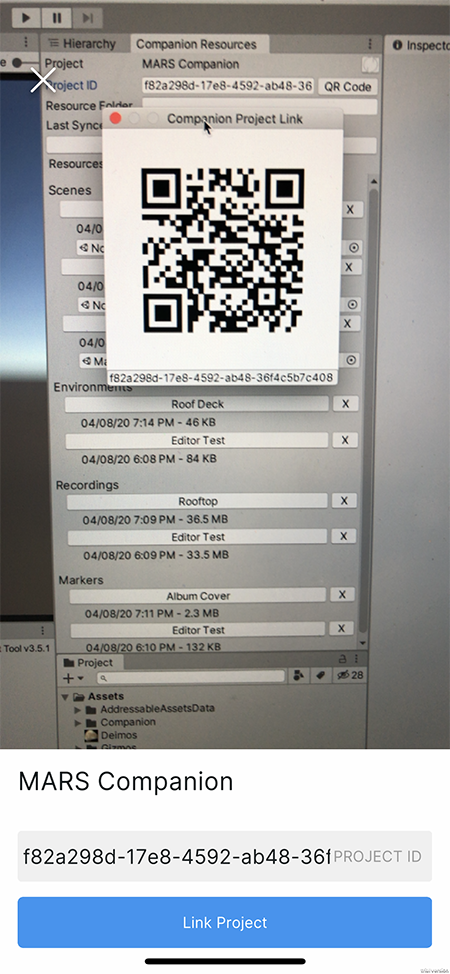
Tap Link Project to complete the linking process. This will bring you to the Resource List view.
Project list view
To return to the Project List view, tap Projects in the upper-left corner of the Resource List view. From there, you can:
- Link another project
- Create a new project
- Choose an existing project

Project list multi-select
To enter multi-select mode, tap Select in the Project List view:
Toggle the selection state on projects in the list and tap Delete to delete multiple projects. Tap Done to exit multi-select mode. Deleting a linked project in the Companion App does not delete the Cloud Services project.
You can also bring up a context menu for an individual project by pressing the three gray dots next to it.
Tap Remove to remove this project from the list. Tap anywhere in the shaded area above the context menu to dismiss it.
To go back to the Sign In view, tap the Profile Button to go to the Profile Screen and then tap Log Out.
Resource list view
Back in the Resource List view, you can also tap Select to enter multi-select mode:
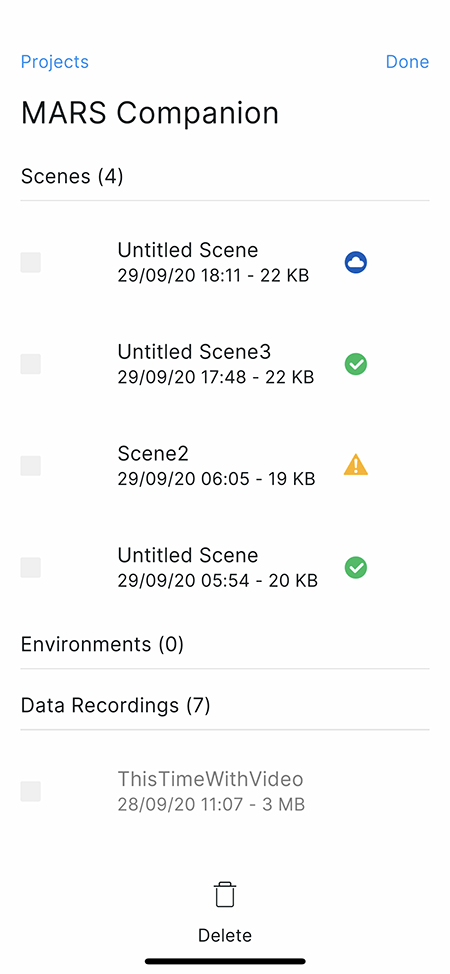
Toggle the selection state on resources in the resource list and tap Delete to delete multiple resources. Tap Done to exit multi-select mode.
Resource list multi-select
You can also bring up a context menu for an individual resource by pressing the three gray dots next to it.
Tap Remove to remove this resource from the list. Tap anywhere in the shaded area above the context menu to dismiss it.
Project list settings
Tap the three gray dots next to the project title to open the Project Settings menu.
Enter a resource folder into the text field to change the folder shown in the resource list. When you dismiss the keyboard, the resource list will update automatically.
AR capture mode
Home screen
Finally, to dismiss the menu and enter capture mode, tap AR Capture Mode in the Resource List view. This will open the Home screen, where you can switch between the app's four main modes:

Swipe left or right on the cards to select the mode you want to use, then tap the Start button. To return to the Resource List view, tap the < button.
Proxy Scan workflow
Tap the Start button to enter the Proxy Scan workflow:
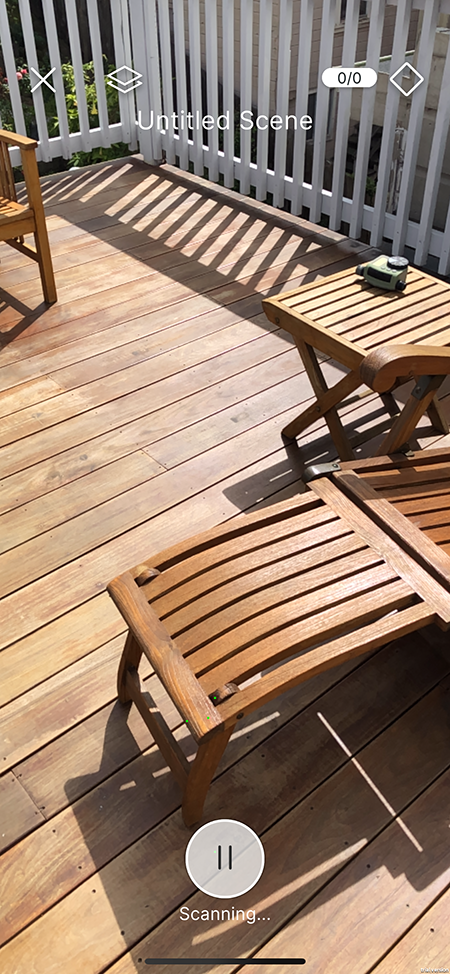
This creates a new scene with a light source and a MARSSession GameObject, and enables point cloud and surface detection. Press the Pause button to start editing Proxies:
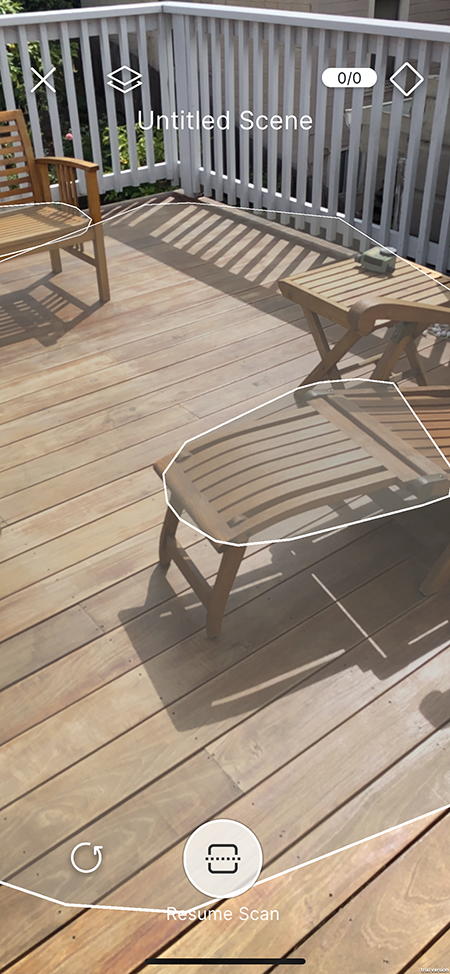
Tap any surface to create a Proxy using the data for that surface. The Toggle Visuals button (top, second from the left) toggles the plane visuals to allow you to preview your content without plane visuals. Disabling plane visuals also disables the ability to create and select Proxies.
To scan or update more surfaces, press Resume Scan. To remove all surfaces and restart the scan, press the Restart button on the left. The app will use the cube on the right to pick from a list of prefabs to be used as the Proxy content (coming soon). You can also tap surfaces with matched proxies (highlighted in blue) to edit that Proxy. If you tap a surface, it will be highlighted orange, and you will see the Proxy Inspector:
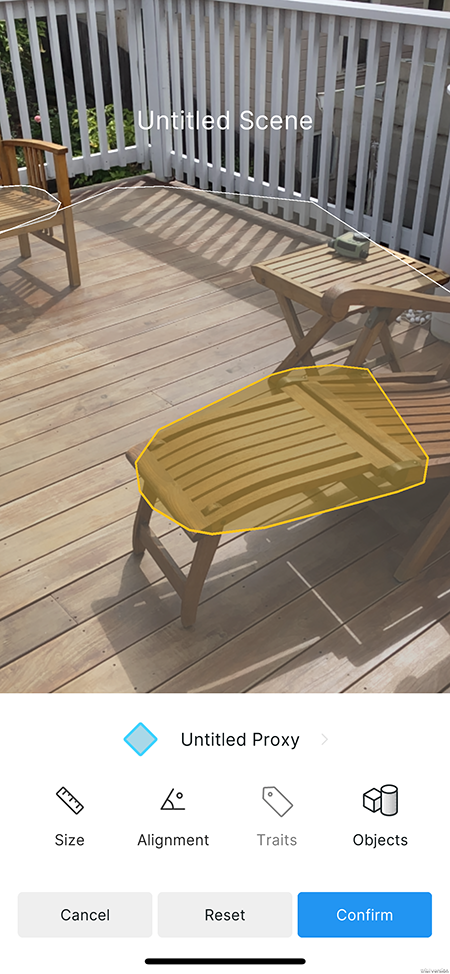
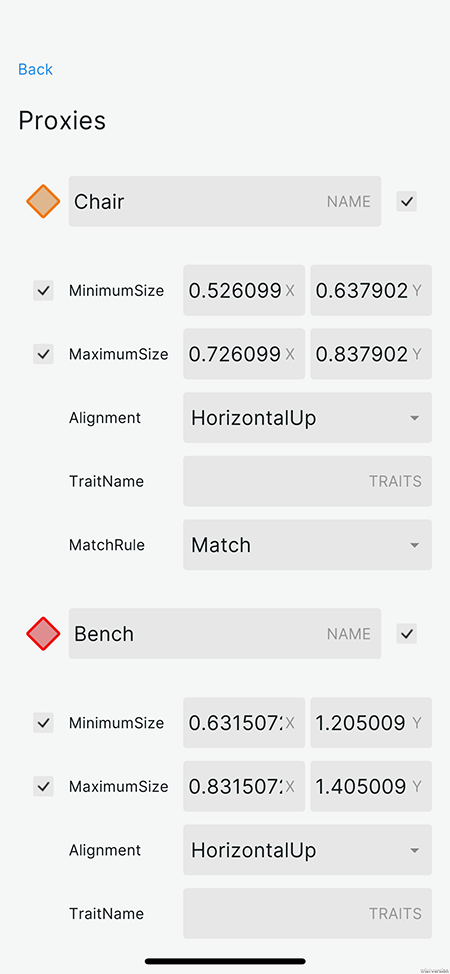
Tap Discard to discard any changes made since you opened this view. Tap Reset to reset the Proxy to its original state (either when it was created, or when the scene was loaded). Tap Size to open the Plane Size Condition Inspector:
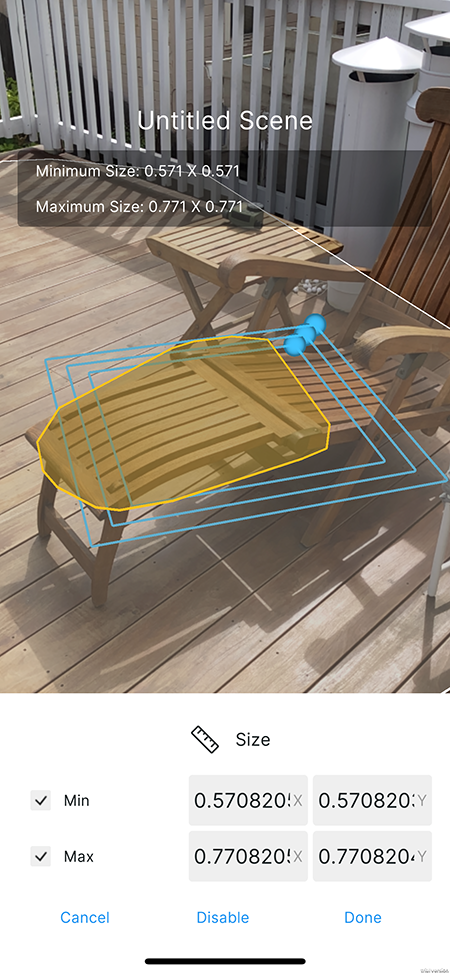
This activates the Plane Size Handle in the Camera view, which you can use to adjust the Plane Size Condition constraints spatially. Changes made here and in the Inspector will update the Proxy in real time, and might cause it to match other surfaces.
The Disable button disables the Plane Size Condition. When this Condition is disabled, tap the Enable button to enable it. Tap Cancel to revert any changes you made since you opened this view. Tap Done to confirm your changes.
Tap Alignment in the Proxy Inspector view to open the Alignment Condition Inspector:
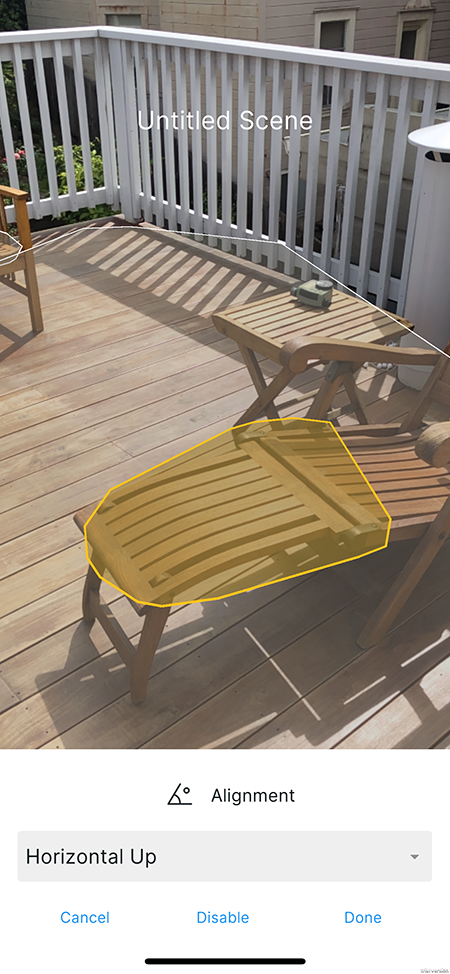
Changes made here and in the Inspector will update the Proxy in real time, and might cause it to match other surfaces.
The Disable button disables the Alignment Condition. When this Condition is disabled, tap the Enable button to enable it. Tap Cancel to revert any changes you made since you opened this view. Tap Done to confirm your changes.
Tap Traits in the Proxy Inspector view to open the Semantic Tag Condition Inspector:
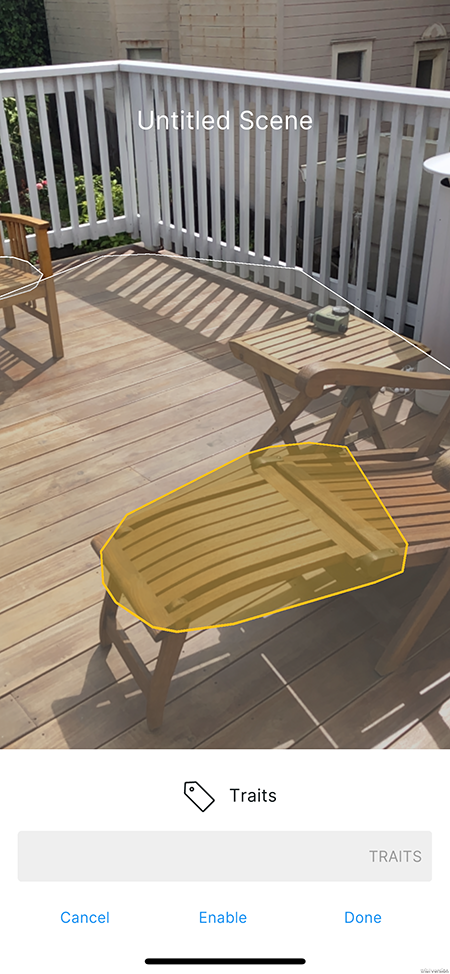
Changes made here and in the Inspector will update the Proxy in real time, and might cause it to match other surfaces. So far, floor is the only semantic tag available in the companion app. In the future, you will be able to make custom builds with more advanced data providers that take advantage of other semantic tags.
The Disable button disables the Semantic Tag Condition. When this Condition is disabled, tap the Enable button to enable it. Tap Cancel to revert any changes you made since you opened this view. Tap Done to confirm your changes.
Tap Objects in the Proxy Inspector view to open the Asset List:
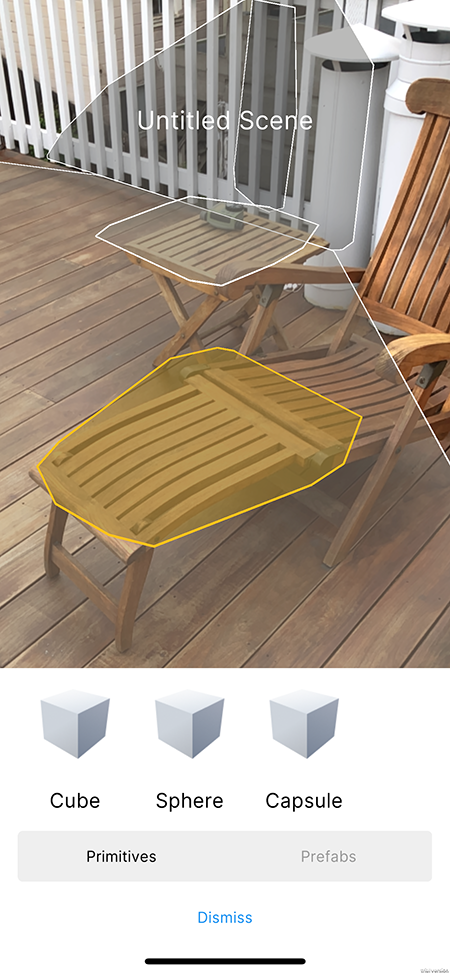
This list contains simple primitives you can use for preview purposes. Tap Prefabs to see a list that contains any prefabs which have been published from the Editor. If this is a new project, the list will be empty. Tap Primitives to return to the list of primitives.
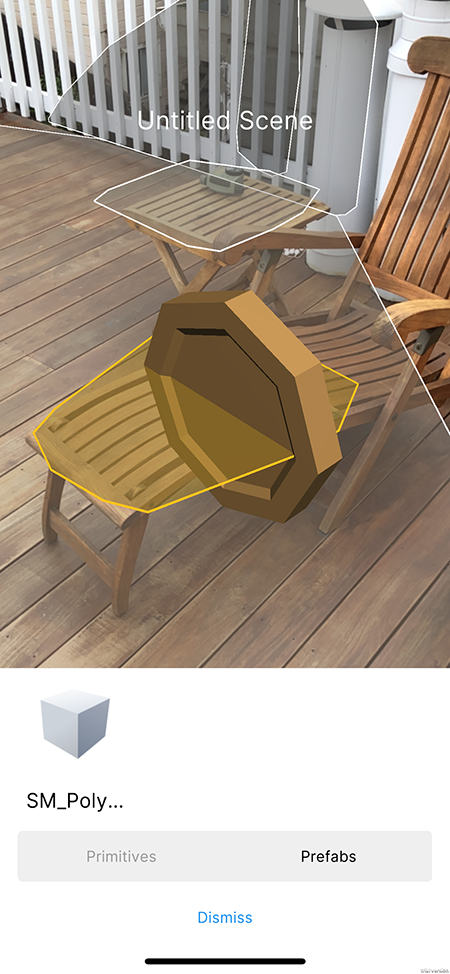
From either the Prefabs or the Primitives list, tap an icon to instantiate the object you tapped as a child of the Proxy you are editing. The Companion App currently supports only one child item with an identity transform. More object manipulation tools will be added before release. Tapping a different object in the list will destroy the previous child and instantiate a new one. Proxies imported from the Editor will have their first child destroyed and replaced with the selectd object if the proxy had any transform children.
Tap Dismiss when you finished editing assets.
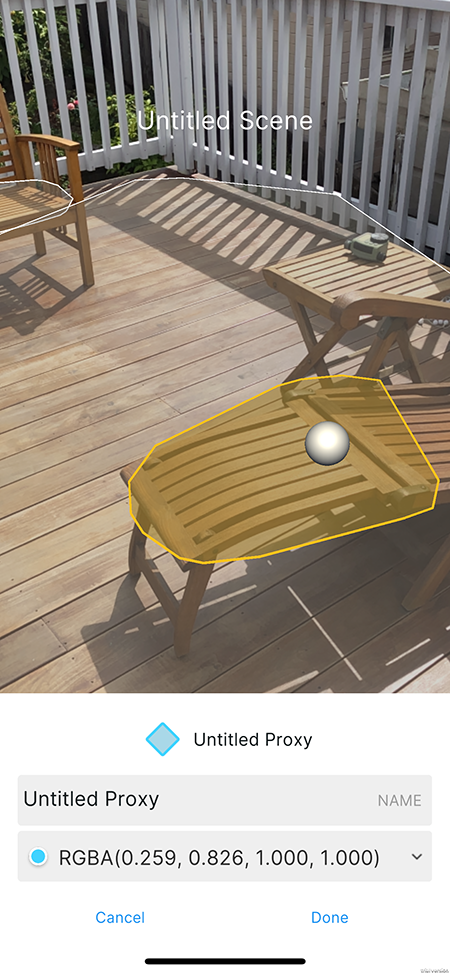
Tap the name of the Proxy at the top of the Proxy Inspector to open the Proxy Attributes Inspector, where you can rename the Proxy and choose a differnet color for the Proxy. The color applies to the Proxy icon in the Inspector, as well as the Proxy visuals in the Editor when the Proxy is imported. Proxies with similar names will be differentiated by their color.
Tap the Proxy List ** button in the upper right to open the **Proxy List view.
When you are done editing, tap the X button in the top-left to exit the Proxy Scan Flow. The app will prompt you to save your changes:
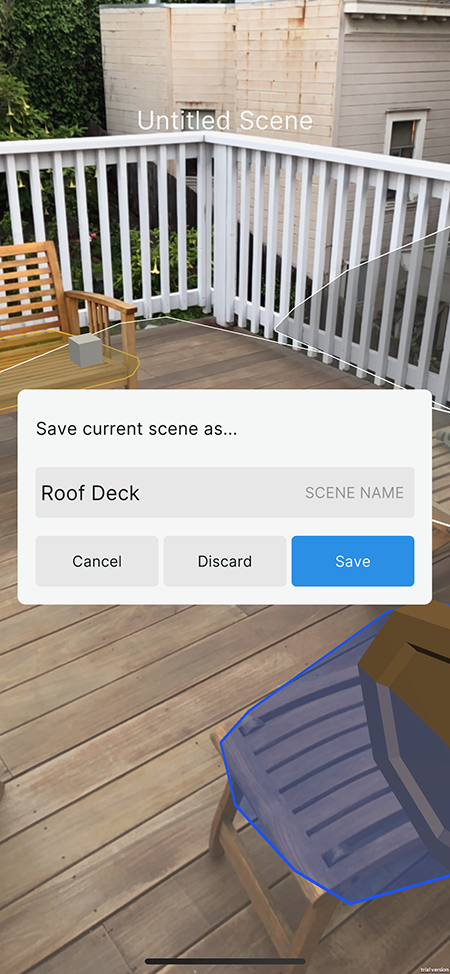
Tap Cancel to dismiss the view and continue editing. Tap Discard to discard changes and revert the scene to the state it was in before you entered the Proxy Scan Flow.
Tap Save to save the scene. This will save the scene to the cloud, add it to the resource list, and cache a local version to the device's local storage. You can rename the scene using the text field above the three buttons.
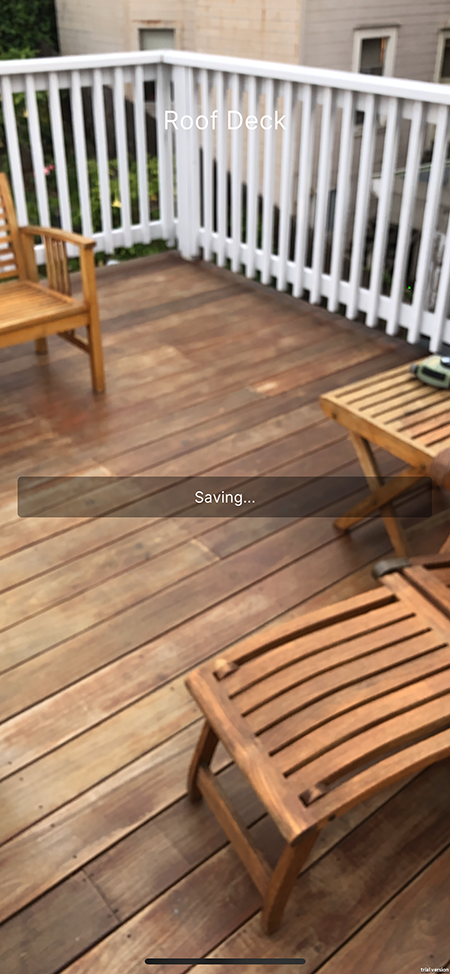
Saving might take a while for complex scenes, or if your connection times out. If the project is not linked, saving is generally much quicker. Otherwise, even if the device is in airplane mode, the app will still attempt a connection, which might take a few seconds.
Environment Capture workflow
Enter the Environment Capture workflow from the Home view.
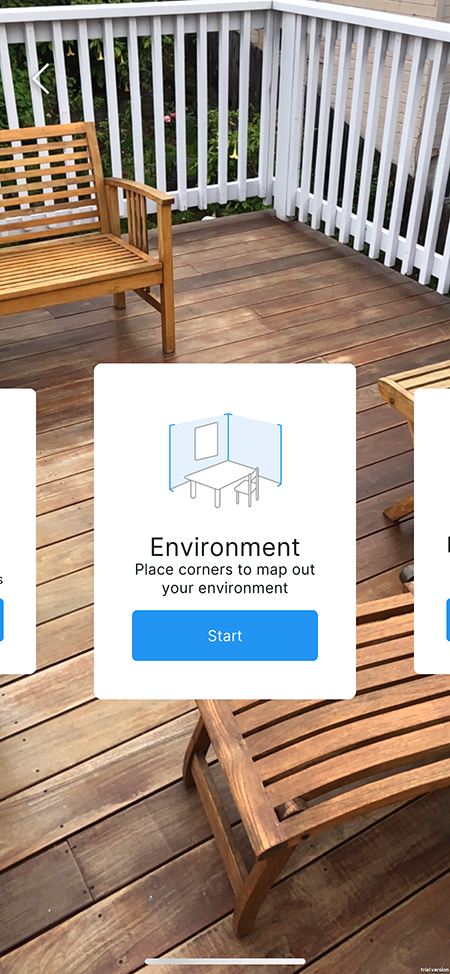
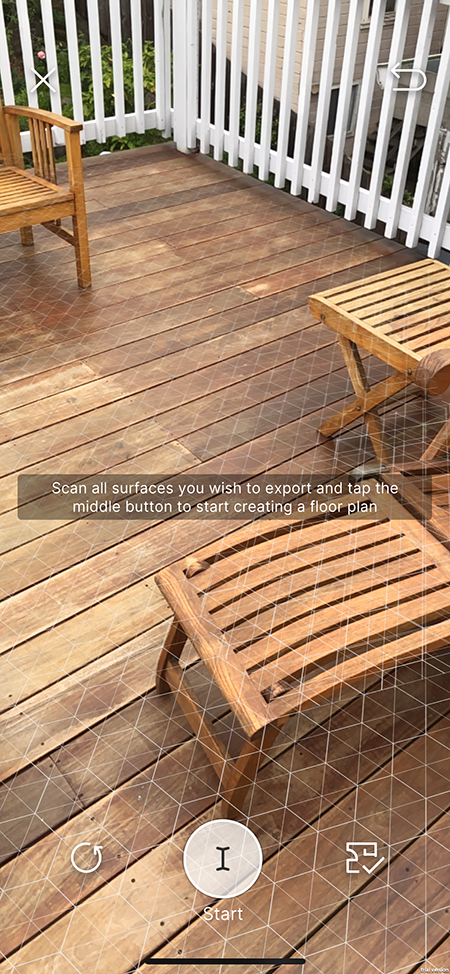
The purpose of this flow is to capture the room as a synthetic environment for use in the Editor. You should scan all of the surfaces you wish to capture, including the floor. At any time during the flow, you can press the Restart button on the left to remove all surfaces, clear the floor plan, and restart scanning.
When you are done scanning all surfaces you wish to capture, press Start. This button becomes active as soon as MARS has recognized the floor:
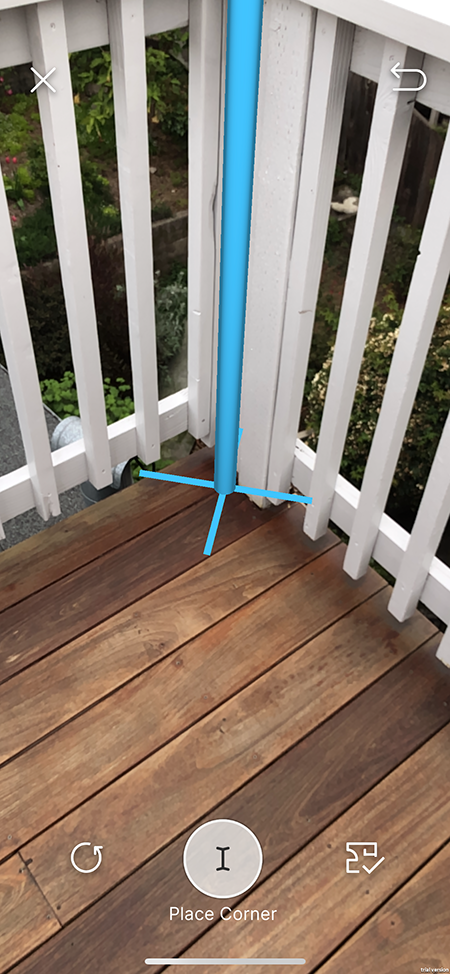
When you press Start, the surface visuals will disappear, and a Cursor Post will appear. The Cursor Post is anchored to the floor so that the bottom of the post lines up with the center of the screen. Tapping Place Corner will begin a Floor Plan which allows you to capture the walls of the room, in case you were not able to scan them as surfaces.
To complete the flow and save the environment, with or without a floor plan, tap the Finish button on the right at any time.
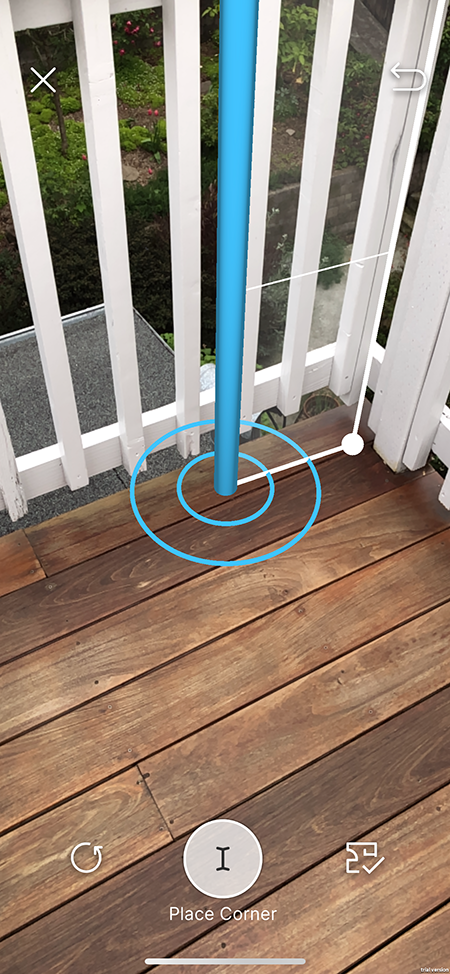
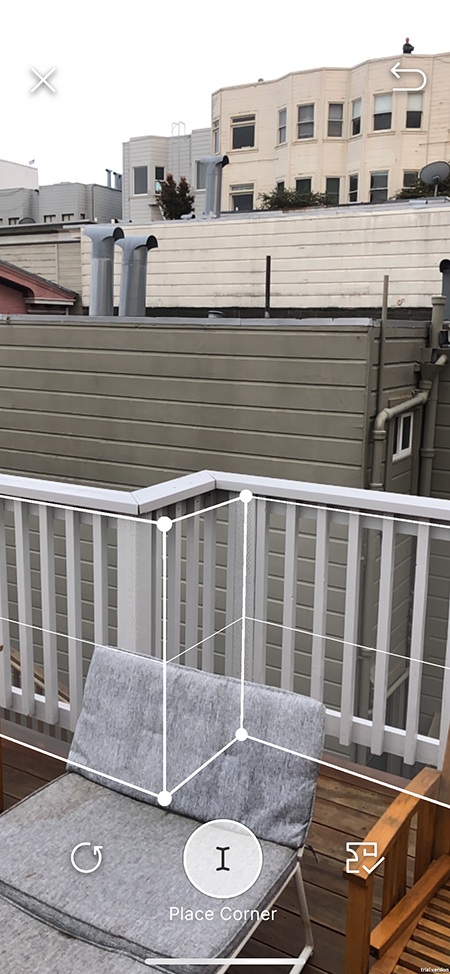
After placing the first corner, you will see a wall outline between the first corner and the cursor. Keep tapping Place Corner to add more walls. The Place Corner button will be disabled if the cursor is too close to an existing corner.
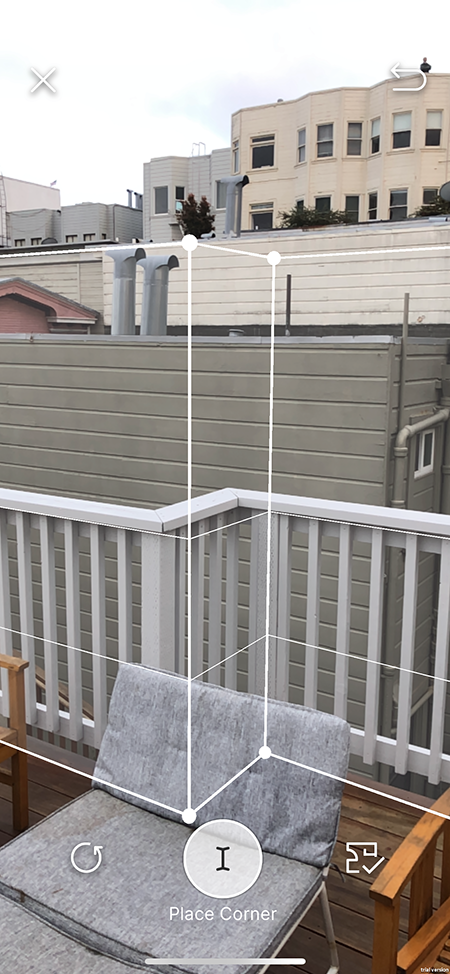
While you are placing corners, you can swipe up and down anywhere on the screen to adjust the height of the walls.
It is often easiest to adjust wall height after you have placed a few corners.
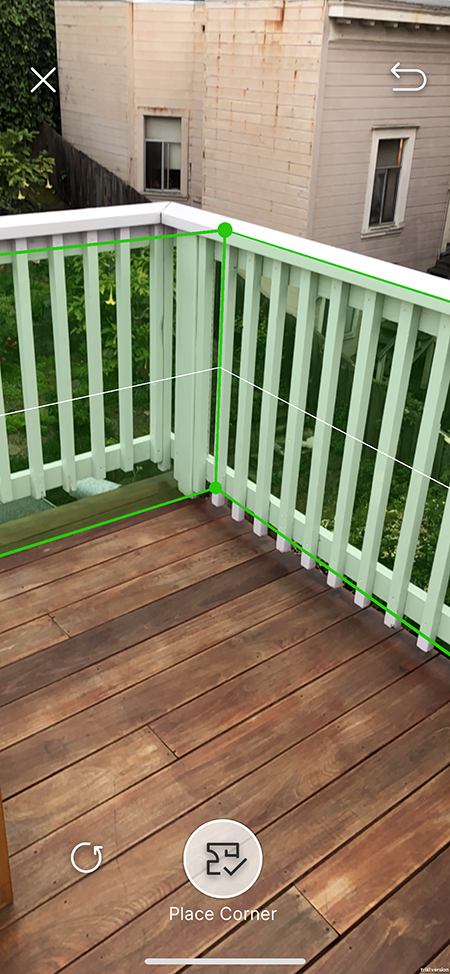
If you have at least two walls and line up the cursor with the first corner, the walls will turn green and the Place Corner button will be replaced by the Finish button.
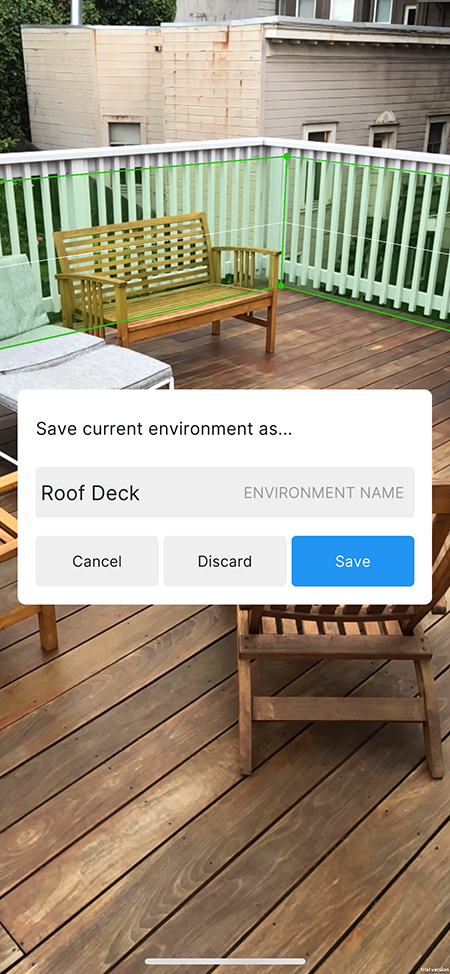
Whenever you tap Finish, the app will prompt you to save the environment
Tap Cancel to dismiss the view and continue editing the floor plan or restart. Tap Discard to discard the environment. Tap Save to save the environment. This will save the environment to the cloud, add it to the resource list, and cache a local version to the device's local storage. You can rename the environment using the text field above the three buttons.
Marker Capture workflow
Enter the Marker Capture workflow from the Home view.
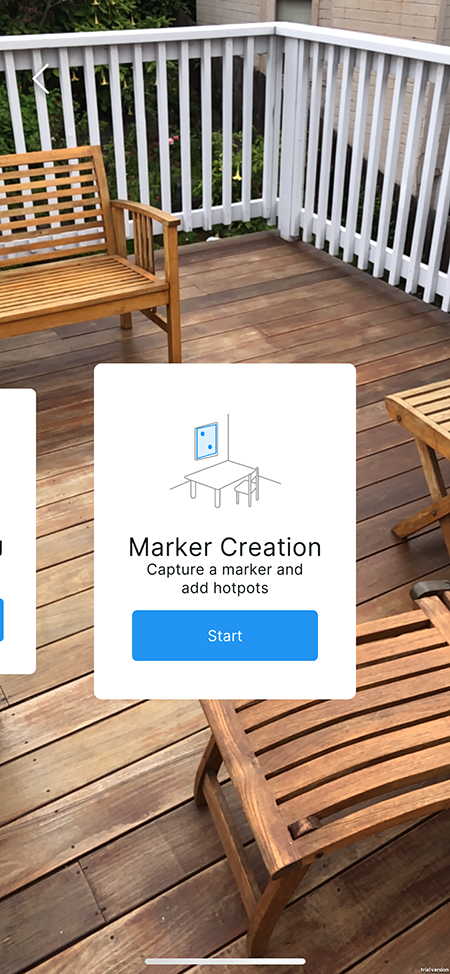
The purpose of this flow is to capture an image for use as an Image Tracking Marker and identify Hotspots on the image.
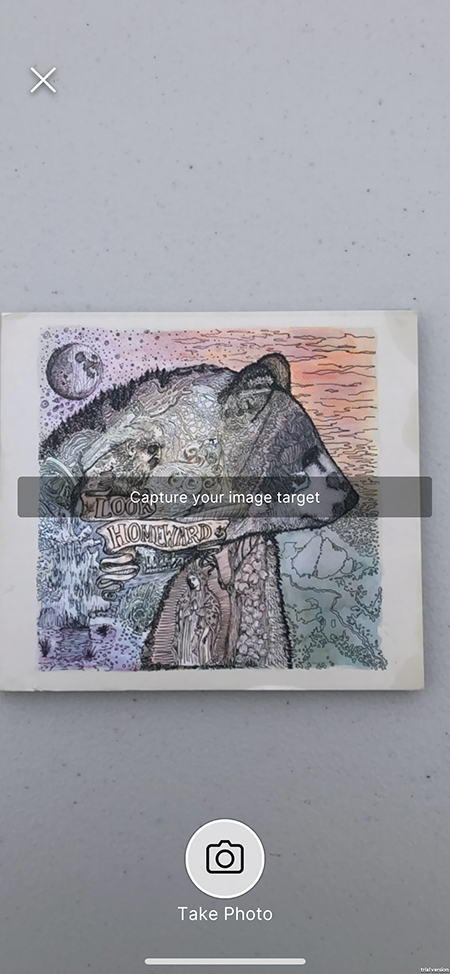
Tap Take Photo to capture the current camera image.
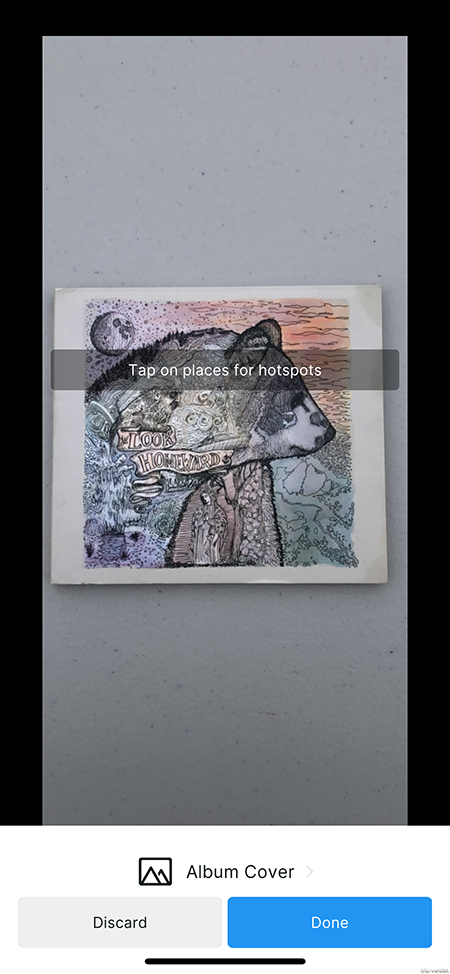
Tap anywhere on the image to add a Hotspot.
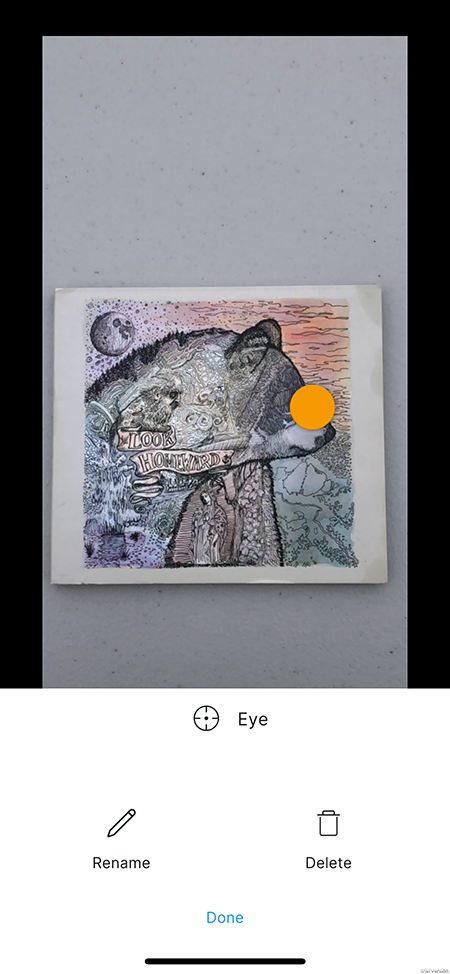
Tap Done to return to the previous menu, or Delete to delete the hotspot.
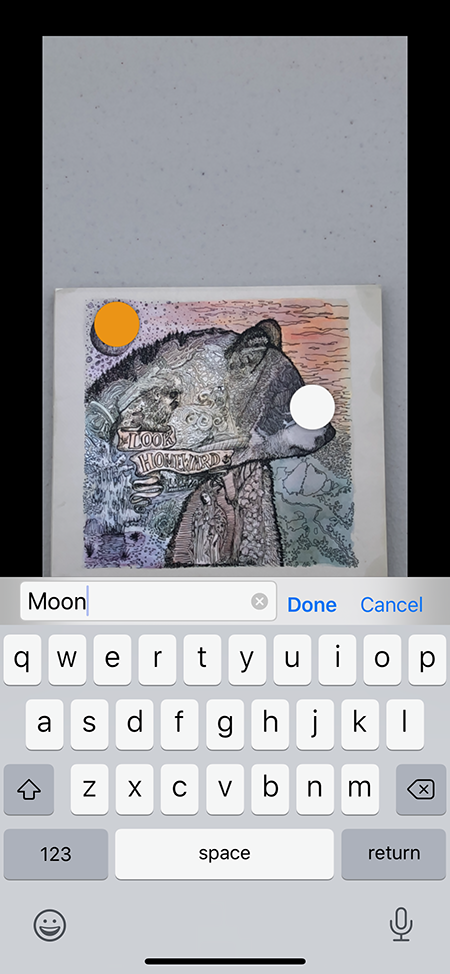
Tap Rename to rename the hotspot.
Back in the previous screen, tap the name of the maker to rename it, Discard to discard it and return to the Capture View, or Done to save the marker to the cloud, add it to the resource list and save a local copy. This will also bring you back to the Capture View so that you can capture another image.
Tap the X to retun to the home view.
Record Data workflow
Enter the Record Data workflow from the Home view:

The purpose of this flow is to create a data recording for playback in the Simulation view. You can either begin recording immediately, or scan some surfaces first so that they exist at the beginning of the recording. Surface scanning begins immediately when you enter the Record Data Flow:
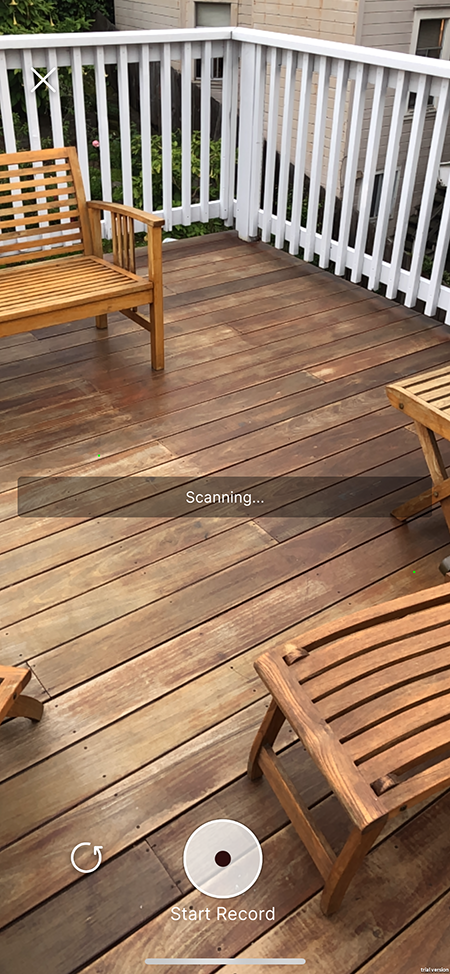
Tap Start Record to start recording video, camera pose, and surface events:
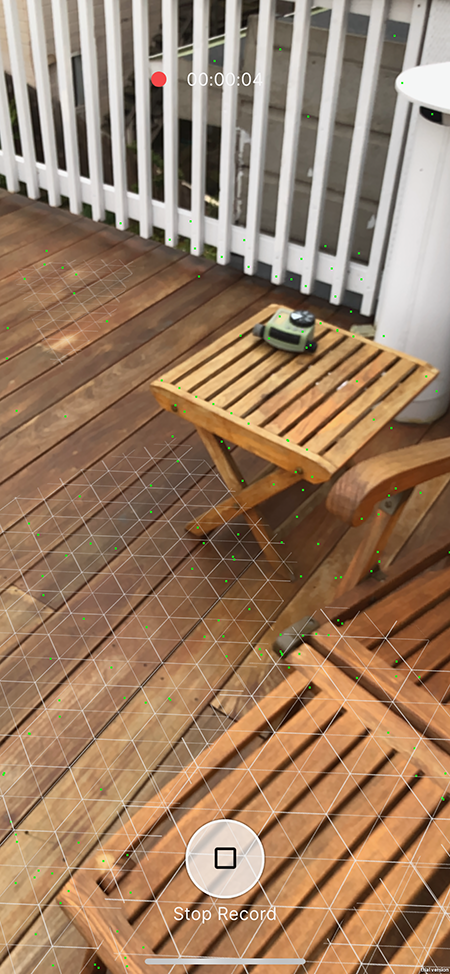
The timer at the top of the screen will indicate the current length of the recording. Tap Stop Record to stop recording and finalize the video:

Tap Untitled Recording to rename the recordin. Tap Discard to discard it, or Save to save the recording and upload the video and data to the cloud, and save the cached version to local device storage.
Technical details
Requirements
This version of MARS Companion Mobile is compatible with the following versions of the Unity Editor:
- 2019.2 and later (recommended)
Known limitations
MARS Companion Mobile version 0.1 includes the following known limitations:
- Android video recordings include UI and visualizers.
- Project link screen shows "Project ID Invalid" if user skipped sign-in.
- Parts of the app are missing progress bars or loading screens, and may appear to stall or fail to indicate progress.
- There is no limitation on data recording length; long recordings might crash the app.
- Scenes published from the Editor may reference script types which don't exist in the build of the app, causing import errors.
- Prefab overrides are not supported, and will be missing in exported scenes.
Document revision history
| Date | Reason |
|---|---|
| Apr 09, 2020 | 0.1.0 release |
| Oct 20, 2019 | Document created. |