Actions
Actions are an important concept in the Input System. They allow you to separate the purpose of an input from the device controls which perform that input. For example, the purpose of an input in a game might be to make the player's character move around. The device control associated with that action might be the motion of the left gamepad stick.
To associate an action with one or more device controls, you set up input bindings in the Input Actions Editor. Then you can refer to those actions in your code, instead of the specific devices. The input bindings define which device's controls are used to perform the action. For example this screenshot shows the "Move" action's bindings to the left gamepad stick and the keyboard's arrow keys.
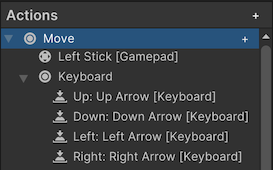
The Actions panel of the Input Actions Project Settings window
When you get a reference to an action in your code, you can use it to check its value, or attach a callback method to be notified when it is performed. For a simple example script demonstrating this, refer to Workflow Overview - Actions.
Actions also make it simpler to create a system that lets your players customize their bindings at runtime, which is a common requirement for games.
Note
Actions are a runtime-only feature. You can't use them in Editor window code.
You can read input without using actions and bindings by directly reading specific device controls. This is less flexible, but can be quicker to implement for certain situations. For more information, refer to Workflow Overview - Directly Reading Device States.
Although you can reorder actions in this window, the ordering is for visual convenience only, and does not affect the order in which the actions are triggered in your code. If multiple actions are performed in the same frame, the order in which they are reported by the Input System is undefined. To avoid problems, you should not write code that assumes they will be reported in a particular order.
Scripting access
Here are several important APIs you can use to script with actions in the Input System:
| API name | Description |
|---|---|
InputSystem.actions |
A reference to the set of actions assigned as project-wide actions. |
InputActionMap |
A named collection of input actions, treated as a group. This is the API equivalent to an entry in the "Action Maps" panel of the Input Actions Editor. |
InputAction |
A named action that can return the current value of the controls that it is bound to, or can trigger callbacks in response to input. This is the API equivalent to an entry in the "Actions" panel of the Input Actions Editor. |
InputBinding |
The relationship between an action and the specific device controls for which it receives input. For more information about Bindings and how to use them, refer to Input Bindings. |
Each action has a name (InputAction.name), which must be unique within the action map that the action belongs to, if any (see InputAction.actionMap). Each action also has a unique ID (InputAction.id), which you can use to reference the action. The ID remains the same even if you rename the action.
Each action map has a name (InputActionMap.name), which must also be unique with respect to the other action maps present, if any. Each action map also has a unique ID (InputActionMap.id), which you can use to reference the action map. The ID remains the same even if you rename the action map.
Create actions
Use the Input Actions Editor in the Project Settings window to create actions. This is the recommended workflow if you want to organize all your input actions and bindings in one place, to apply across the whole project. This workflow works for most types of game or app.
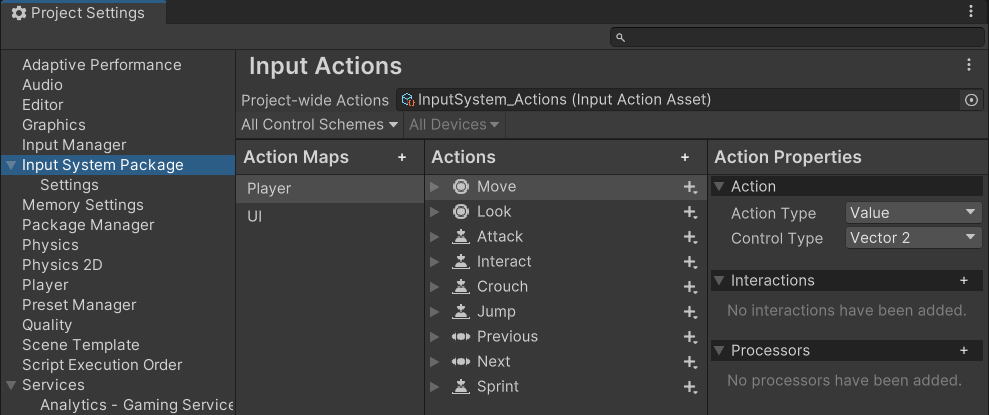 The Input Actions Editor in the Project Settings window
The Input System package API is open and flexible, which provides a lot of flexibility to suit less common scenarios. So if you want to customize your project beyond the standard workflow, you can use these alternative techniques to create actions:
- Declare actions in MonoBehaviour components
- Load actions from JSON data
- Create actions entirely in code
Declare actions in MonoBehaviours
You can declare individual InputAction and InputActionMap objects as fields directly inside MonoBehaviour components.
using UnityEngine;
using UnityEngine.InputSystem;

public class ExampleScript : MonoBehaviour
{
    public InputAction move;
    public InputAction jump;
}
The result is similar to using an action defined in the Input Actions Editor, except that you define the actions in the GameObject's properties and save them as scene or prefab data, instead of in a dedicated asset.
When you define serialized InputAction fields in a MonoBehaviour component to embed actions, the GameObject's Inspector window displays a script component similar to the "Actions" panel of the Input Actions Editor:
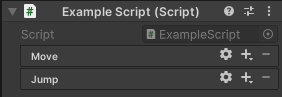
This interface allows you to set up the bindings for those actions. For example:
- To add or remove actions or bindings, select the Add (+) or Remove (-) icon on the action.
- To edit actions, select the gear icon on individual action properties.
- To edit bindings, double-click them.
- To open the context menu, right-click an entry.
- To duplicate an entry, hold the Alt key while dragging it.
Unlike the project-wide actions in the Project Settings window, you must manually enable and disable actions and action maps that are embedded in MonoBehaviour components.
When you use this workflow, the serialized action configurations are stored with the parent GameObject as part of the scene, instead of being serialized with an action asset. This can be useful if you want to bundle the control bindings and behavior together in a single MonoBehaviour or prefab, so it can be distributed together. However, this can also make it harder to organize your full set of control bindings if they are distributed across multiple prefabs or scenes.
Load actions from JSON
You can load actions as JSON in the form of a set of action maps or as a full InputActionAsset. This also works at runtime in the Player.
// Load a set of action maps from JSON.
var maps = InputActionMap.FromJson(json);

// Load an entire InputActionAsset from JSON.
var asset = InputActionAsset.FromJson(json);
Create actions in code
You can manually create and configure actions entirely in code, including assigning the bindings. This also works at runtime in the Player. For example:
// Create free-standing actions.
var lookAction = new InputAction("look", binding: "<Gamepad>/leftStick");
var moveAction = new InputAction("move", binding: "<Gamepad>/rightStick");

lookAction.AddBinding("<Mouse>/delta");
moveAction.AddCompositeBinding("Dpad")
    .With("Up", "<Keyboard>/w")
    .With("Down", "<Keyboard>/s")
    .With("Left", "<Keyboard>/a")
    .With("Right", "<Keyboard>/d");

// Create an action map with actions.
var map = new InputActionMap("Gameplay");
var lookAction = map.AddAction("look");
lookAction.AddBinding("<Gamepad>/leftStick");

// Create an action asset.
var asset = ScriptableObject.CreateInstance<InputActionAsset>();
var gameplayMap = new InputActionMap("gameplay");
asset.AddActionMap(gameplayMap);
var lookAction = gameplayMap.AddAction("look", "<Gamepad>/leftStick");
Any action that you create in this way during Play mode doesn't persist in the input action asset after you exit Play mode. This means you can test your application in a realistic manner in the Editor without having to worry about inadvertently modifying the asset.
Enable actions
Actions have an enabled state, meaning you can enable or disable them to suit different situations.
If you have an action asset assigned as project-wide, the actions it contains are enabled by default and ready to use.
For actions defined elsewhere, such as in an action asset not assigned as project-wide, or defined your own code, they begin in a disabled state, and you must enable them before they will respond to input.
You can enable actions individually, or as a group by enabling the action map which contains them.
// Enable a single action.
lookAction.Enable();

// Enable an en entire action map.
gameplayActions.Enable();
When you enable an action, the Input System resolves its bindings, unless it has done so already, or if the set of devices that the action can use has not changed. For more details about this process, refer to the documentation on binding resolution.
You can't change certain aspects of the configuration, such as action bindings, while an action is enabled. To stop actions or action maps from responding to input, call Disable.
While enabled, an action actively monitors the controls it's bound to. If a bound control changes state, the action processes the change. If the control's change represents an interaction change, the action creates a response. All of this happens during the Input System update logic. Depending on the update mode selected in the input settings, this happens once every frame, once every fixed update, or manually if updates are set to manual.