Toolbox
After import, 3D models may need to be...
- Fixed: for example, meshes showing defects like cracks or flipped normals.
- Beautified: for example, add UVs on meshes to apply materials with repeatable textures.
- Re-arranged: for example, merge/separate GameObjects logically.
- Optimized: for example, decrease a high triangles count.
...to be ready for an optimal real-time usage.
The Toolbox offers a set of Actions for manual, post-import operations.
These actions are also the foundation of Rules, which offer the same set of actions, but executed on a selection created with filters (see Rule Engine). Use the Toolbox to find a convenient chain of actions for creating a Rule (which can be then associated with an Import script).
You can use the Toolbox for any 3D asset in Unity, including those that you haven't imported using Asset Transformer Toolkit.
Note
The Toolbox preserves the animations and bones of assets, for examples from .fbx files.
How to use
The Toolbox is made of a dedicated Asset Transformer Toolkit toolbar, docked at the bottom of the Scene View, displayed after the installation of the package.
Use the Toolbox buttons to import files in your project, and perform data preparation actions with the action buttons.
Note
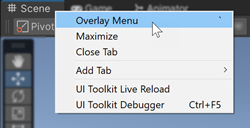
If the Toolbox is missing or disappears, right-click the title of the Scene View panel > Overlay Menu > Asset Transformer Toolkit Toolbox
Important
The Unity Editor does not handle selections of more than 1,000 GameObjects well, which means the Toolbox will not work properly with these large selections. Be mindful of the size of your selection and avoid using Get Actions, as it may include thousands of GameObjects. If this limitation is problematic, consider using the Rule Engine instead. The Rule Engine allows selections of any size without restrictions.
Custom actions
The Toolbox can be extended with custom actions that you can write yourself: see Create Custom Actions.
Note
Custom actions can also be used in the Rule Engine.