Setting up Variants
Variants are custom variations of your Prefab Asset that you can show to consumers when they make different selections in your application. For example, if you have a Prefab Asset for a car, you can create Variants for different customizations of the car. Forma supports two types of Variants that you can use to determine how the configurator displays your product when users select different customizations in your application:
Material Variants let you assign different materials to specific items of your product in Forma. Each Material Variant in Material Variant Set in the same Material Variant Set represents a different material that the user can select.
Visibility Variants: let you show or hide specific items of your product in the Forma. Each Visibility Variant in a Visibility Variant Set represents a different selection of visible items.
To specify the initial state of your product when a user opens your application, you can define a Default Configuration before you export it. For each Variant Set, you can select a single Variant for the configurator to display by default.
Tell me about ...
- Setting up Material Variants
- Setting up Visibility Variants
- Verifying that Variants function correctly
- Changing the internal name of a Variant
- Changing the display name of a Variant
- Setting up the default product configuration
Setting up Material Variants
Before you can add a Material Variant, you must add a Material Variant Set. By default, the system adds a Material Variant to each new set that you can configure.
Adding Material Variants involves these steps:
A. Adding a new Material Variant Set to contain the new Variant
B. Associating the new Material Variant to the elements of your product that will share the material
C. Assigning a specific material to the Variant
D. Adding other Material Variants to the set as needed
A. Add a new Material Variant Set
In the Configurator window, select Product tab.

To add the Material Variant Set that will contain the new Material Variant, select Add > Material Variant Set.
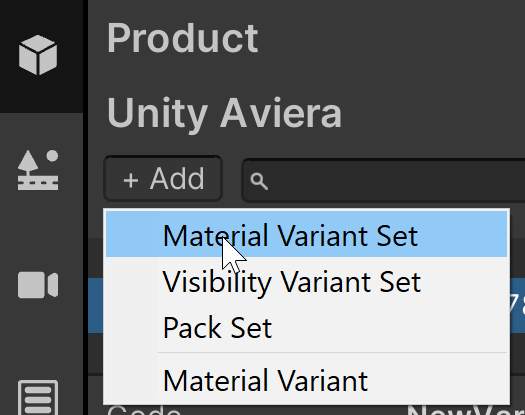
The system creates the new Set and gives it a unique name that you can change.
B. Associate the new Material Variant with parts of your product
In the Product window, find the new Material Variant Set and select it.
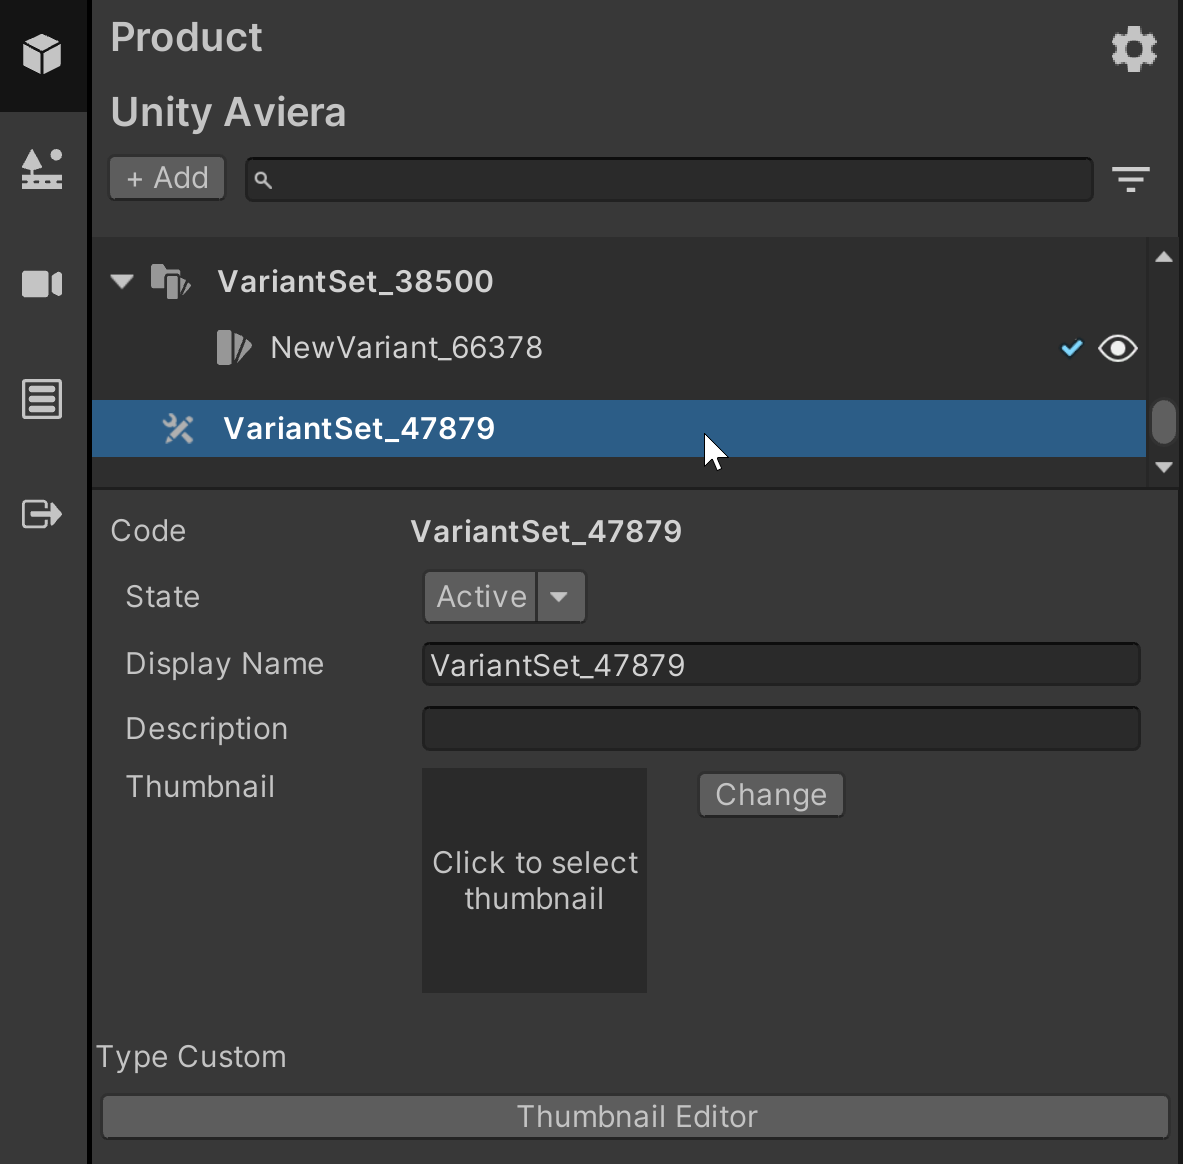
To add a new Variant to the set, right click on the selected set and then select Add Variant.
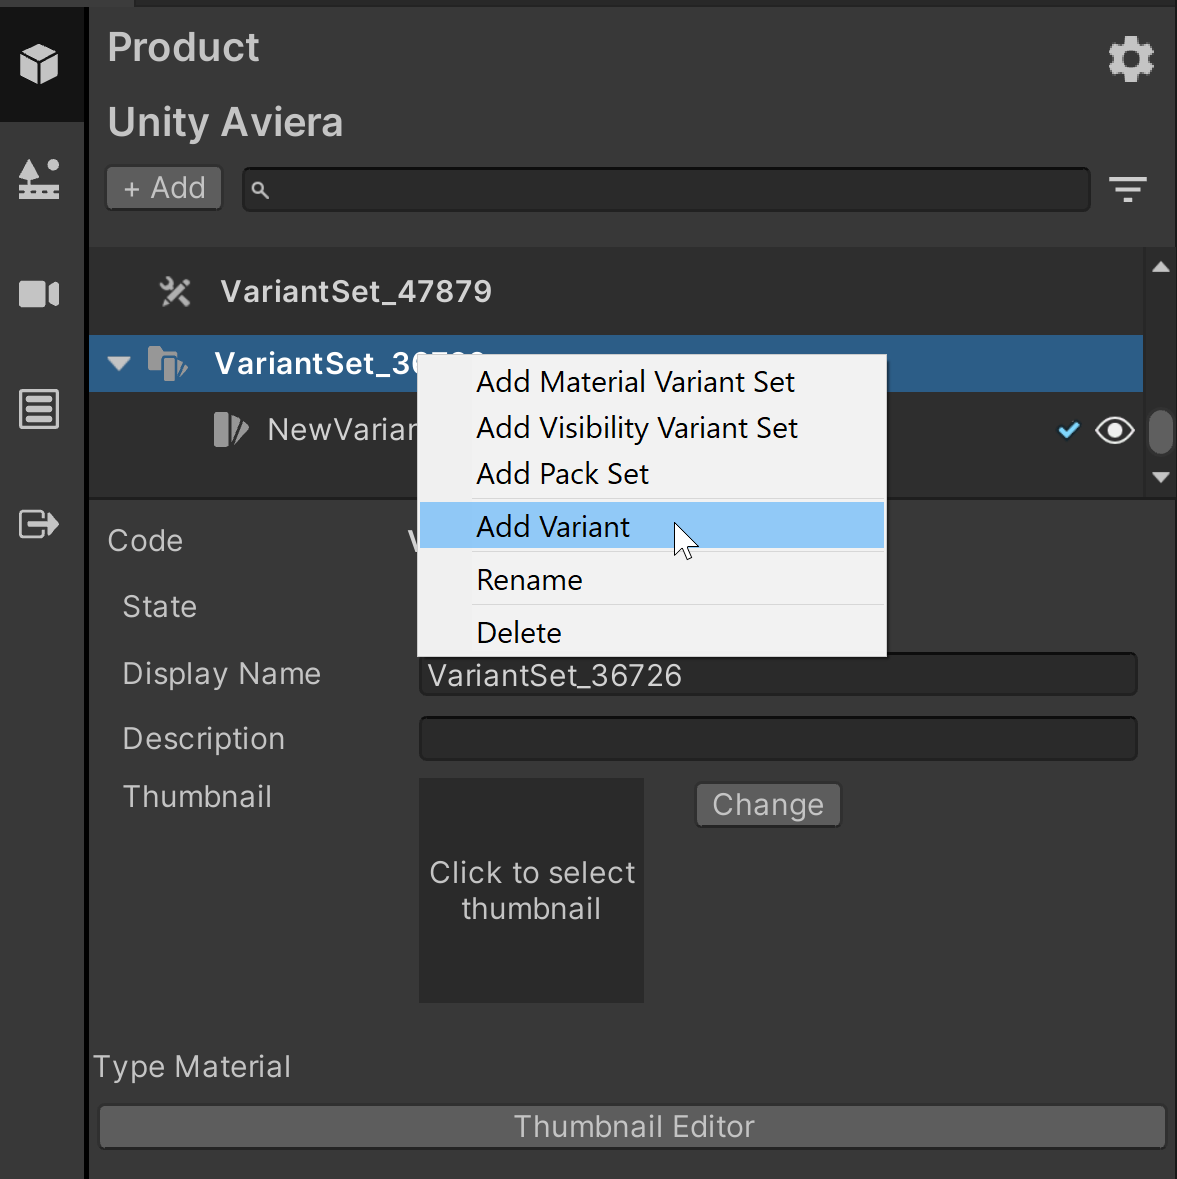
Select the new Variant under the Material Variant Set.
In the Product Outline (on the right), select a product part that uses the material that you want to create a variant for.
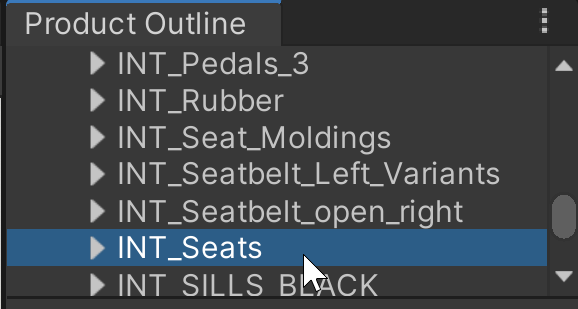
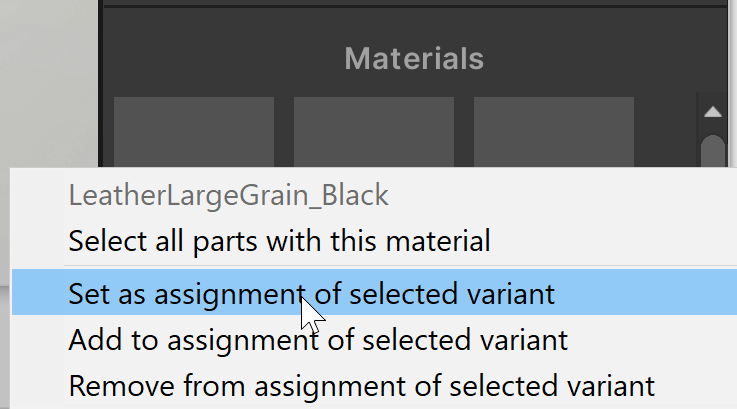
In the Materials list for the part, right-click on the material you want to associate with the new Variant (in the Materials list) and select Set as assignment of selected Variant.
All the elements that share the material should now appear in the list of Assignments for the new Material Variant.
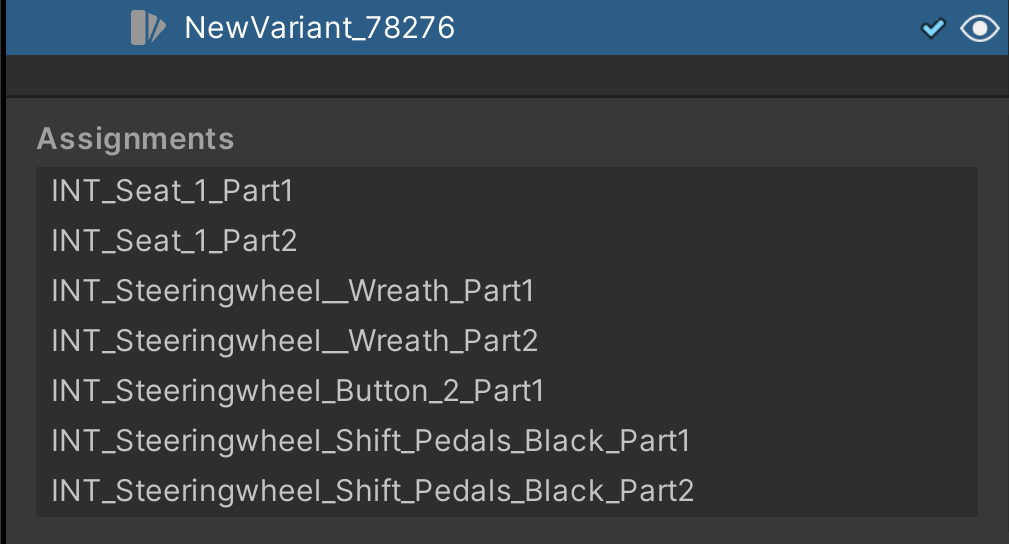
The material for each element will be determined by the material you associate with the new Variant.
Now, you must select a material for the Variant.
C. Assign a material to the Material Variant
To assign a material to the new Variant, in the Configurator tab, use the Select Material button to select the material you want from the list. 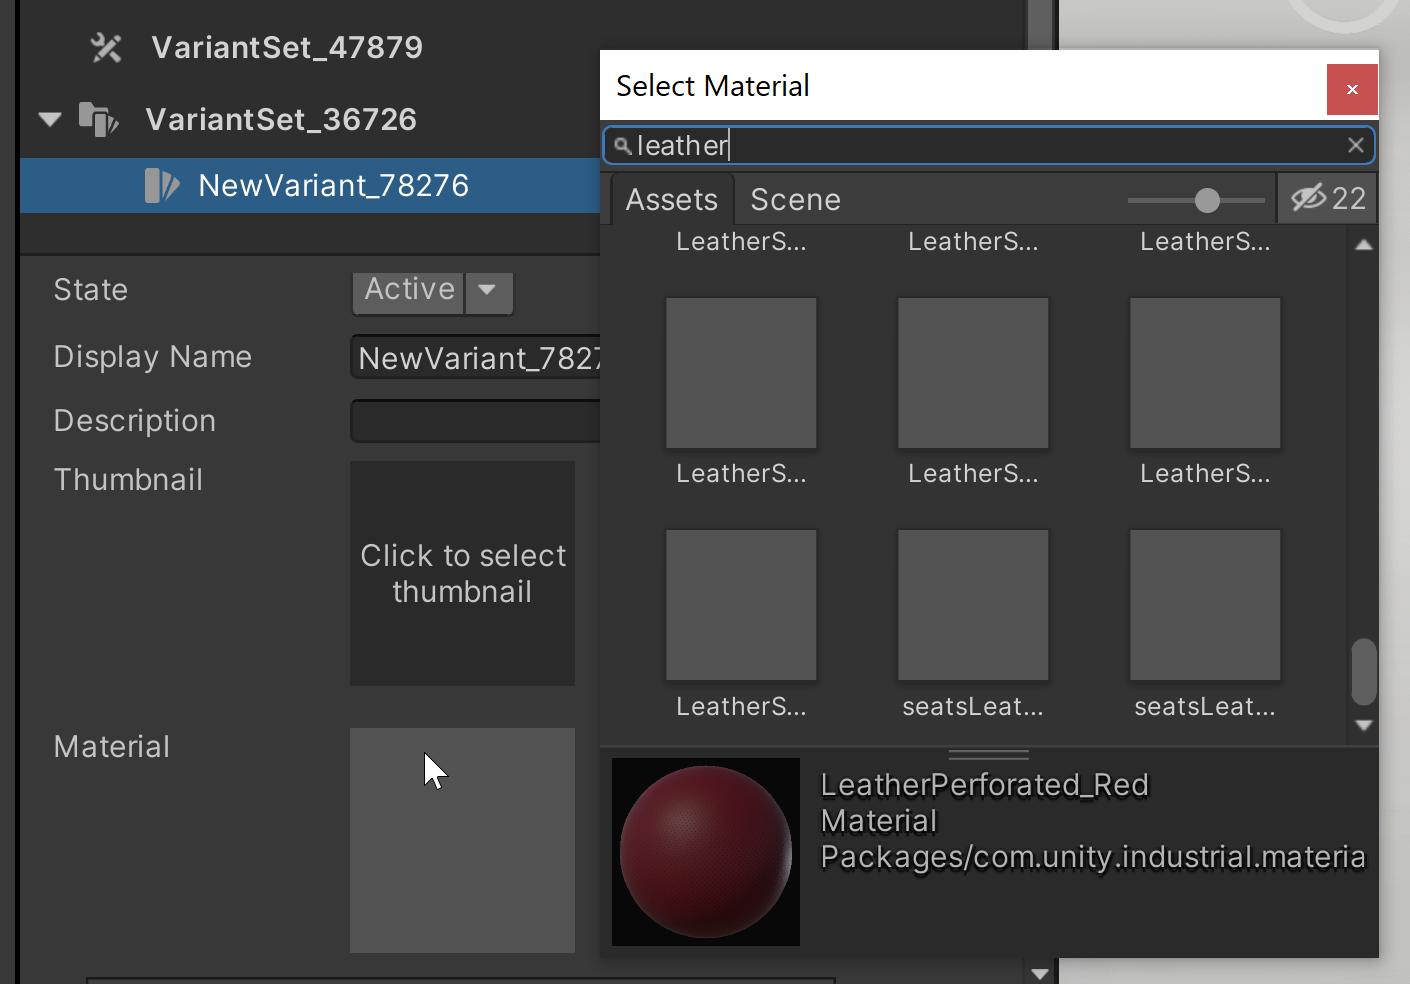
D. Add another Material Variant in the set
When you add a second Variant, it inherits settings from the Assignments you defined for the first Variant in the set.
To add a another Variant to the set, follow these steps:
Select Add > Material Variant.
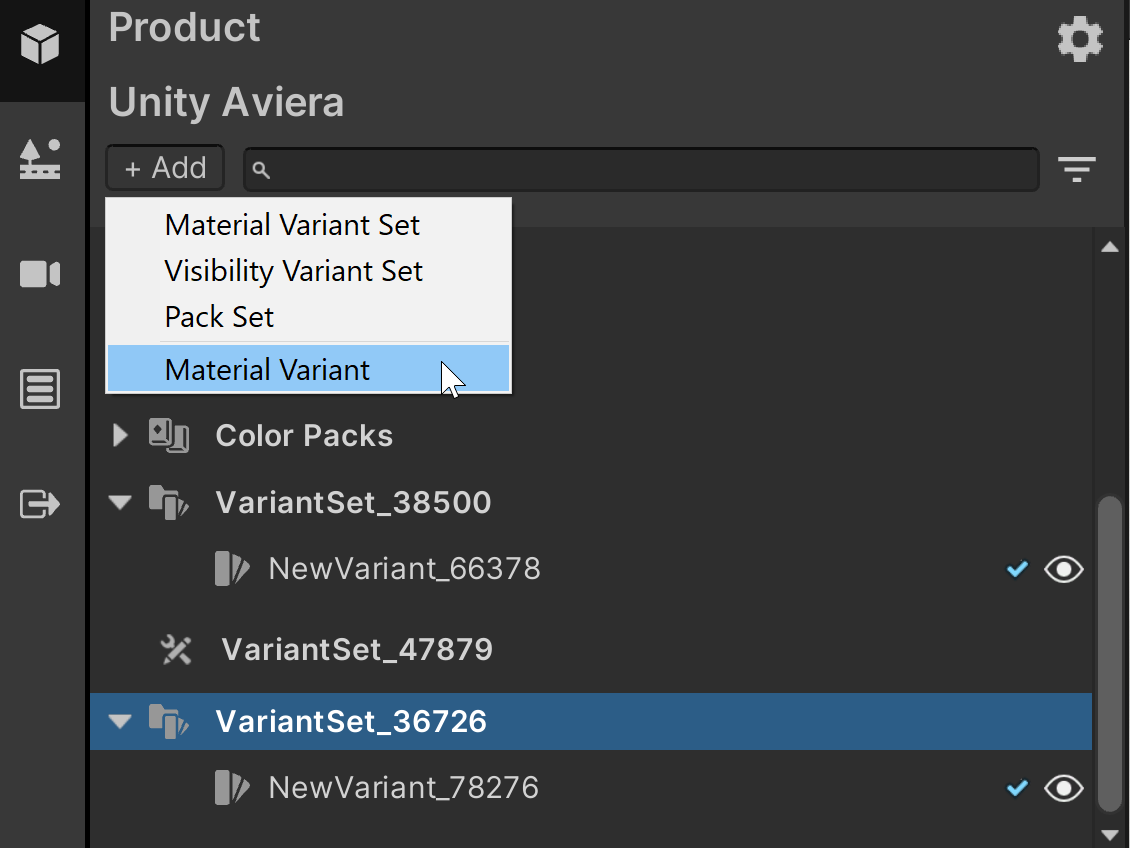
Select the new Variant.
Use the Select Material button to find a material for the new Variant (different from the material it inherited from the first Variant).
Add subsequent Variants as needed.
Setting up Visibility Variants
Before you can add a Visibility Variant, you must add Visibility Variant Set. By default, the system adds a Visibility Variant that you can configure to each new set when you create it.
Setting up Visibility Variants involves these steps:
A. Adding a new Visibility Variant Set to contain the new Variant
B. Associate the new Variant with the parts of your product you will use the Variant to show or hide.
C. Adding other Visibility Variants as needed.
A. Add a new Visibility Variant Set
In the Configurator tab (left pane), select Product Setup.

Select Add > Visibility Variant Set.
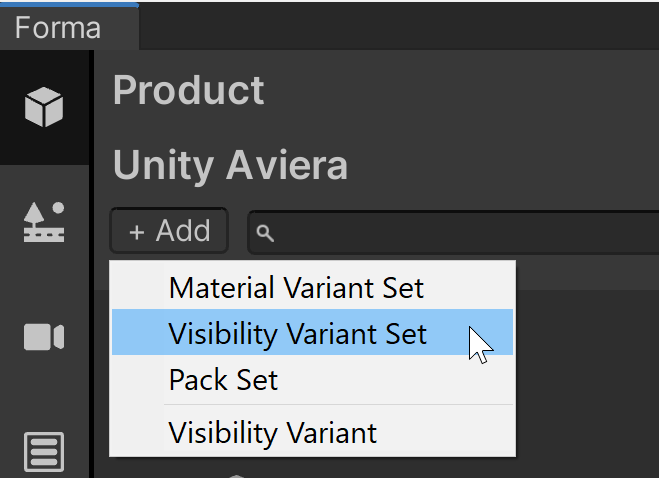
When you create a new set, the system automatically adds a first Variant to it for you to configure.
B. Associate the new Variant with the parts of your product you will use it to show or hide
Select the new Variant Set.
Select the new Variant in the Set.
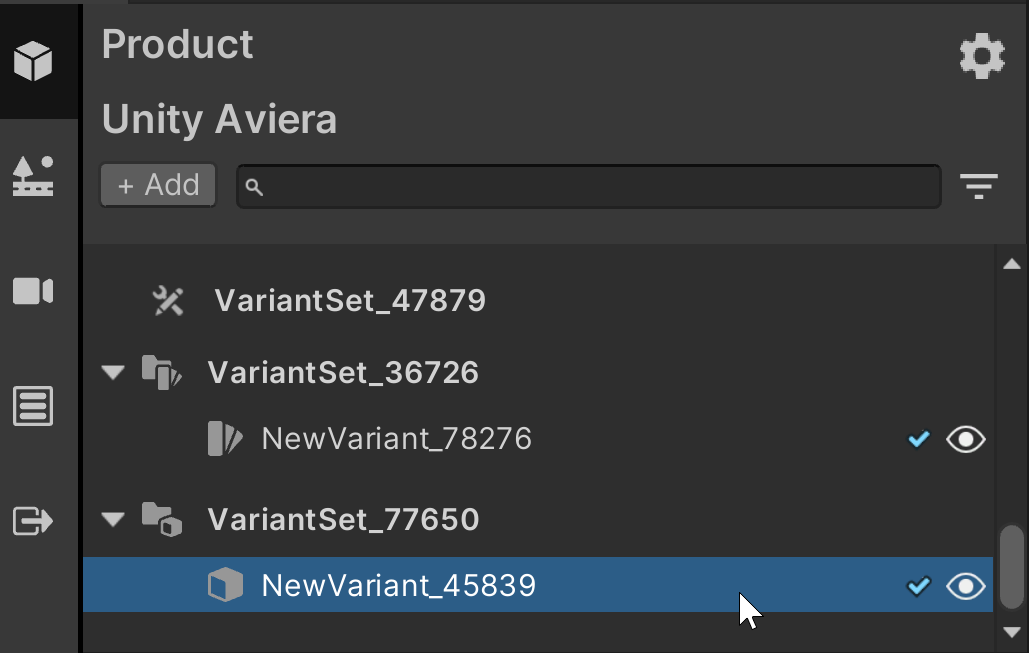
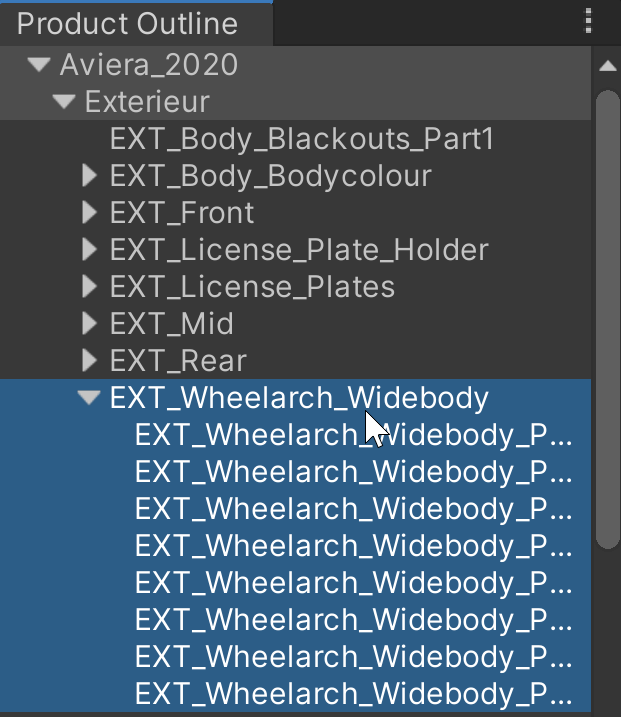
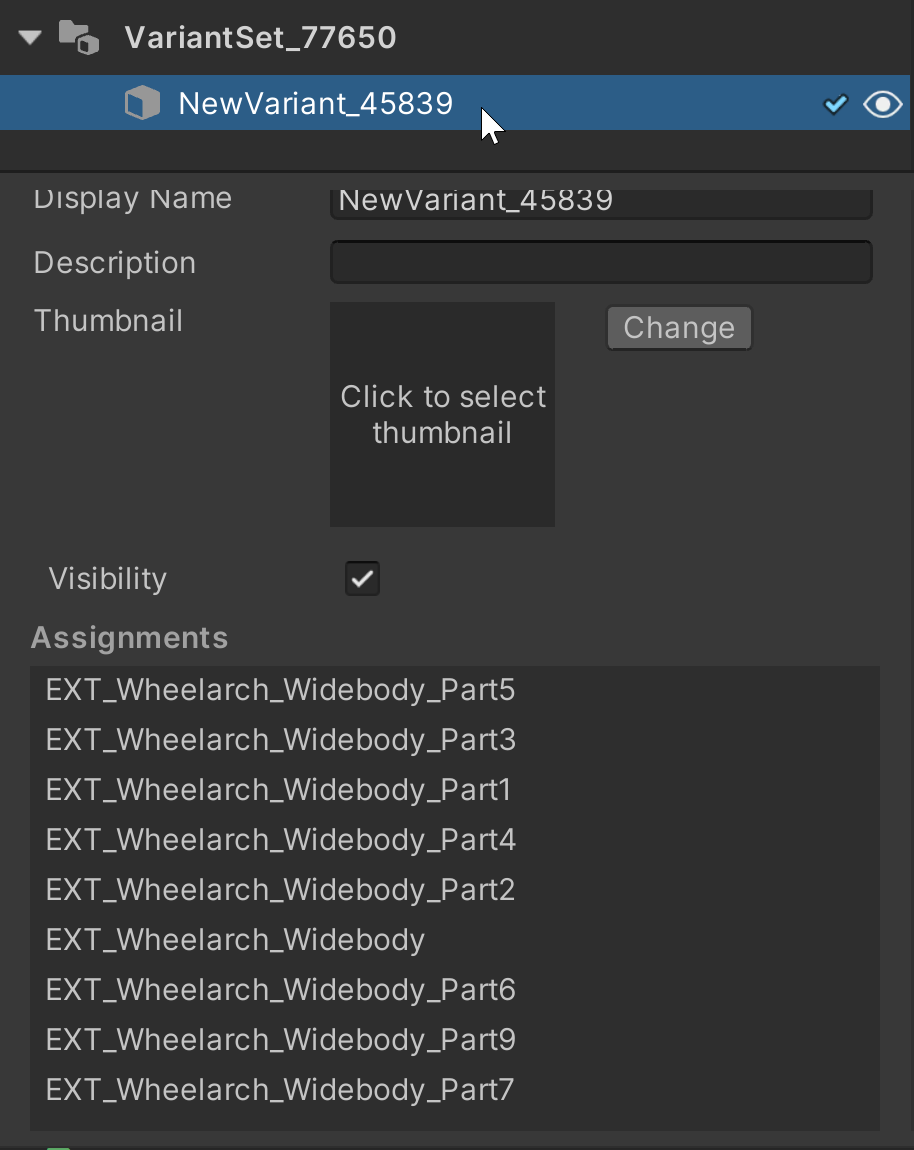
In the Product Outline tab (on the right), select the parts of your product that you want to associate with this Variant.
Right-click on your selection and select Add to assignments of <Insert-Variant-Name>.
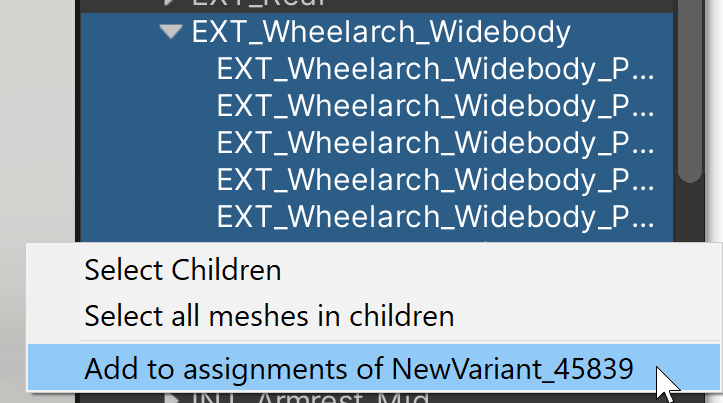
All selected elements of your product appear in the Assignments list for the Variant. Now you can use the Variant to determine when the elements are visible in the application.
C. Adding more Visibility Variants to the Set
When you add a subsequent Visibility Variant to a set, it automatically excludes product elements that you assigned to the first Visibility Variant.
Assignments connect elements of your product with the Variant that determines when they are visible or invisible to the consumer.
If you need a Variant that will hide all the elements of your product, you can add a Visibility Variant with no Assignments.
To add another Variants to the set, follow these steps:
Select Add > Visibility Variant.
Select the new Variant. Note: By default, the second Visibility Variant you create excludes the elements of your product that are assigned to the first Visibility Variant you created.
Modify or add Assignments to associate the new Variant with the group of elements that you will use to determine visibility for.
Note: You can apply multiple Visibility Variants to the same product element.
Add more Variants as needed.
Verifying that Variants function correctly
It can be helpful to verify that the Variants you add show and hide the correct elements or material in the configurator.
To see how a specific Variant affects your product in preview, follow these steps:
- Find the Variant you want to test in the list.
To the right of the Variant name, select the preview (eye) icon.

The system shows a preview that you can use to make sure the correct elements or materials are visible.
Changing the internal name of a Variant
To make it easier to find different variants while you set up the configurator, you can give any Variant or Set an internal name.
To edit the internal name of a Variant, follow these steps:
Find the Variant you want to rename.
At the top of the properties for the Variant, select the name and enter a new one.
Changing the display name of a Variant
You can control the information that consumers see about a Variant when they use your configurator.
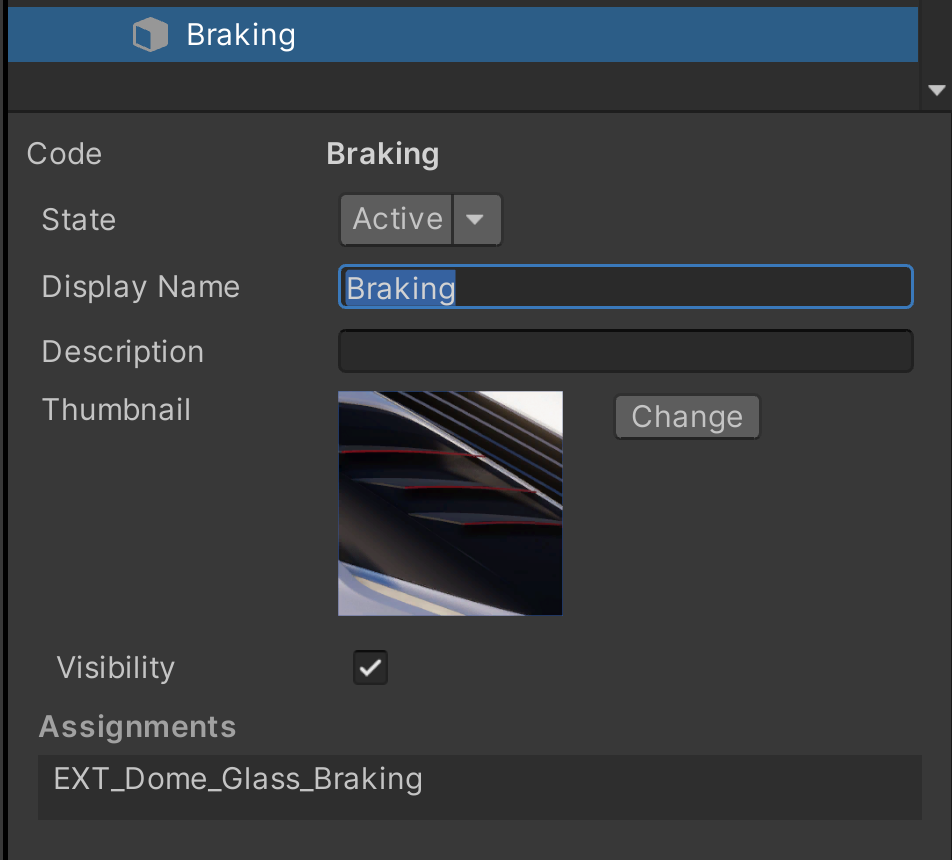
In the properties for any Variant or Variant Set, you can add a Name, Description, and Thumbnail to display to consumers.
Showing and hiding Variants in the configurator
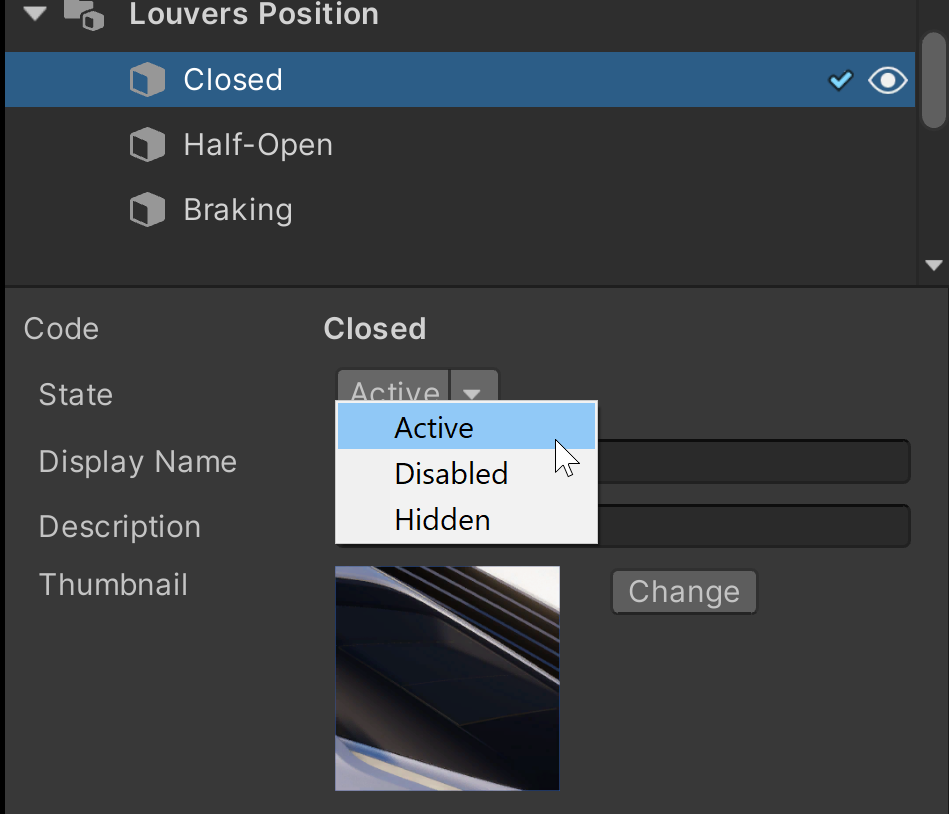
You can customize which Variants and Sets consumers can see. In the properties for any Variant, you can set the Variant to one of these states:
- Active - The Variant is displayed in the configurator and consumers can select it.
- Disabled - The Variant is displayed in the configurator but consumers cannot select it.
Hidden - The Variant is not displayed in the configurator.
Setting up the default product configuration
You can set a default configuration that determines which how the product is displayed to consumers when they open the configurator.
To set up the default configuration of your product, you must identify a default Variant in each Variant set.
Forma uses a blue checkmark to indicate which Variant is currently set as the default in a Variant Set.
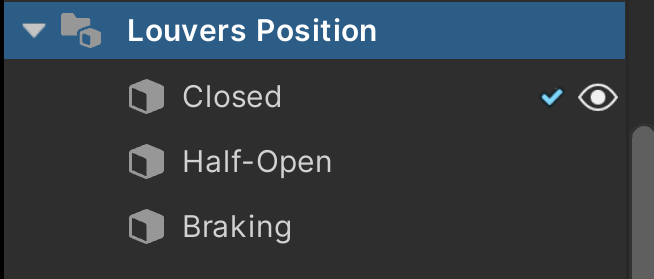
To change the default selection, right-click on the correct Variant and select Set as Default.