Configit Ace® Unity Forma Adapter Overview
The Configit Ace® Unity Forma Adapter allows you to use Configit Ace® as a rule engine in Unity Forma. After creating products in Configit Ace®, you can import them into Unity Forma, link them to 3D geometry, and visualize their configurations in real time. You can only configure one Configit Ace® product model per Unity Forma project.
Terminology
Configit Ace® and Unity Forma use different terminology to describe a product model. For consistency, this documentation uses the Unity Forma terminology. See the table below for a list of corresponding terms:
| Configit Ace® | Unity Forma |
|---|---|
| Configuration variable | Feature Set |
| Feature | Feature |
Prerequisites
To use the Configit Ace® Unity Forma Adapter, you need the following:
- Unity Editor version 2021.3+.
- Unity Forma version 4.1.1+.
- A valid Unity Forma license.
- A running Configit Ace® instance, along with its URL and API key.
- A Configit Ace® product model.
- A Unity Forma product that will serve as the visual representation of the Configit Ace® product model in the Unity Editor. More information on creating a Unity Forma product can be found here: https://docs.unity3d.com/Packages/com.unity.industrial.forma@4.1/manual/product-import.html.
Installation
To use the Configit Ace® Unity Forma Adapter, you need to install two packages. The Configit Ace Unity Forma Adapter package depends on the Configit Ace .NET API package.
Install the Configit Ace .NET API package
- From the Unity Package Manager, select Add package from git URL....
- Enter https://github.com/configit-sdk/ace-unity-integration.git?path=/com.configit.ace#v1.0.3
Depending on the packages that are already installed in the project, a library that ships with the Configit Ace .NET API might raise errors. This happens when the same library is being added more than once to the project. The error looks like this:
Multiple precompiled assemblies with the same name System.Runtime.CompilerServices.Unsafe.dll included on the current platform. Only one assembly with the same name is allowed per platform.
If this situation occurs, you will need to add a define symbol that will indicate that the System.Runtime.CompilerServices.Unsafe.dll library that ships with the Configit Ace .NET API must not be included. To do so, first open the Project Settings window via Edit > Project settings. Select the Player section in the column on the left, scroll down to Other Settings > Script Compilation, add EXCLUDE_COMPILERSERVICES to the list of Scripting Define Symbols and then press Apply. The project should now no longer raise errors about duplicate libraries.

Install the Configit Ace Unity Forma Adapter package
- From the Unity Package Manager, open the Unity Registry.
- Select Configit Ace Unity Forma Adapter.
Creating a Configit Ace® product model compatible with Unity Forma
The process for creating a Unity Forma-compatible Configit Ace® product model is different for products that contain geometry information and those that don't.
Note: Adding geometry information to a Configit Ace® product model can require customized tooling for your specific data pipeline.
Create a product model containing no geometry information
Use this method to define the product model and its rules in Configit Ace®, and to define the geometry affected by configuration changes in Forma.
Before your import your Configit Ace® product model, you must define the following properties:
| Property name | Applies to | Specification necessity | Possible values | |
|---|---|---|---|---|
| Value | Notes | |||
| ASSIGNMENTTYPE | Feature Sets | Required | MaterialAssignment |
Specifies a material Feature Set |
GameObjectVisibilityAssignment |
Specifies a GameObject visibility assignment | |||
| RUNTIMETHUMBNAIL | Features, Feature Sets |
Optional | The path to the thumbnails used by Features and Feature Sets | Path relative to the Unity project |
Create a product model containing geometry information
Use this method if your Configit Ace® product model contains information about how different Feature Sets influence the 3D model. Unity Forma uses this geometry information, specified through various properties, to construct the Variant Table and create Assignments for Features and Feature Sets.
When you import property Assignments from Configit Ace®, you don't need to redo these Assignments in Forma:
| Property name | Applies to | Specification necessity | Possible values | |
|---|---|---|---|---|
| Value | Notes | |||
| ASSIGNMENTTYPE | Feature Sets | Required | MaterialAssignment |
Specifies a material Feature Set |
GameObjectVisibilityAssignment |
Specifies a GameObject visibility assignment | |||
| ASSIGNMENTTARGETQUERYTYPE | Feature Sets | Required | StaticListMaterialSlotQueryNode |
Assignment type is MaterialAssignment |
StaticListGameObjectQueryNode |
Assignment type is GameObjectVisibilityAssignment |
|||
| ASSIGNMENTVALUEQUERYTYPE | Features | Required | StaticMaterialQueryNode |
Assignment type is MaterialAssignment |
StaticBoolQueryNode |
Assignment type is GameObjectVisibilityAssignment |
|||
| ASSIGNMENTVALUEQUERY | Features | Required | The relative path to material assets (.mat) | Assignment type is MaterialAssignment |
True |
Assignment type is GameObjectVisibilityAssignment and selecting the Feature enables the visibility of the list of GameObjects specified in GAMEOBJECT |
|||
False |
Assignment type is GameObjectVisibilityAssignment and selecting the Feature disables the visibility of the list of GameObjects specified in GAMEOBJECT |
|||
| GAMEOBJECT | Features, Feature Sets |
Required | The comma-separated list of affected Unity GameObjects |
|
| MATERIALSLOTINDEX | Feature Sets | Required for Feature Sets of type MaterialAssignment |
The comma-separated list of material slot indices |
|
| RUNTIMETHUMBNAIL | Features, Feature Sets |
Optional | The path to the thumbnails used by Features and Feature Sets | Path relative to the Unity project |
Using the Unity Forma Adapter
You can use the Unity Forma Adapter to import Configit Ace® product models into Unity Forma and make configuration requests to a Configit Ace® instance.
To use the Unity Forma Adapter, follow these steps:
- Initialize the Configit Ace® rule engine
- Enter client credentials
- Import a Configit Ace® product model
- Customize the Configurator experience
Initialize the Configit Ace® rule engine
Before you can initialize Configit Ace® as your rule engine, you must have a valid Unity Forma scene containing a Configurator GameObject.
To create configuration files and initialize the Configit Ace® rule engine, follow these steps:
- Create assets in the Assets folder of your project. Right-click in the Project window and select the following:
- Create > Forma > Adapter > Configit Ace > Ace Client Settings Provider (SO)
- Create > Forma > Adapter > Configit Ace > Ace Product Settings Provider (SO)
- Create > Forma > Adapter > Configit Ace > Ace Runtime Settings Provider (SO)
- Create > Forma > Adapter > Configit Ace > Ace Property Mapping Provider (SO)
Note: It's recommended that you create these assets in an appropriately named subfolder (such as "Configit Ace") within the Assets folder.
To open the Configuration dialog, select Forma > Configit Ace > Configuration.
To create a new AceClient component on the Configurator GameObject, select Create Ace Client.
In the Configit Ace® Configuration window, drag and drop the newly created files into the corresponding fields.
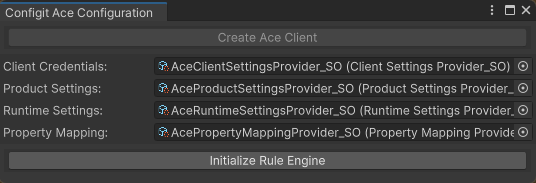
Note: You can replace this ScriptableObject implementation with your own mechanism for storing configuration data.To ensure that the rule engine is assigned and ready to use, select Initialize Rule Engine.
Enter client credentials
Ensure that you have the URL for your Configit Ace® platform and a valid API key.
To successfully connect to a Configit Ace® server, follow these steps:
To open the Client Settings dialog, from the toolbar, select Forma > Configit Ace > Client Settings.
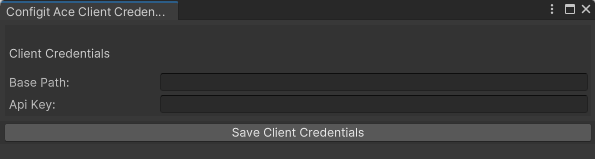
In the Base Path field, enter the URL for your Configit Ace® platform.
In the API Key field, enter your API key.
Select Save Client Credentials.
Important: If you don't select Save Client Credentials, the credentials won't be saved.
Import a Configit Ace® product model
Before you can import a Configit Ace® product model, you must have a compatible Unity Forma product model.
To import a Configit Ace® product model, follow these steps:
To open the Model Import dialog, from the toolbar, select Forma > Configit Ace > Model Import.
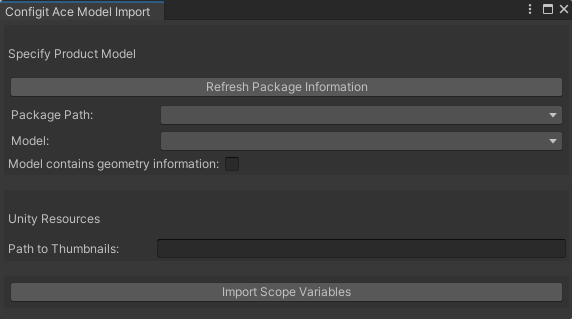
To ensure you have the latest package information available on the Configit Ace® instance, select Refresh Package Information.
In the Package Path dropdown, select the package containing the product model to import.
In the Model dropdown, select the product model to import.
If the Configit Ace® product model contains geometry information, enable Model contains geometry information.
In the Path to Thumbnails field, specify the relative path to your project thumbnails.
To save the values for the current Unity Forma product model, select Import Scope Variables.
Important: If you don't select Import Scope Variables, you won't save any of the changed values.
Note: This step creates a variant table that includes every Feature and Feature Set in the Configit Ace® product model. If the Scope Variables aren't set or if the variant table refreshes before runtime, the Configurator application won't function properly.
Customize the Configurator experience
You can use Scope Variable to customize the Configurator experience. To open the Runtime Settings dialog, from the toolbar, select Forma > Configit Ace > Runtime Settings.

Change the Variant Table language
The available languages depend on the Configit Ace® package and the translation availability depends on the product model. If a translation isn't available, the language of the Variant Table will default to the language specified in the Configit Ace® package.
- In the Runtime Default Language dropdown, select your desired language
Select the Configit Ace® product model view
You must set the view used for the Configit Ace® product model as it refines the available Feature Sets in the Variant Table.
- In the Runtime Model View dropdown, select your desired view.
Select the default view
Using the default view ignores the view selected in the Runtime Model View dropdown.
- To use the default view for the Configit Ace® product model, select Use Default View.
Automatically resolve conflicting assignments
Conflicting assignments occur when a new selection requires deselecting a previously made assignment. By default, you're prompted to either accept or cancel new assignments whenever they cause conflicts.
- To automatically resolve conflicting assignments, select Ignore Conflicts.
Set the Scope Variables
Before you enter Play mode, you must set the Scope Variables. The Configit Ace® product model must only have one phase (set of Scope Variables).
- Use the dropdowns in this section to set the Scope Variables.
Note: Anytime you edit Scope Variables, you must create a new build. If you do not create a new build, the system will not implement your changes.
Save the Variant Table
- To save and update the variant table, select Refresh Variant Table.
Important: If you don't select Refresh Variant Table, you won't save any of the changed values.
At this point, the updated variant table is ready to use. You can now test your Configit Ace® product model.
Test your Configit Ace® product model
Enter Play Mode in the Unity Editor or create a standalone build. Unity Forma starts with the RuntimeUI by default, which allows you to specify values for Feature Sets.
Note: Every time you select a Feature, Unity Forma must query the Configit Ace® instance. If your internet is slow, it can take longer for the Unity Editor to show configuration changes.
Update your Configit Ace® product model
Once your Configit Ace® product model is imported into Unity Forma, some limited updates can still be made to the Configit Ace® product model without having to reimport it.
For now, making changes to rules using the Configit Ace® web interface is supported, as long as the updated rules do not reference any new Feature Set or Feature. In order for the new rules to take effect, it is necessary to restart the build (or restart Play Mode if testing in the Unity Editor). It is not necessary to produce a new standalone build.
Please note that any changes made to Feature Sets and Features will require a product reimport (see Import a Configit Ace product model). Those changes will also require producing a new standalone build.