Get started with coding your own graph tool with Graph Toolkit
This guide walks you through the initial steps of creating your own simple graph tool with a graph window, a custom node and custom types.
It covers:
Set-up your code structure
Start by creating a folder to store all your scripts. It's recommended to organize your classes into separate files to build a strong foundation for when you fully implement your tool.
Although not required at this stage, it's a good idea to create an assembly to start organizing your code now. This assembly must specifically target the Editor, as Graph Toolkit is meant for Editor use only.
Here's a basic example of an assembly you can use:
{
    "name": "Unity.GraphToolkit.DocCodeSamples",
    "rootNamespace": "Unity.GraphToolkit.DocCodeSamples",
    "references": [
        "Unity.GraphToolkit.Editor",
        "Unity.GraphToolkit.Common.Editor"
    ],
    "includePlatforms": [
        "Editor"
    ]
}
You can find more details on how to create an assembly definition in the Unity documentation.
Step 1: Define your custom Graph class
The foundation of any Graph Toolkit tool is a custom Graph class. Follow these steps to create yours:
- Create a new C# script file and import the necessary namespaces:
using System;
using UnityEditor;
using UnityEngine;
using Unity.GraphToolkit.Editor;
- Add a class
MySimpleGraphthat inherits fromGraph - Define an
AssetExtensionconstant to specify your graph's file extension - Apply the
[Graph]attribute and pass your extension as a parameter - Mark your class with
[Serializable]to ensure proper data persistence as you extend your graph tool - Finally, add a new
CreateAssetFile()function that callsPromptInProjectBrowserToCreateNewAssetmethod and decorate this function with aMenuItemattribute
[Graph(AssetExtension)]
[Serializable]
class MySimpleGraph : Graph
{
    public const string AssetExtension = "simpleg";

    [MenuItem("Assets/Create/Graph Toolkit Samples/Simple Graph", false)]
    static void CreateAssetFile()
    {
        GraphDatabase.PromptInProjectBrowserToCreateNewAsset<MySimpleGraph>();
    }
}
This basic implementation creates the core structure for your graph tool. The AssetExtension constant defines the file format Unity will use when saving your graph assets.
The CreateAssetFile() function allows you to create a new graph asset directly from the Unity Editor's menu. Navigate to Assets > Create > Graph Toolkit Samples > Simple Graph. The new asset appears in the Assets section of the project window with its name in edit mode, ready for you to type.
After naming it, double-click the file to open your brand-new graph editor window. Your graph tool looks similar to the following:

Step 2: Create your first node
Let's now add a node by adding a new class that extends Node:
[Serializable]
class MySimpleNode : Node {}
That's it! Because you defined the node in the same assembly as the graph, it's automatically registered and added to the graph item library which makes it discoverable in the search window.
As recommended earlier, apply the [Serializable] attribute to your class to ensure Unity preserves your data during serialization as you extend the functionality of your custom node.
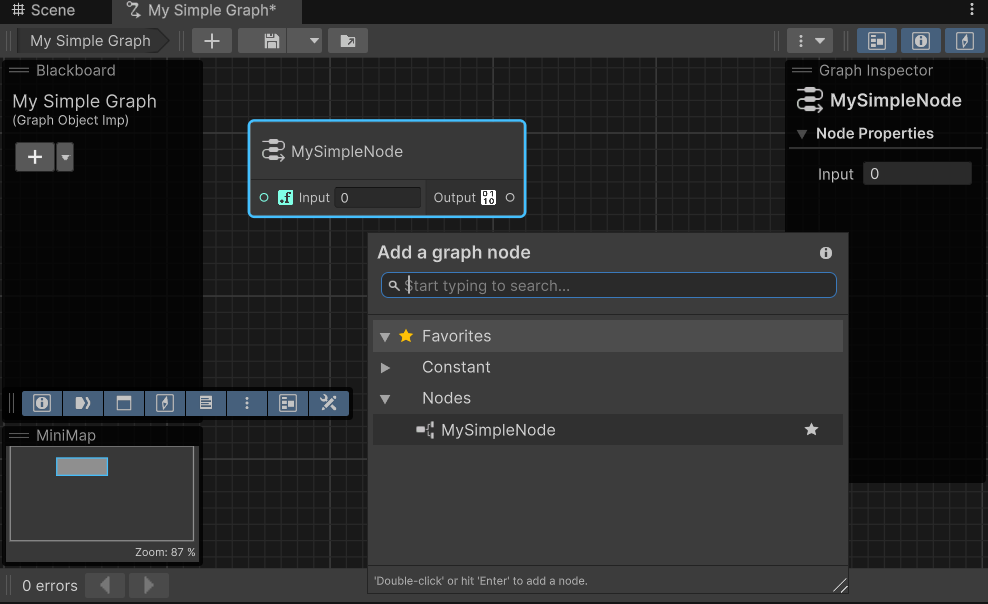
At this point, you can add this node to your canvas, though it currently lacks input and output ports.
Enhance its functionality by defining a float input port and a custom type output port:
[Serializable]
class MySimpleNodeWithPorts : Node
{
    protected override void OnDefinePorts(IPortDefinitionContext context)
    {
        context.AddInputPort<float>("Input").Build();
        context.AddOutputPort<MyCustomType>("Output").Build();
    }
}
It's a wrap
That's it. You have covered the basics.
Here's your final script:
#region Imports
using System;
using UnityEditor;
using UnityEngine;
using Unity.GraphToolkit.Editor;
#endregion Imports

namespace Samples.DocCodeSamples.Editor
{
    #region SimpleGraph
    [Graph(AssetExtension)]
    [Serializable]
    class MySimpleGraph : Graph
    {
        public const string AssetExtension = "simpleg";

        [MenuItem("Assets/Create/Graph Toolkit Samples/Simple Graph", false)]
        static void CreateAssetFile()
        {
            GraphDatabase.PromptInProjectBrowserToCreateNewAsset<MySimpleGraph>();
        }
    }
    #endregion SimpleGraph

    class MyCustomType : ScriptableObject
    {
    }

    #region SimpleNode
    [Serializable]
    class MySimpleNode : Node {}
    #endregion SimpleNode

    #region SimpleNodeWithPorts
    [Serializable]
    class MySimpleNodeWithPorts : Node
    {
        protected override void OnDefinePorts(IPortDefinitionContext context)
        {
            context.AddInputPort<float>("Input").Build();
            context.AddOutputPort<MyCustomType>("Output").Build();
        }
    }
    #endregion SimpleNodeWithPorts
}
And some recommendations for next steps:
- Check out the Graph Toolkit samples to learn more advanced features and implementations.
- Explore the Graph Toolkit user manual and Graph Toolkit API documentation to learn more about the available classes and methods.