Navigation
App UI provides a navigation system that can be used to navigate between pages in your application. This is useful to define specific flows in your application and to provide a better user experience.
Navigation Destination
A navigation destination is a page that can be navigated to. A navigation destination is defined by a NavDestination component.
To reach a navigation destination, you need to link some navigation actions to it.
Navigation Action
A navigation action is a component that can be used to navigate to a navigation destination. A navigation action is defined by a NavAction component.
Inside the navigation action, you can define the way the navigation is performed, such as an animation or a transition, or the way the back stack is managed.
A Navigation action can be Local or Global. A local navigation action can be used to perform a navigation from a specific previous navigation destination. A global navigation action can be used to perform a navigation from any navigation destination in the navigation graph.
With nested navigation graphs, you can use global navigation actions to navigate between navigation graphs.
Navigation Graph
A navigation graph is a set of pages that can be navigated to. A navigation graph is defined by a NavGraph component. When building an application which contains separate flows, it is recommended to create a separate navigation graph for each flow.
The navigation graph must always have a start destination. The start destination is the first page that will be displayed when navigating to the navigation graph.
For example, if you have a login flow and a main flow, you can create two navigation graphs, one for the login flow and one for the main flow.
You can nest navigation graphs to create more complex navigation flows. For example, if you have a main flow that contains a settings flow, you can create a navigation graph for the main flow and a navigation graph for the settings flow.
Navigation Graph View
A navigation graph view is the main Unity asset that contains one several nested navigation graphs. A navigation graph view is defined by a NavGraphViewAsset component.
This is the main resource used by the navigation host to display the pages in the navigation graph.
Navigation Host
A navigation host is a component that can host a navigation graph. A navigation host is defined by a NavHost component.
A navigation host can host a single navigation graph view asset. When navigating to a page, the navigation host will display the page in the navigation host, including the navigation components which can be controlled via the INavVisualController interface.
Navigation Controller
A navigation controller is a component that can be used to navigate between pages in a navigation graph. A navigation controller is defined by a NavController component.
A navigation controller can be used to navigate to a page in a navigation graph. When navigating to a page, the navigation controller will handle the navigation back stack and will request the navigation host to display a new page.
A navigation controller is always attached to a single navigation host. It is created automatically when a navigation host is instantiated.
Navigation Visual Components
Handling Visual Components Globally : Navigation Visual Controller
A navigation visual controller is a component that can be used to control the content of the navigation components. A navigation visual controller is defined by a INavVisualController interface.
You can implement this interface to control the content of the navigation components.
For example, you can use this interface to display the title of the page in the AppBar component, or to display a list of links to other pages in the Drawer component.
Here is an example of a custom navigation visual controller:
class MyVisualController : INavVisualController
{
    // called only when the Bottom Navigation Bar is required by the destination
    public void SetupBottomNavBar(BottomNavBar bottomNavBar, NavDestination destination, NavController navController)
    {
        var homeButton = new BottomNavBarItem("info", "Home", () => navController.Navigate(Actions.navigateToHome))
        {
            isSelected = destination.name == Screens.home
        };
        bottomNavBar.Add(homeButton);

        // etc ...
    }
    // called only when the AppBar is required by the destination
    public void SetupAppBar(AppBar appBar, NavDestination destination, NavController navController)
    {
        appBar.title = destination.label;
    }
    // called only when the Drawer is required by the destination
    public void SetupDrawer(Drawer drawer, NavDestination destination, NavController navController)
    {
        drawer.Add(new DrawerHeader());
        drawer.Add(new Divider { vertical = false });
        var homeButton = new MenuItem {icon = "info", label = "Home", selectable = true};
        homeButton.SetValueWithoutNotify(destination.name == Screens.home);
        homeButton.clickable.clicked += () => navController.Navigate(Actions.navigateToHome);
        drawer.Add(homeButton);

        // etc ...
    }
    // called only when the Rail is required by the destination
    public void SetupNavigationRail(NavigationRail navigationRail, NavDestination destination, NavController navController)
    {
        navigationRail.anchor = NavigationRailAnchor.End;
        navigationRail.labelType = LabelType.Selected;
        navigationRail.groupAlignment = GroupAlignment.Center;

        var homeButton = new NavigationRailItem { icon = "info", label = "Home", selected = destination.name == Destinations.home };
        homeButton.clickable.clicked += () => navController.Navigate(Actions.navigateToHome);
        navigationRail.mainContainer.Add(homeButton);

        // etc ...
    }
}
Then you can assign this controller to the navigation host:
var navHost = new NavHost();
navHost.visualController = new MyVisualController();
Handling Navigation Visual Components Per Navigation Screen
You also have the possibility to implement SetupNavigationRail, SetupAppBar, SetupBottomNavBar and SetupDrawer methods directly in your implementation of NavigationScreen.
class MyAppHomeScreen : NavigationScreen
{
    protected override void SetupAppBar(AppBar appBar, NavController navController)
    {
        appBar.title = "Home";
    }
}
Components
App UI provides a set of navigation components that can be used to create a navigation menu for your application.
AppBar Navigation Component
The AppBar component is a navigation component located at the top of the screen. It can be used to display a button to display the Drawer and a title.
You can also add a actions to the AppBar component to display a button on the right side of the AppBar.
When navigating to a page, you can set the title property of the AppBar component to display the title of the page.
If the navigation back stack is not empty, the AppBar component will display a back button that will navigate to the previous page.
Drawer Component
The Drawer component is a navigation component located on the left or right side of the screen. It can be used to display a list of links to other pages in your application, or to display a list of links to other applications.
The Drawer component can be collapsed or expanded. When collapsed, the AppBar component will display a button to expand the Drawer component.
The Drawer component can be expanded by clicking on the button displayed by the AppBars component, or by dragging the edge of the screen.
BottomNavBar Component
The BottomNavBar component is a navigation component located at the bottom of the screen.
The BottomNavBar component can be used to display a list of links to other pages in your application, or to display a list of links to other applications.
NavigationRail Component
The NavigationRail component is a navigation component located on the left or right side of the screen.
You can choose which side of the screen the NavigationRail component is displayed by setting the anchor property.
The NavigationRail component can be used to display items similar to the BottomNavBar component, but in a vertical layout.
It is composed of three parts:
- The leading container.
- The main container, which you can align to the start, center or end of the vertical layout.
- The trailing container.
These containers usually contain NavigationRailItem interactable components, where you can specify an icon and a label to display.
You can customize the way labels are displayed in the main container by setting the labelType property.
Note
When using a NavigationRail component, we recommend to not use any other navigation components like the Drawer or the
BottomNavBar in order to avoid redundancy.
INavigationScreen interface
All these components are ready to use in NavigationScreen implementations. But if you want to have a total control over navigation screens, you can make your own implementation of the INavigationScreen interface.
class MyCustomScreen : VisualElement, INavigationScreen
{
    public void OnEnter(NavController controller, NavDestination destination, Argument[] args)
    {
        // Called when the screen is entered.
        // You can use this method to initialize the screen or to perform any action when the screen is displayed.
    }

    public void OnExit(NavController controller, NavDestination destination, Argument[] args)
    {
        // Called when the screen is exited.
        // You can use this method to clean up the screen or to perform any action when the screen is hidden.
    }
}
Navigation Graph Editor
The Navigation Graph Editor is a visual editor that can be used to create and edit navigation graphs.
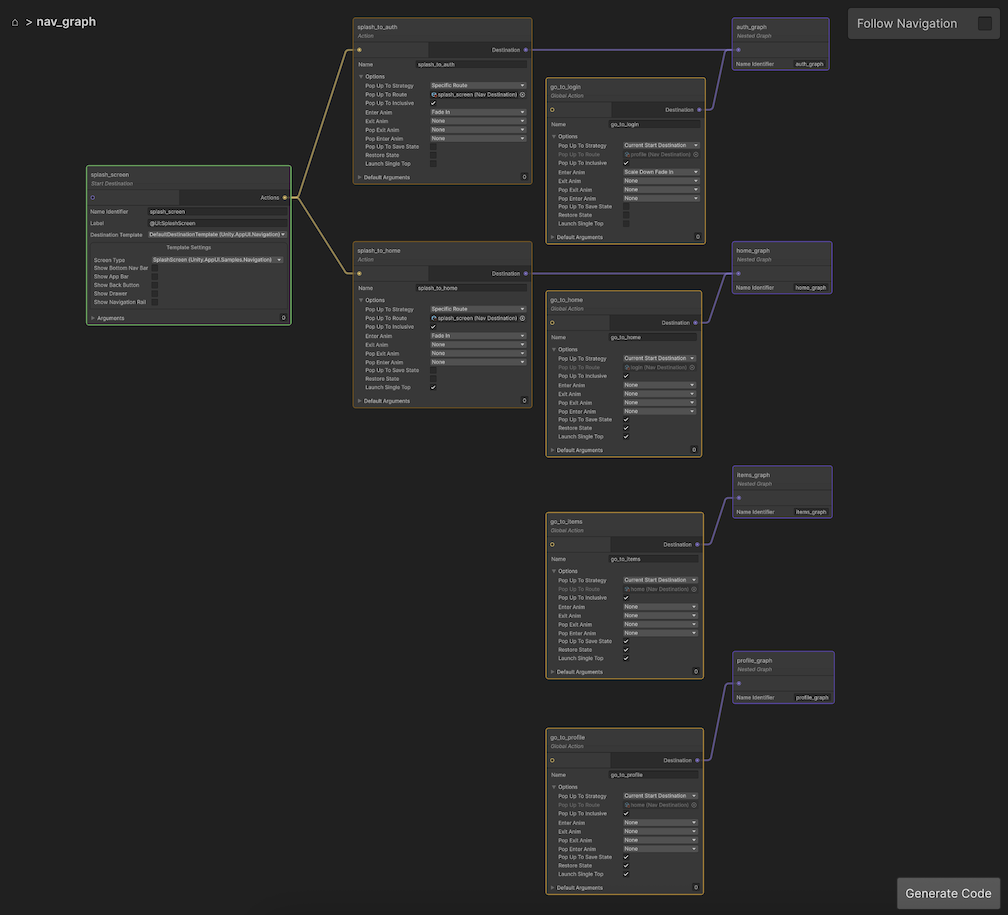
To create a new navigation graph asset, right click on the Project window and select Create > App UI > Navigation Graph.
To open the Navigation Graph Editor, double click on the navigation graph asset in your Project window.
Nodes
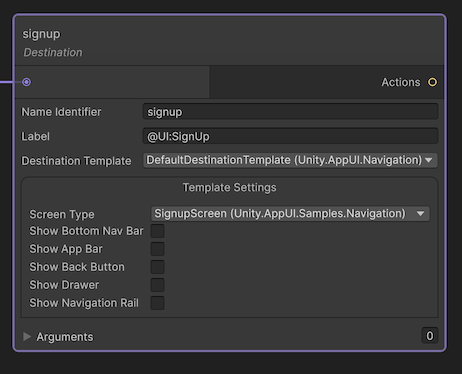
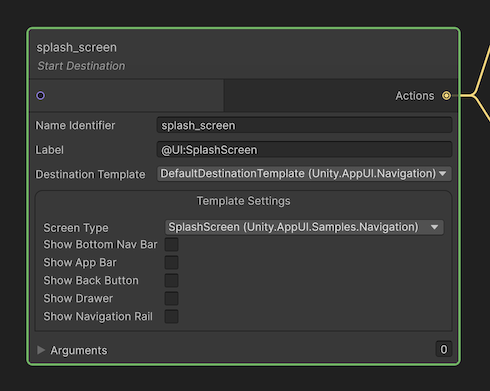
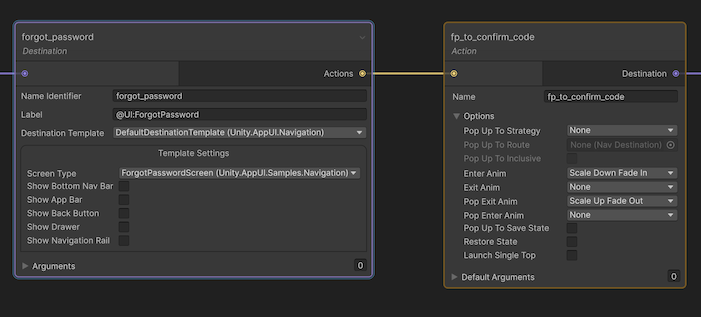
Destination Node
A destination node represents a page in the navigation graph. A destination node is defined by a NavDestination component. A destination node can be connected to other destination nodes using actions.
When a Destination node is used as the start destination of the navigation graph, its node will be outlined in green.
Note
A navigation graph can have only one start destination. By default when a single destination node is present in the navigation graph, it will be used as the start destination.
Customizing the Destination Node with templates
In a destination node, it is convenient to define some directives that must be executed when reaching the destination.
App UI provides a DefaultDestinationTemplate
which is an implementation of NavDestinationTemplate
that is used to instantiate and set up NavigationScreen
instances when the destination is reached. The options offered by this template is the selection of the derived type of
NavigationScreen to instantiate, and the display of the various navigation components
(AppBar, Drawer, BottomNavBar, NavigationRail). A visual example of this template used in a destination node
is shown in the screenshot above.
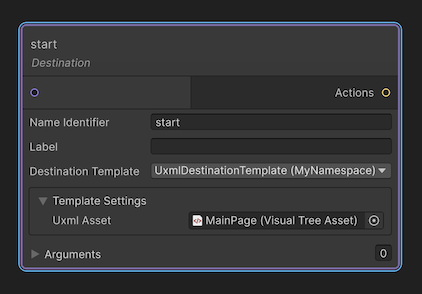
By creating your own implementation of the NavDestinationTemplate class, you can add your own logic to execute.
Here is an example of a custom destination template that
takes a VisualTreeAsset (UXML) file as a parameter and instantiates it when the destination is reached:
// UxmlDestinationTemplate.cs
using System;
using UnityEngine;
using UnityEngine.UIElements;

namespace MyNamespace
{
    [Serializable]
    public class UxmlDestinationTemplate : NavDestinationTemplate
    {
        [SerializeField]
        [Tooltip("The UXML asset to instantiate when the destination is reached.")]
        VisualTreeAsset m_UxmlAsset;

        public VisualTreeAsset uxmlAsset
        {
            get => m_UxmlAsset;
            set => m_UxmlAsset = value;
        }

        public override INavigationScreen CreateScreen(NavHost host)
        {
            // Instantiate the screen here, or use a factory method if you have a more complex setup
            // (like caching screen per destination).
            var screen = new UxmlNavigationScreen(uxmlAsset, host);
            return screen;
        }
    }
}
// UxmlNavigationScreen.cs
using UnityEngine.UIElements;
using Unity.AppUI.Navigation;

namespace MyNamespace
{
    public class UxmlNavigationScreen : VisualElement, INavigationScreen
    {
        readonly VisualTreeAsset m_UxmlAsset;

        public UxmlNavigationScreen(VisualTreeAsset uxmlAsset)
        {
            m_UxmlAsset = uxmlAsset;
            m_UxmlAsset.CloneTree(this);
        }

        public void OnEnter(NavController controller, NavDestination destination, Argument[] args)
        {
            // Called when the screen is entered.
            // You can use this method to initialize the screen or to perform any action when the screen is displayed.
        }

        public void OnExit(NavController controller, NavDestination destination, Argument[] args)
        {
            // Called when the screen is exited.
            // You can use this method to clean up the screen or to perform any action when the screen is hidden.
        }
    }
}
Result in the Navigation Graph Editor:
Action Node
An action node represents a navigation action in the navigation graph. An action node is defined by a NavAction component.
When navigating from a destination to another one, the navigation controller will execute the action associated with the action node that links the two destination nodes.
By default, when creating a new Action Node, the action will be defined as a Global Action. That means that the action will be available from any destination in the current navigation graph and nested ones.
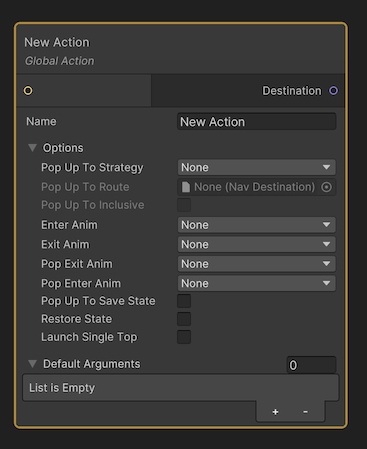
As soon as you link a destination on the action node's input port, the action will be defined as a Local Action.
The output port of an action node can be connected to the input port of a destination node or a group node. At runtime, the navigation controller will find the start destination of the navigation graph and will execute the action associated with the action node that links the start destination to another destination.
Nested Graph Node
A nested graph node represents a nested navigation graph in the navigation graph. A nested graph node is defined by a NavGraph component.
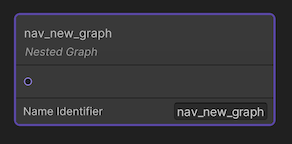
To browse a nested navigation graph, you can double click on the nested graph node. This will open the nested navigation graph in place of the current navigation graph. You can go back to the parent navigation graph by choosing Go Back option in the context menu of the navigation graph editor, or by clicking one of the items in the breadcrumb bar.
Code Generator
The Navigation Graph Editor can generate C# code that can be used in your application to navigate between pages. While it is not required to use the generated code, it can be useful to avoid typos when navigating between pages.
The generated code follow this template:
namespace namespace Unity.AppUI.Navigation.Generated
{
    public partial static class Actions
    {
        public const string <actionName> = "<actionName>";
        [...]
    }

    public partial class Destinations
    {
        public const string <destinationName> = "<destinationName>";
        [...]
    }

    public partial class Graphs
    {
        public const string <graphName> = "<graphName>";
        [...]
    }
}
To generate the code, click on the Generate Code button in bottom-right corner of the navigation graph editor. This will prompt you to select a folder where the code will be generated. The generated code will be named after the navigation graph asset.