Use real time multiparticipant
You can connect your client application to the Unity Cloud Netcode for GameObjects (NGO) server to connect your participants to one another. For example, you can create participant avatars, share their locations, and spawn them inside rooms whenever new participants join those rooms.
Whenever two or more participants join the same room, the Unity Cloud cloud automatically spawns a multiparticipant server instance using the NGO server. You can connect your application to this multiparticipant server instance to share data with other participants.
Prerequisites
Before you manage your participants, you must first manage your room.
Connect your participants to a server
To connect your participants to a Netcode server instance, see the following steps:
- Go to GameObject > Create Empty and name the new game object NetcodeManager.
- In your
Assets/Scriptsdirectory, create a new script and name itNetcodeManager. - Attach the
NetcodeManagerscript to your NetcodeManager game object. In your
NetcodeManagerscript file, use theNetcodeManagerclass to reference NGO'sNetworkManager,NetcodeParticipantManager,INetcodeService, andISessionProvider.public class NetcodeManager : MonoBehaviour { [SerializeField] NetworkManager m_NetworkManager; [SerializeField] NetcodeParticipantManager m_NetcodeParticipantManager; INetcodeService m_NetcodeService; ISessionProvider m_SessionProvider; }Use the
Awakemethod to retrieve theISessionProviderservice from PlatformServices and to reference theNetworkProviderin the Editor. You must create theINetcodeServicemethod internally and dispose of it with theOnDestroymethod.void Awake() { m_SessionProvider = PlatformServices.SessionProvider; m_NetcodeService = new NetcodeService(m_NetworkManager, m_NetcodeParticipantManager, m_SessionProvider); } void OnDestroy() { m_NetcodeService = null; }
Server connection varies depending on how many participants are in a room. See the following for more information:
- If the participant is alone in the room, the Presence Service doesn't spawn a server instance because there are no other participants for the server to share data with.
- If the participant is the second participant to join the room, the Presence Service spawns a server instance and both participants automatically connect to this server.
- If the participant joins a room with 2 or more participants, the server instance already exists.
- When a new participant joins a room, a
NetcodeParticipantgame object spawns in the server. All participants then see this game object in their scene.NetcodeParticipantis a NetworkBehaviour .NetcodeParticipantcannot be used directly. It is accessible through anINetcodeParticipant.INetcodeParticipantcan be used to share participant data among all clients.
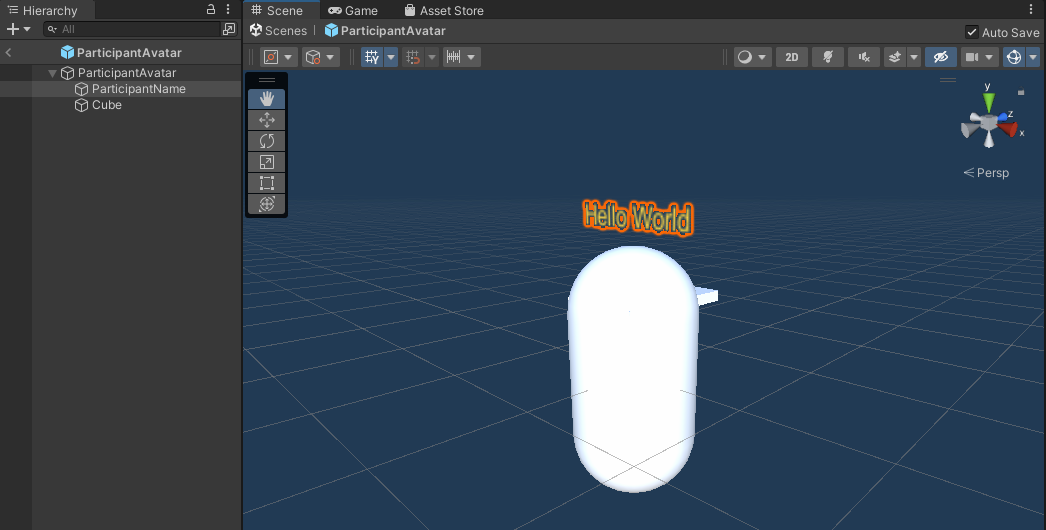
Create participant avatar prefabs
You can create an avatar prefab to share the position of a participant in the room. To create an avatar prefab, see the following steps:
- Create a ParticipantAvatar prefab. You can add geometry and text to display the name of the participant.
- In your
Assets/Scriptsdirectory, create a new script and name itParticipantPrefab. - Attach the
ParticipantPrefabscript to your ParticipantAvatar prefab. In your
ParticipantPrefabscript file, use theParticipantAvatarclass to expose two floats for movement control, reference the text field, and reference the correspondingINetcodeParticipant.public class ParticipantAvatar : MonoBehaviour { [SerializeField] float m_MovementSpeed = 2.0f; [SerializeField] float m_LookSpeed = 10.0f; [SerializeField] TextMesh m_ParticipantNameText; INetcodeParticipant m_NetcodeParticipant; }Use the
Initializemethod to store theINetcodeParticipantargument, subscribe to itsParticipantIdChangedevent, and callApplyParticipantIdto make sure that the participant Id is updated from the start. Use theOnDestroymethod to unsubscribe from the event.public void Initialize(INetcodeParticipant participant) { m_NetcodeParticipant = participant; m_NetcodeParticipant.ParticipantIdChanged += ApplyParticipantId; ApplyParticipantId(m_NetcodeParticipant.ParticipantId); } void OnDestroy() { m_NetcodeParticipant.ParticipantIdChanged -= ApplyParticipantId; } void ApplyParticipantId(ParticipantId participantId) { m_ParticipantNameText.text = participantId.ToString(); }Use the
Updatemethod to handle the avatar position. Ifm_NetcodeParticipant.IsOwneris true, the avatar belongs to the current participant. Ifm_NetcodeParticipant.IsOwneris false, the avatar belongs to another participant.void Update() { if (m_NetcodeParticipant == null) return; if (m_NetcodeParticipant.IsOwner) { UpdateOwner(); } else { UpdateOtherParticipant(); } }If
m_NetcodeParticipant.IsOwneris true, use theSetParticipantTransformmethod to allow movement and sync the new value with the server.void UpdateOwner() { if (Input.GetKey(KeyCode.W) || Input.GetKey(KeyCode.S) || Input.GetKey(KeyCode.A) || Input.GetKey(KeyCode.D)) { var movementSpeed = m_MovementSpeed * Time.deltaTime; transform.Translate(Input.GetAxis("Horizontal") * movementSpeed, 0.0f, Input.GetAxis("Vertical") * movementSpeed); } else if (Input.GetMouseButton(1)) { var rotationSpeed = m_LookSpeed * Time.deltaTime; transform.eulerAngles = transform.eulerAngles + new Vector3(-Input.GetAxis("Mouse Y"), Input.GetAxis("Mouse X"), 0) * rotationSpeed; } m_NetcodeParticipant.SetParticipantTransform(transform.position, transform.rotation); }- If
m_NetcodeParticipant.IsOwneris false, readm_NetcodeParticipant.Transformto read the latest value.csharp void UpdateOtherParticipant() { var newTransform = m_NetcodeParticipant.Transform; transform.position = newTransform.position; transform.rotation = newTransform.rotation; }
Spawn participant avatars
When a new participant joins the room, you can use an avatar spawner to instantiate an avatar for that new participant. To spawn an avatar, see the following steps:
- In your
Assets/Scriptsdirectory, create a new script and name itAvatarSpawner. - Attach the
AvatarSpawnerscript to your NetcodeManager game object. In your
AvatarSpawnerscript file, use theAvatarSpawnerclass to reference yourParticipantAvatarprefab, a transform that contains all instantiated game objects, and a dictionary mapping between the Participant ID and its correspondingParticipantAvatar.public class AvatarSpawner : MonoBehaviour { [SerializeField] Avatar m_Prefab; [SerializeField] Transform m_Root; readonly Dictionary<ParticipantId, ParticipantAvatar> m_Avatars = new(); }Use the
Awakemethod to subscribe to them_NetcodeService.ParticipantAddedandm_NetcodeService.ParticipantRemovedevents. Use theOnDestroymethod to unsubscribe from the events.void Awake() { m_NetcodeService.ParticipantAdded += OnParticipantAdded; m_NetcodeService.ParticipantRemoved += OnParticipantRemoved; } void OnDestroy() { m_NetcodeService.ParticipantAdded -= OnParticipantAdded; m_NetcodeService.ParticipantRemoved -= OnParticipantRemoved; }- When the participant prefab is created, instantiate the avatar prefab, initialize it with participant data, and save it in the mapping.
csharp void OnParticipantAdded(INetcodeParticipant participant) { var avatar = Instantiate(m_Prefab, m_Root); avatar.transform.localPosition = Vector3.zero; avatar.Initialize(participant); m_Avatars[participant.ParticipantId] = avatar; } - When the participant prefab is destroyed, destroy the avatar prefab and clear it from the mapping.
csharp
 void OnParticipantRemoved(INetcodeParticipant participant)
 {
     if (m_Avatars.ContainsKey(participant.ParticipantId))
     {
         var avatar = m_Avatars[participant.ParticipantId];
         Destroy(avatar.gameObject);
         m_Avatars.Remove(participant.ParticipantId);
     }
 }
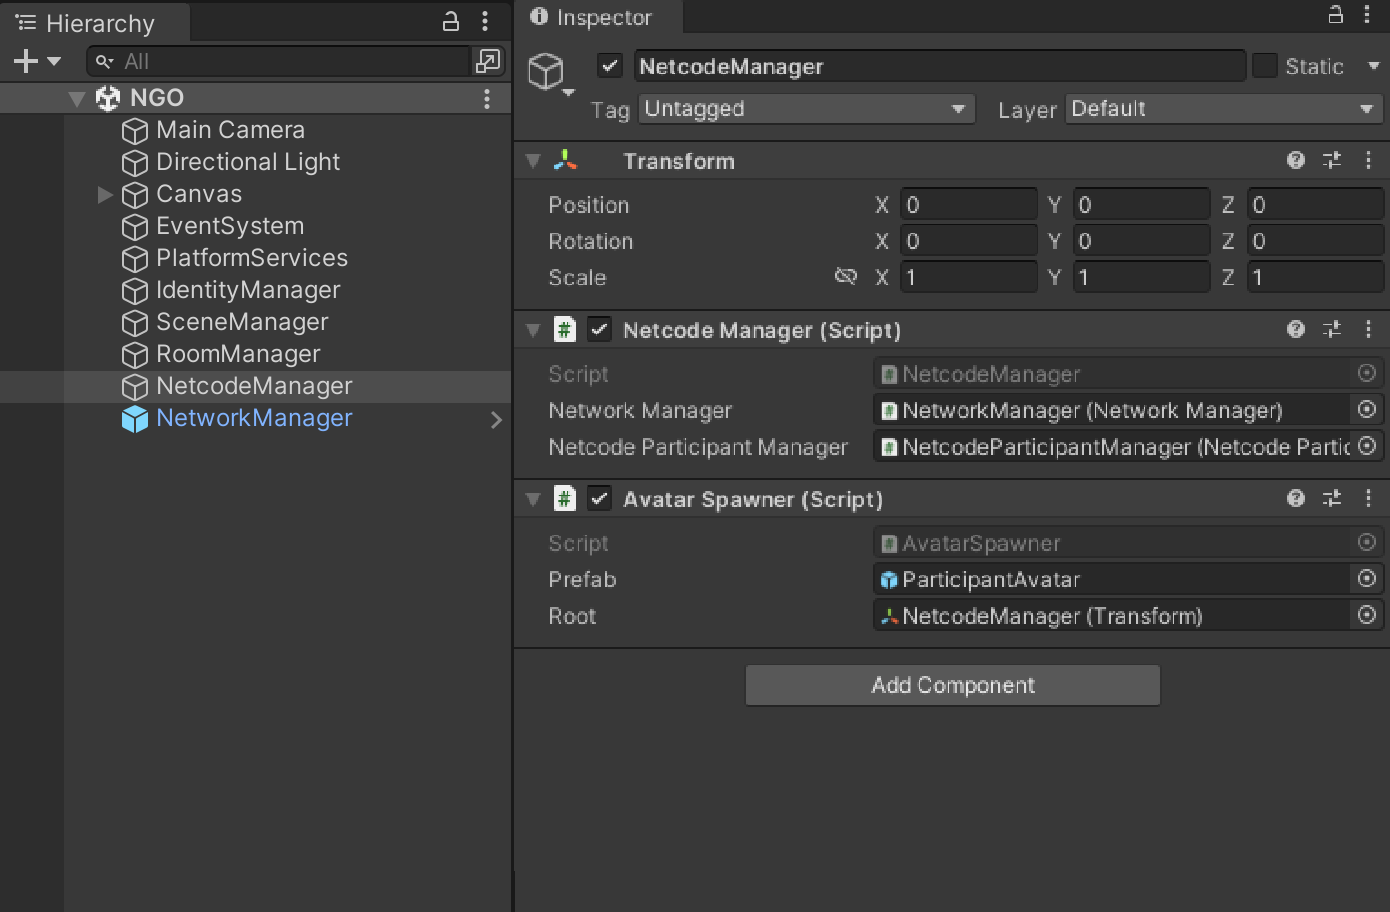
Complete your scene setup
To complete your scene setup, see the following steps:
- In the Unity Editor, open your
Packages/Unity Cloud/Prefabs. - Instantiate the NetworkManager prefab in your scene.
- Select the
NetcodeManagergame object you created earlier. - Update the
NetcodeManagergame object with your NetworkManager and NetcodeParticipantManager instance, your avatar prefab, and a root transform.