Get started
This section describes how to set up a basic scene and script to initialize and use the Annotations package.
Configure the Annotations package
To configure the Annotations package, you must set up a Unity scene, create a MonoBehaviour, and create an AnnotationRepository.
Set up a Unity scene
To set up a Unity scene, follow these steps:
- In your Unity project window, go to Assets > Scenes.
- Right-click the
Assets/Scenesfolder and go to Create > Scene.
Name your sceneAnnotationTest.
Create a MonoBehaviour
To create a MonoBehaviour, follow these steps:
- In your Unity project window, go to Assets > Scripts.
- Create an
Assets/Scriptsfolder if the folder doesn't already exist. - Right-click the
Assets/Scriptsfolder and go to Create > C# Script.
Name your scriptAnnotationBehaviour. - In the
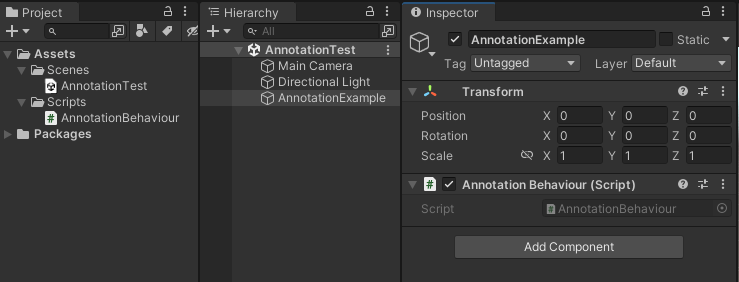
AnnotationTestscene you created earlier, right-click the hierarchy and select Create Empty.
Name your new objectAnnotationExample. - Select the
AnnotationExampleobject and add theAnnotationBehaviourscript you created earlier.
Create an AnnotationRepository
To create an AnnotationRepository, follow these steps:
- Implement the platform services pattern. See the Best practices: dependency injection page in the Identity package documentation for more information.
Update the
PlatformServicesclass in yourPlatformServicesfile to look like the following:using System; using System.Threading.Tasks; using Unity.Cloud.Identity; using Unity.Cloud.Identity.Runtime; using Unity.Cloud.Common; using Unity.Cloud.Common.Runtime; using Unity.Cloud.Storage; using UnityEngine; using System.Collections.Generic; public static class PlatformServices { // Makes HTTP requests static UnityHttpClient s_HttpClient; // Makes authenticated HTTP requests using your Access Token public static ServiceHttpClient ServiceHttpClient { get; private set; } // Required for user login public static ICompositeAuthenticator CompositeAuthenticator { get; private set; } // Required for fetching scene information public static ISceneProvider SceneProvider { get; private set; } // Required for fetching service communication configuration public static IServiceHostResolver ServiceHostResolver { get; private set; } public static void Create() { ServiceHostResolver = UnityRuntimeServiceHostResolverFactory.Create(); var playerSettings = UnityCloudPlayerSettings.Instance; s_HttpClient = new UnityHttpClient(); var compositeAuthenticatorSettings = new CompositeAuthenticatorSettingsBuilder(s_HttpClient, PlatformSupportFactory.GetAuthenticationPlatformSupport(), ServiceHostResolver) .AddDefaultBrowserAuthenticatedAccessTokenProvider() .AddDefaultPersonalAccessTokenProvider() .AddDefaultPkceAuthenticator(playerSettings) .Build(); CompositeAuthenticator = new CompositeAuthenticator(compositeAuthenticatorSettings); ServiceHttpClient = new ServiceHttpClient(s_HttpClient, CompositeAuthenticator, playerSettings); SceneProvider = new SceneProvider(ServiceHttpClient, ServiceHostResolver); } public static async Task InitializeAsync() { await CompositeAuthenticator.InitializeAsync(); } public static void Shutdown() { SceneProvider = null; ServiceHttpClient = null; CompositeAuthenticator = null; s_HttpClient = null; } }Upload a scene. See the Get Started page in the Storage package documentation for more information. Note the newly created scene's ID.
- Open the
AnnotationBehaviourscript you created earlier. - Paste the following code sample into your script:
using System; using System.Linq; using System.Threading.Tasks; using Unity.Cloud.Common; using Unity.Cloud.Identity; using UnityEngine; public class AnnotationBehaviour : MonoBehaviour { // The annotation repository retrieves, creates, edits, and removes annotations from a scene IAnnotationRepository m_AnnotationRepository; // The id for the scene to initialize the annotation repository with static readonly SceneId k_SceneId = new("<enter-id-here>"); // The authenticator responsible for user login ICompositeAuthenticator m_CompositeAuthenticator; bool m_HasAttemptedLogin; async Task Start() { // Register to get notified of the login state after the authenticator has initialized m_CompositeAuthenticator = PlatformServices.CompositeAuthenticator; m_CompositeAuthenticator.AuthenticationStateChanged += ApplyAuthenticationState; // Apply the initial state for the authenticator ApplyAuthenticationState(m_CompositeAuthenticator.AuthenticationState); } void ApplyAuthenticationState(AuthenticationState newAuthenticationState) { switch (newAuthenticationState) { case AuthenticationState.LoggedIn: // If the user is logged in, initialize the repository m_CompositeAuthenticator.AuthenticationStateChanged -= ApplyAuthenticationState; _ = InitializeAnnotationRepository(); break; case AuthenticationState.LoggedOut: // If the user is logged out, attempt to automatically login // Set a flag to ensure we only attempt an auto-login once if (!m_HasAttemptedLogin) { m_HasAttemptedLogin = true; _ = m_CompositeAuthenticator.LoginAsync(); } else { // Unregister if login attempt failed m_CompositeAuthenticator.AuthenticationStateChanged -= ApplyAuthenticationState; } break; } } async Task InitializeAnnotationRepository() { // Gets a scene var scene = await PlatformServices.SceneProvider.GetSceneAsync(k_SceneId); // Create a new AnnotationRepository with the chosen scene m_AnnotationRepository = new AnnotationRepository(scene, PlatformServices.ServiceHttpClient, PlatformServices.ServiceHostResolver); await RunExamples(); } async Task RunExamples() { // Logs you out after running the examples if (PlatformServices.CompositeAuthenticator.RequiresGUI) await PlatformServices.CompositeAuthenticator.LogoutAsync(); } } - Paste your scene's ID into the
Guidnamedk_SceneId.
Note: The code sample above automatically logs you in. You can associate the login call with the UI for a better user experience. See the Annotations sample page for a UI-driven login and scene selection.
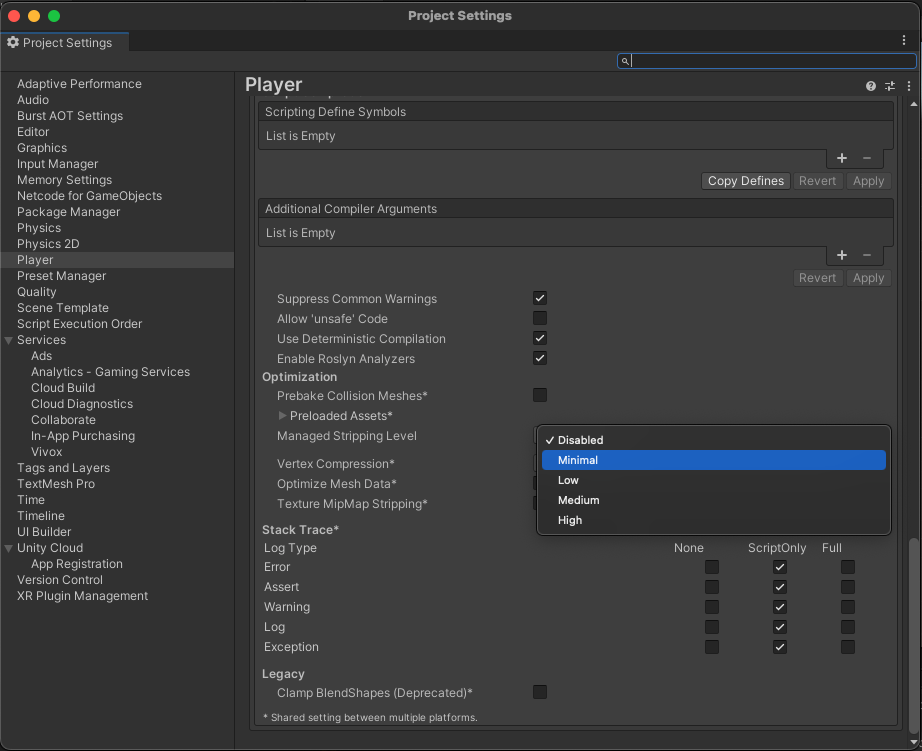
Manage the package stripping level
To avoid runtime errors when building with this package, follow these steps:
- In your Unity project window, go to Edit > Project settings.
The Project setting window opens. - Select the Player option.
- Scroll to the Additional Compiler Arguments section.
- Set the Managed stripping level option to:
- Disabled
or - Minimal (if the Disabled option isn't available)