Use conditions with a Conditional node
Conditional nodes check a set of conditions and, based on the results, determine how the graph runs its tasks. The flow of the behavior graph might change dynamically based on whether these conditions are met or not. For example, a Conditional node checks if the distance between two characters is below a threshold and triggers a dialog or an attack sequence.
Use a Conditional node as a Flow node
To use a Conditional node as a Flow node, do the following:
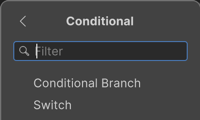
Right-click an empty area of the Unity Behavior graph editor and select Add > Flow > Conditional.
Select the relevant Conditional node: Conditional Branch or Switch.
The selected node displays on the Unity Behavior graph editor. By default, no conditions are assigned to the node.
To assign conditions to the Conditional Branch node, refer to Conditional Branch.
Conditional Branch
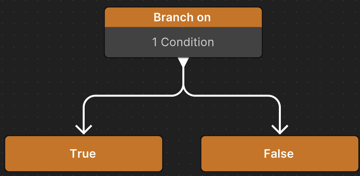
The Conditional Branch node redirects the flow of logic to the appropriate branch when the assigned condition is either true or false. This node can use multiple conditions.
To assign conditions to the Conditional Branch node, do the following:
In the Node Inspector, select the condition that must be true for the redirect to work from the Check if dropdown.
The available options are Any Are True and All Are True.
(Optional) Enable Truncate Node to combine multiple conditions or actions into a single, neat node.
This makes the behavior tree less cluttered and easier to read.
Select Assign Condition.
The Add Condition window displays.
Select Create new Condition to create a new custom condition or perform step 5 to use a pre-defined condition.
In the New Custom Condition window, enter a Name, select the condition Category, and select Next.
Describe the condition against which you want to evaluate the game's logic.
For each GameObject, select the relevant Variable Type.
Select Create.
Unity Behavior generates a newC#script that defines the new condition.Select Save.
To use the new condition, select Assign Condition > Variable Conditions > [new_condition].
Select Variable Conditions to add a pre-defined condition.
The available options are:
- Variable Comparison: To use this condition, insert any variable from the Blackboard and use it to evaluate the condition.
- Variable Value Changed: To use this condition, insert any variable from the Blackboard. It returns
Trueif the value of the variable changes andFalseif the variable remains unchanged. You can use this condition with the Abort and Restart nodes. For more information, refer to Abort and Restart nodes.
Select the relevant pre-defined condition.
The selected condition appears both on the node and the Node Inspector. To remove a condition, right-click the condition in the Node Inspector and select Delete.
If the Conditional Branch node evaluates one condition, it will branch off to either True or False.
The following table shows the how the Conditional Branch node's logic branches off based on the Check if option selected and the number of conditions applied.
| Check if | Node evaluates one condition | Node evaluates multiple conditions |
|---|---|---|
| Any Are True | True - False | If Any Is True - If All Are False |
| All Are True | True - False | If All Are True - If Any Is False |
Switch
The Switch node doesn't work with conditions, but it allows for branching logic to be used based on the value of an Enumeration variable.
For example, you can define an Enumeration variable called GameState that could use the values Playing, Paused, and GameOver.
Use Conditional node as an Action node
To apply Conditional node as an Action node, do the following:
Right-click an empty area of the Unity Behavior graph editor and click Add > Action > Conditional.
Select Conditional Guard.
The selected node displays both on the Unity Behavior graph editor and the Node Inspector.
The Conditional Guard node allows the flow of logic to pass only if the assigned conditions are met. This node can use multiple conditions.
In the Node Inspector, select the condition that must be true for the node to run from the Continue if dropdown.
The available options are Any Are True and All Are True.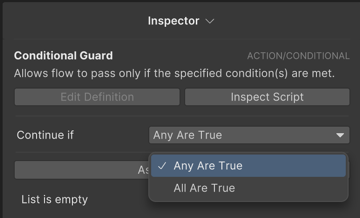
To proceed, refer to the instructions in the Conditional Branch section, starting from steps 3.
If you have multiple conditions on the Conditional Guard node, Unity Behavior combines those multiple conditions into a single node and condenses the label on the node.