Composite Recordings
This feature not only enables users to create and run recorded playbacks (recordings) of a Unity project, but also combine multiple existing recorded playbacks to create new ones (composite recordings).
Example Usage:
- Let's say I want to re-use my start up menu recording for multiple tests
- First, I'd press "START RECORDING", click through my start up menu actions, then press "SAVE RECORDING SEGMENT"
- Then I click through my next scene, pressing "SAVE RECORDING SEGMENT" again
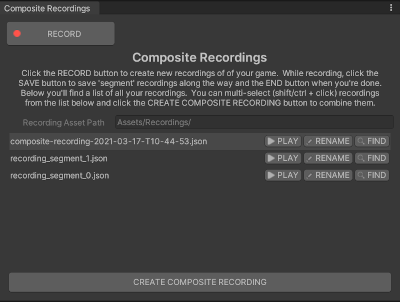
- After I press "STOP RECORDING", I will see that 3 new recordings have been added to my recordings list:
- 1 )
composite-recording-<date>.json- the full playthrough recording (including menu + next scene) - 2 )
recording_segment_1.json- the individual 'next scene' recording - 3 )
recording_segment_0.json- the individual 'menu' recording
- 1 )
- Now I can simply select
recording_segment_0.json, my 'menu' recording, from the recordings list + any other recordings and press "CREATE COMPOSITE RECORDING" to "stitch" them together without having to re-record the menu actions for each recording!- e.g. I can create
composite_menu_and_sceneA.json,composite_menu_and_sceneB.json, etc
- e.g. I can create
- When I'm ready, I can attach my composite recordings to my tests with Recorded Testing.
Usage
First open the Composite Recordings window in the editor: Window -> Automated Testing -> Advanced -> Composite Recordings
There are 2 ways to create composite recordings:
- From Record mode (create new recordings)
- From the Editor Window (combine existing recordings to create new ones)
1. From Record Mode
- Press "START RECORDING" to start recording.
- Perform actions in your scene, then press "SAVE RECORDING SEGMENT" when you're ready to save a new recording (without exiting record mode), and repeat.
- Press "STOP RECORDING" to end the recording.
Each recording will be saved individually, defaulted with a
recording_segment_*prefix filename will automatically be saved to the project's Assets/Recordings folder.Press "Play" to the right of the recording to play back your composite recording
- Press "Rename" to rename your recording
- Warning: Renaming your recording will not automatically update any references to the recording from composite recordings, and will need to be manually updated
- Press "Find" to locate and preview your recording in the inspector
2. From The Editor Window (with Existing Recordings)
- Select any recordings you want to combine from the recordings list (by ctrl/shift + clicking) and press "COMBINE RECORDINGS" to open a pre-populated composite recording view.
- Press "+" to add a recording
- Press "-" to remove a recording
- Click any row to find and select an existing recording from Assets/Recordings
- When you're ready, you can press either:
- "SAVE COMPOSITE RECORDING" to save a new composite recording (recordings executed in order from top to bottom of list), or
- "PLAY ALL AND CONTINUE RECORDING" to play all the selected recordings and continue recording
- Optionally, you can also just press "COMBINE RECORDINGS"
![]()
Composite Recording Files
Composite Recordings are saved under the Assets/Recordings folder and by default named composite-recording-[timestamp].json, and are stored the same way as non-composite recordings: as json files containing a timestamped list of touch data on Game Objects - each defined by its name and tags.
Unlike non-composite recordings, composite recordings will reference the individual recordings it includes under the "recordings" key.
Example file
{
    "entryScene": "",
    "recordingType": 1,
    "recordings": [
        {
            "filename": "recording-segment-A.json"
        },
        {
            "filename": "recording-segment-B.json"
        },
        {
            "filename": "recording-segment-C.json"
        }
    ],
   "touchData" : [
      {
         "position" : {
            "y" : 0.508287310600281,
            "x" : 0.457231730222702
         },
         "eventType" : 1,
         "timeSinceStart" : 0.582690715789795,
         "pointerId" : -1,
         "waitSignal" : "",
         "emitSignal": "",
         "objectName": "MenuButton",
         "objectTag": "Untagged"
      }
   ]
}
Known Limitations
- Renaming recordings will not automatically update any references to the original file name in other recordings. We recommend doing a find + replace all if you have any file name references in composite recordings that need to be updated.
- Game objects included in recordings must have a unique combination of name and tags in the scene at the time they are interacted with.
- Only touch, click, and drag actions are recorded, we do not yet support keyboard input.
- Native device interactions such as phone keyboards or purchase confirmations are not currently supported.
Attaching Composite Recordings to Unity Tests
See Recorded Testing.