Modify generated sprites
Sprite Generator provides several post-processing options to refine the generated sprites. Use the different tabs in the Generate window to modify the generated sprites.
Remove background
Use the Remove BG tab to remove the background elements from the generated sprite.
To use this tab, follow these steps:
- In the Generate window, select the Remove BG tab.
- Select Remove BG.
Spritesheet
Use the Spritesheet tab to generate an animation-ready spritesheet from the selected sprite. Sprite Generator creates a short animation video, samples frames from the video, and arranges them into a 4 × 4 spritesheet (16 frames).
To use this tab, follow these steps:
- In the Generate window, select the Spritesheet tab.
- In the Prompt field, specify a motion type. For example:
Turntable. - Provide a reference image that acts as the first frame of the generated spritesheet.
- Select Spritesheet.
For more information on spritesheet, refer to Generate a spritesheet.
Upscale
Use the Upscale tab to increase the resolution of the generated sprite without losing detail.
To use this tab, follow these steps:
- In the Generate window, select the Upscale tab.
- Select Change to choose a model from the Select Model window.
- Select Upscale.
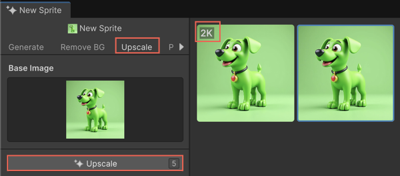
View the upscaled image in the Generations panel. The resolution badge (for example, 2K or 4K) appears in the top-left corner of the image.
Pixelate
Use the Pixelate tab to convert the sprite into a pixel art style.
To use this tab, follow these steps:
In the Generate window, select the Pixelate tab.
Adjust the following settings:
Setting Description Size Defines the pixel size. Keep Image Size Retains the original sprite size. Sampling Size Sets the number of neighboring pixels to sample. Pixelate Mode Selects how the pixelation is applied.
The following options are available:
* Centroid: Averages the color of pixels within a grid cell based on their center point. It creates a smooth and balanced pixelation effect.
* Contrast: Enhances the contrast between adjacent pixels to clearly define the edges.
* Bicubic: Uses bicubic interpolation to calculate pixel values. The resulting effect is smoother and more natural.
* Nearest: Assigns the color of the nearest pixel. It produces a sharper pixelation effect.
* Center: Uses the color of the pixel at the center of each grid cell. It results in a consistent and uniform appearance.
* Outline Thickness: Adjusts the thickness of the pixel outline.Select Pixelate.
Recolor
Use the Recolor tab to customize the color palette used in the sprite.
To use this tab, follow these steps:
In the Generate window, select the Recolor tab.
In the Palette Reference field, select the Paint Brush tool.
The Doodle window opens. Use the following tools:
Tool Description Paint Brush Colors directly on the canvas. Eraser Erases existing color from the canvas. Paint Fills the canvas with the selected color. Color Picker Selects a color from the canvas. Brush Size Adjusts the brush size. Show BaseImage Previews the original sprite while you recolor it. Select Recolor to apply the new color scheme.
Inpaint
Use the Inpaint tab to refine specific areas of the sprite with masking. You can adjust the mask with brush settings and an eraser.
To use this tab, follow these steps:
In the Generate window, select the Inpaint tab.
In the Prompt field, specify the object that you want to insert in the area defined by the mask.
Note
Don't leave the Prompt field blank.
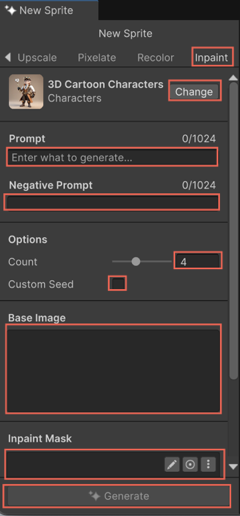
In the Inpaint Mask field, select the Paint Brush tool.
The Doodle window opens.
Paint a mask over the area you want to modify.
For more information on the tools available in the Doodle window, refer to the Recolor section.
Select Generate to regenerate the masked area.