Create UI from a Figma design
Generate Unity UI assets from a Figma design when you connect your Figma project to Assistant through a Figma project link.
Assistant can import design data from a Figma project, extract the relevant image assets and screen references, and generate Unity UI with the UI framework of your choice. This speeds up UI authoring and converts Figma mock-ups into Unity UI assets directly inside the Unity Editor.
Before you generate UI from Figma, create a Figma personal access token and save it in the Unity Editor Project Settings. For more information, refer to UI Authoring settings reference.
After setup, you can provide a Figma project link in Assistant and ask it to create a screen from the design.
Prerequisites
Before you begin:
- Install and open Assistant in the Unity Editor.
- Have access to the Figma project you want to use.
- Have permission to generate a personal access token in Figma.
Connect Assistant to Figma
Before Assistant can import designs from Figma, generate a Figma personal access token and save it in the Unity Editor.
To connect Assistant to Figma:
Open the Figma personal access token settings using one of the following methods:
If you're in the Unity Editor:
Open the Assistant window.
Select Figma to UI.
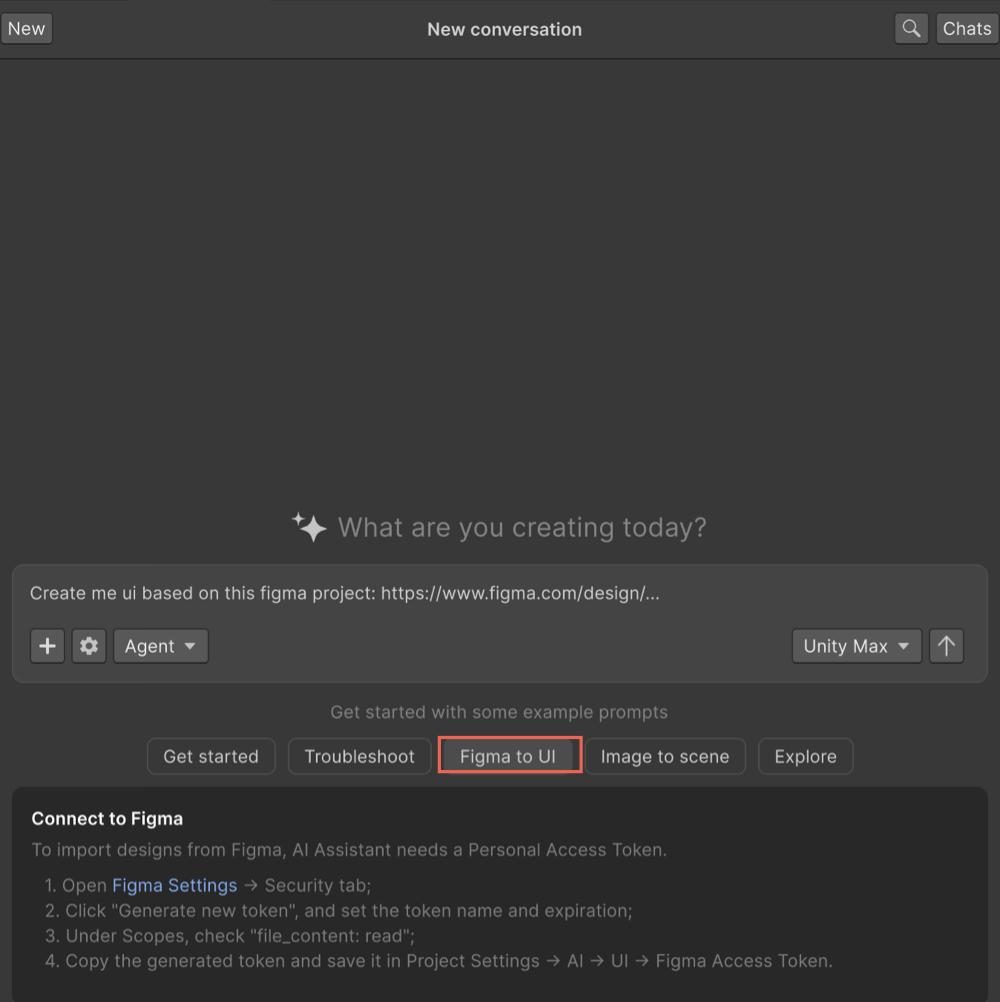
In the Connect to Figma section, select the Figma Settings link.
If you're in Figma:
- Select the Main menu icon.
- Select Help and account > Account settings.
On the Figma Account page, select Security.
In the Personal access tokens section, select Generate new token.
Enter a name for the token.
Set the token Expiration.
In the Files section, enable file_content:read.
Select Generate token.
Copy the generated token.
In the Unity Editor, open Edit > Project Settings > AI > UI.
Paste the token into Figma Access Token.
Select Verify & Save.
After the token is verified, Assistant can access your Figma project links.
Generate UI from a Figma project
After you connect Assistant to Figma, provide a Figma project link in Assistant to generate UI assets. You can use your own Figma project or a public community design.
To generate UI from a Figma design:
- Open the Assistant window.
- Enter a prompt that includes your Figma project link. For example,
Recreate UI from my Figma project: <Figma project link>. - Submit the prompt.
Assistant analyzes the Figma project link. If it points to a specific screen, Assistant generates that screen directly. If it points to a project with multiple screens, Assistant asks you to select which screen to recreate.
Review generated UI assets
When Assistant processes the Figma project, it imports the referenced design assets and generates Unity UI files in your project's Assets folder.
To review the generated files:
- In the Project window, open the
Assetsfolder. - Locate the folder created for the imported Figma design.
- Review the generated UI files.
Assistant imports:
- Image assets from the Figma design.
- A reference image of the selected screen.
It also generates the UI layout files for the selected UI framework, such as .uxml and related assets for UI Toolkit.
Assistant summarizes the generated output in the Assistant conversation so you can identify which files were created.