Sprite Shape Profile
The Sprite Shape Profile contains the settings that determine which sprites appear on a Sprite Shape at specific Angle Ranges, as well as other display settings. You can use the same Profile for multiple Sprite Shapes in a Scene.
Create a Sprite Shape Profile from the Editor main menu (menu: Assets > Create > Sprite Shape Profile), and select from the two available options: Open Shape and Closed Shape.
| Property | Function |
|---|---|
| Control Points | - |
| Use Sprite Borders | Enable to draw the Sprite Borders of a Sprite at the Control Point. Define the Sprite Borders in the Sprite Editor. |
| Fill | - |
| Sprite | Assign the sprite that fills the enclosed area of the Sprite Shape. The sprite must cover its entire texture and must not be packed into a Sprite Atlas. Set the Wrap Mode of its texture to Repeat so that Unity can tile the sprite across the Fill area. Unity also applies any secondary textures on the sprite to the Fill area. This property has no effect if you enable Open Ended in the Sprite Shape Controller. |
| Texture (Deprecated) | Displays the Fill Texture that this Profile renders from, as read only. Assign a Fill Sprite to replace it. This property is visible only if Unity can't automatically upgrade the Fill Texture of the Profile to a Fill Sprite. Refer to Upgrade a Fill Texture. |
| Offset | Determines the border offset at the edges of the Fill Sprite. |
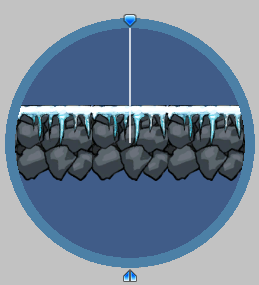 Angle Ranges (tool) |
Use this tool to create Angle Ranges and assign Sprites to those ranges. |
| Start (degrees) | Enter the starting angle for the selected Angle Range in degrees. |
| End (degrees) | Enter the ending angle for the selected Angle Range in degrees. |
| Order | Determines the display priority when Sprites intersect. Sprites with higher values are rendered above lower ones. |
| Sprites | List of Sprites assigned to the selected Angle Range. Displays a list of all Sprites assigned to the selected Angle Range. The order of Sprites in the list determines their Sprite Variant number, starting from zero at the top of the list. The first Sprite at the top of the list is the Sprite displayed by default at a Control Point. |
| Corners | - |
| (All Corner options) | Assign specific Sprites to be displayed on the Sprite Shape at the respective corners. |
Upgrade a Fill Texture
A Fill Sprite defines the Fill area. Profiles from earlier versions of the package use a Fill Texture instead. When Unity imports one of these Profiles, or you open it in the Inspector window, Unity automatically upgrades it and replaces the Fill Texture with the sprite of that texture.
Unity upgrades a Profile only if its Fill Texture is imported as a single sprite that covers the whole texture. In any other case, Unity can't determine which sprite to use. If the texture has Texture Type set to Default, or Sprite Mode set to Multiple, the Profile keeps rendering from its Fill Texture, and the Inspector window shows the texture as read only with a warning. To complete the upgrade, re-import the texture as a single sprite that covers the whole texture, set its Wrap Mode to Repeat, and assign the sprite to the Sprite field.
A Profile that still uses a Fill Texture renders the same way as in earlier versions of the package, but Unity doesn't apply secondary textures to its Fill area.
In scripts, use SpriteShape.fillSprite. SpriteShape.fillTexture is deprecated. Reading it returns the texture of the Fill Sprite if one is set, and assigning it sets a Fill Texture and clears the Fill Sprite.
Open Shape
Use the Open Shape preset Profile to create Shapes made from a single edge outline with tiled Sprites along its edge. This preset is ideal for creating level elements such as platforms.
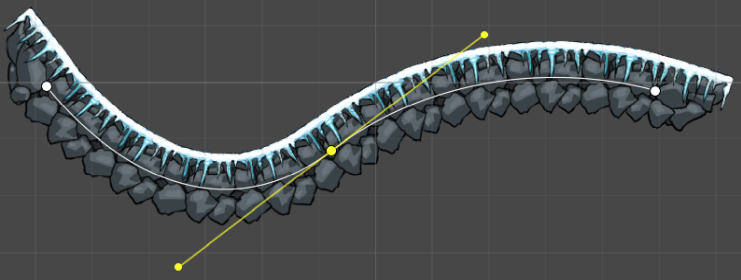
Drag the Open Shape Profile into the Scene view to automatically generate a Sprite Shape with Open Ended enabled in its Sprite Shape Controller settings.
Closed Shape
Use the Closed Shape preset Profile to create Shapes that encompass an enclosed area. A Closed Shape displays and tiles a Fill Sprite in the enclosed area if you assign a Fill Sprite in its Profile. Use this preset to create large solid filled Shapes that are ideal for backgrounds or large platforms.
Drag the Closed Shape Profile into the Scene view to automatically generate a Sprite Shape with Open Ended disabled in its Sprite Shape Controller settings. The Closed Shape Profile's preset Angle Ranges create a square Sprite Shape by default.
A key feature of the Sprite Shape Profile is the Angle Ranges tool. Assigning an Angle Range determines what Sprite is displayed at specific angles, as the Sprite Shape is deformed in the Scene.
Creating Angle Ranges
Method 1:
To create an Angle Range, click the Create Range button at the bottom of the Angle Ranges tool.
The Create Range button is only visible if the Preview Handle is over an area without an Angle Range.
Method 2:
Another way is to hover your cursor over an empty area of the Angle Range circle. An outline appears to show the possible default angle range. Click to create this Angle Range.
Editing the Angle Range degrees
The range covered by the currently selected Angle Range is displayed at the bottom of the tool.
You can edit a range by entering new values into Start and End, or drag either endpoint of the tool to the desired angles. A range cannot be extended into an existing neighboring range. To delete an Angle Range, select the range and then press the Del/Delete key.
Assigning Sprites
After creating the Angle Ranges, the next step is to assign Sprites to those ranges. The Sprites list is found beneath the Angle Ranges tool. It lists all the Sprites assigned to the selected range.
To add Sprites to the list, click the + icon to insert a new row to the list. Click the circle icon next to the empty row to open the Object Picker window, which displays all available Sprites in the project.
You can also drag a Sprite directly onto a row to add it to the list. The Sprite at the top of the list is the default Sprite displayed on the Sprite Shape. Refer to the other Sprites in the list by their Sprite Variant number. See the Sprite Shape Controller page for more details.
Drag the leftmost ends of the rows up or down to reorder the list, which changes the Sprite Variant numbers of the Sprites accordingly.
Previewing Sprites of multiple Angle Ranges
After assigning Sprites to multiple Angle Ranges, rotate the Preview Handle around the Angle Range tool to preview the Sprites assigned those ranges.