Build Settings
Unity can build your application for different platforms and with different settings. This documentation describes how to define the scenes, target platform, and settings for your build.
To select your platform and settings, and start the build process, use the Build Settings window. To access the Build Settings window: from Unity’s main menu, go to File > Build Settings.
Understanding builds
Unity produces two build types:
- A release build, which includes only what’s necessary to run the application. This is the default build type.
- A development build, which includes scripting debug symbols and the ProfilerA window that helps you to optimize your game. It shows how much time is spent in the various areas of your game. For example, it can report the percentage of time spent rendering, animating, or in your game logic. More info
See in Glossary. Selecting the development build option enables an additional set of options, such as deep profiling support and script debugging. These options are explained in the Generic Platform Settings section.
For faster iteration during development, Unity uses an incremental build pipeline that rebuilds artifacts only if they have changed since the previous build. For more information, see Incremental build pipeline.
Managing scenes in a build
When you build your application, Unity builds all selected scenes in the Scenes In Build pane. Unity builds scenes in the order in which they appear in the list.
You can add, exclude, remove, and reorder scenes in the list:
- To add all currently open scenes to the list: Select Add Open Scenes. You can also drag scenes from your Project window into the list.
- To exclude a scene in the list from the build: Clear the checkbox next to that scene. This removes the scene from the build, but not from the list.
- To remove a scene from the list: Select the scene and press Delete.
- To adjust the scene order: Drag and drop scenes in the list to reorder them.
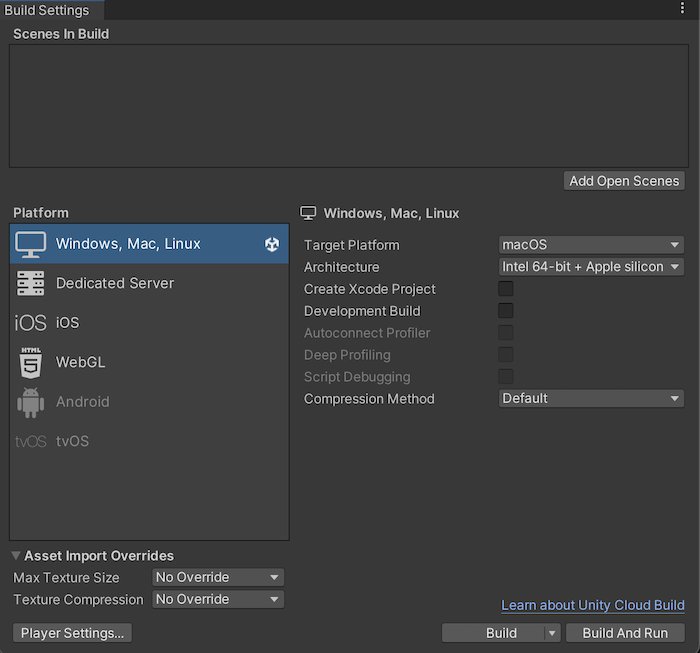
Platform list
Each build must have a target platform. The Platform pane lists all the platforms you can build for.
Each version of Unity installed on your computer has its own platform list.
If the platform you need is not on the list, do one of the following:
-
In the Build Settings window:
- Select the platform you want to add.
- Select Install or Download.
-
In Unity Hub > Installs:
- Select the three dots on the version of Unity you’re using.
- Select Add Modules.
- Follow the instructions to install the platform module.
To change the build’s target platform:
- Select the platform you want to switch to.
Tip: The list displays the Unity icon next to the platform currently selected as the target platform. - Select Switch Platforms.
If Unity needs to re-import your assets in formats that match your target platform, the switch process can take a long time.
Build settings
When you select a platform, Unity displays a list of options that you can adjust for the build. Some settings apply to all platforms, and some are platform-specific.
Generic platform settings
The following settings apply to all platforms.
| Setting: | Function: | |
|---|---|---|
| Development BuildA development build includes debug symbols and enables the Profiler. More info See in Glossary |
Include scripting debug symbols and the Profiler in your build. You should use this setting when you want to test your application. When you select this option, Unity sets the DEVELOPMENT_BUILD scripting define. Your build then includes preprocessor directives that set DEVELOPMENT_BUILD as a condition (see Platform-dependent compilations). |
|
| Autoconnect Profiler | Automatically connect the Unity Profiler to your build. This option is only available if you selected Development Build. |
|
| Deep Profiling Support | Turn on Deep Profiling in the Profiler. This makes the Profiler instrument every function call in your application so it returns more detailed profiling data. This option might slow down script execution. This option is only available if you selected Development Build. |
|
| Script Debugging | Allow your script code to be debugged. This option is only available if you selected Development Build. This option is not available for WebGL. |
|
| Wait for Managed Debugger | Make the Player wait for a debugger to be attached before it executes any script code. This option is only available if you selected Script Debugging. |
|
| IL2CPP Code Generation | Define how Unity manages IL2CPP code generation. This option is only available if you are using IL2CPP for your scripting backend, not Mono. To change your scripting backend, go to Player Settings > Configuration > Scripting Backend and change from Mono to IL2CPP. |
|
| Faster runtime | Generates code that is optimized for runtime performance. This is the default, and the behavior in previous versions of Unity. | |
| Faster (smaller) builds | Generates code that is optimized for build size and iteration. It generates less code and produces a smaller build, but may have an impact on runtime performance, especially for generic code. You might want to use this option when faster build times are important, such as when iterating on changes. | |
| Compression Method | Compress the data in your Project when you build the Player. This includes AssetsAny media or data that can be used in your game or project. An asset may come from a file created outside of Unity, such as a 3D Model, an audio file or an image. You can also create some asset types in Unity, such as an Animator Controller, an Audio Mixer or a Render Texture. More info See in Glossary, ScenesA Scene contains the environments and menus of your game. Think of each unique Scene file as a unique level. In each Scene, you place your environments, obstacles, and decorations, essentially designing and building your game in pieces. More info See in Glossary, Player settingsSettings that let you set various player-specific options for the final game built by Unity. More info See in Glossary, and GI data. This option is not available for the WebGL platform. |
|
| Default | On PC, Mac, Linux Standalone, and iOS, there is no default compression. On Android, the default compression is ZIP, which gives slightly better compression results than LZ4HC. However, ZIP data is slower to decompress. |
|
| LZ4 | A fast compressionA method of storing data that reduces the amount of storage space it requires. See Texture Compression, Animation Compression, Audio Compression, Build Compression. See in Glossary format that is useful for development builds. For more information, see BuildOptions.CompressWithLz4. |
|
| LZ4HC | A high compression variant of LZ4 that is slower to build but produces better results for release builds. For more information, see BuildOptions.CompressWithLz4HC. | |
Asset Import Overrides
To speed up import and platform switch time, you can locally override all texture import settings. Usually you would not ship your final build with any import overrides, but during development they can be useful to speed up iteration time, especially if you are not concerned with assets (textures, in this case) looking as good as possible.
To set asset import overrides for initial project imports, use the editor command line arguments -overrideMaxTextureSize and -overrideTextureCompression.
The default value for both override options is No Override.
| Setting: | Function: | |
|---|---|---|
| Max Texture Size | Override the maximum imported texture size. Unity imports textures in the lower of two values: this value, or the Max Size value specified in Texture import settings. The time it takes to import a texture is roughly proportional to the number of pixels it contains, so a lower maximum allowed texture size can speed up import times. However, the resulting textures are lower resolution, so use this setting only during development. |
|
| Texture Compression3D Graphics hardware requires Textures to be compressed in specialized formats which are optimized for fast Texture sampling. More info See in Glossary |
Override the texture compression options set in Texture import settings. Only affects textures imported into one of the compressed texture formats. |
|
| Force Fast Compressor | Use a faster but lower quality texture compression mode for formats that support it (BC7, BC6H, ASTC, ETC, ETC2). Usually this results in more compression artifacts, but for many formats the compression itself is 2 to 20 times faster. This setting also disables Crunch texture compression format on any textures that have it. The effect of this setting is the same as if all textures had their Compressor Quality set to Fast setting in their platform’s Texture import settings. |
|
| Force Uncompressed | Do not compress the textures; use uncompressed formats instead. This is faster to import (because it skips the texture compression process), but the resulting textures take up more memory and game data size, and can impact rendering performance. The effect of this setting is the same as if all textures had their Compression set to None in their platforms’ Texture import settings. |
|
Platform-specific settings
Each platform also has specific build settings:
- PC, Mac, and Linux Standalone: See PC, Mac, and Linux build settings.
-
Universal Windows PlatformAn IAP feature that supports Microsoft’s In App Purchase simulator, which allows you to test IAP purchase flows on devices before publishing your application. More info
See in Glossary: See Universal Windows Platform build settings. - tvOS: See Building your application for tvOS.
- iOS: See iOS build settings.
- Android: See Android Build Settings.
-
WebGLA JavaScript API that renders 2D and 3D graphics in a web browser. The Unity WebGL build option allows Unity to publish content as JavaScript programs which use HTML5 technologies and the WebGL rendering API to run Unity content in a web browser. More info
See in Glossary: See Building and Running a WebGL project. - For the Build Settings for closed platformIncludes platforms that require confidentiality and legal agreements with the platform provider for using their developer tools and hardware. These platforms aren’t open to development unless you have an established relationship with the provider. For example PlayStation®, Game Core for Xbox®, and Nintendo®.
See in Glossary development, see the documentation included in the Unity installer, or consult the Unity Forums.
Building your application
To build your application, select one of the following:
-
Build: Compile a Player, then do nothing. The default build is incremental, except for the first build, which is always a full non-incremental (clean) build. To force a clean build instead of an incremental build, select Clean Build from the dropdown menu.

- Build and run: Compile a Player and open it on your target platform (for more information, see the individual platform pages). This option always uses the incremental build.