Introduction
The aim of this manual is to guide you to quickly rig and animate a 2D character in Unity with the 2D Animation V2 package and tools. This package is only supported for Unity 2018.3.
Adobe Photoshop PSB format
For character animation with the 2D Animation V2 package, the PSD Importer package is required. Currently the PSD Importer package only supports Adobe Photoshop PSB format, and does not support the Adobe PSD format. The PSB format has identical functions as PSD, with the additional support for much larger image sizes.
Preparing and Importing artwork
When the art Asset is imported with the PSD Importer, Unity automatically arranges the individual characters parts (prepared as Layers) into a Sprite Sheet layout. The PSD Importer imports the graphic data from each Photoshop layer and does the following:
- Arrange/Mosiac the layers into a Sprite Sheet layout.
- Generate a Sprite from each layer’s graphic data.
When an artist designs a character for animation (see Example 1), they would usually manually separate and arrange the different parts of the character (see Example 2). The PSD Importer can generate a Prefab that reassembles the Sprites in their original positions as arranged in the PSB source file automatically (see Example 3), making it more convenient for the artist to begin animating the character.
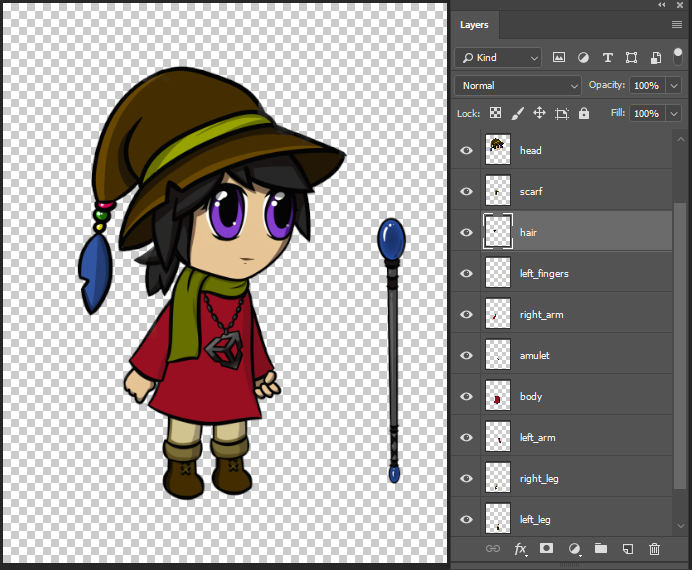
Example 1: Layered character artwork in Adobe Photoshop.
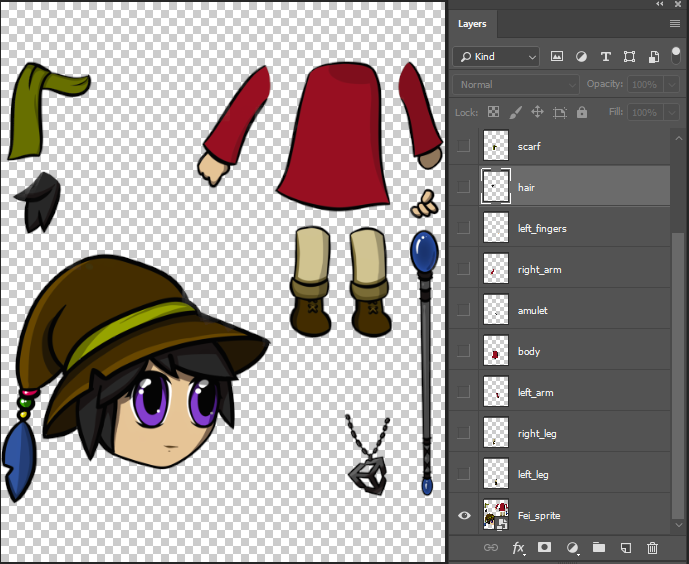
Example 2: Manually created Sprite Sheet with different layer parts.
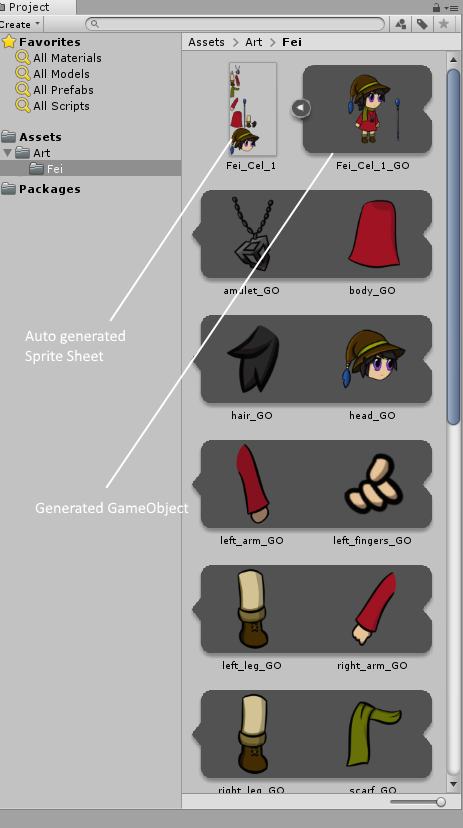
Example 3: The layers mosaic into a Sprite Sheet, with a generated Prefab of the character in source pose.
Import settings
Prepare your character by separating the character's limbs and parts into separate layers, and arrange them in a default pose.
- Save your artwork as a PSB file in Adobe Photoshop by selecting the Large Document Format under the Save As menu. You can convert an existing PSD file to PSB in the same way.
- Import the PSB file into Unity as an Asset.
- Select the Asset to bring up the PSD Importer Inspector window.
- In the Inspector window, ensure these settings are set (see the example below):
- Set Texture Type to 'Sprite(2D and UI)'.
- Set Sprite Mode to 'Multiple'.
- Check Mosaic Layer.
- Check Character Rig.
- Check Use Folder Grouping.
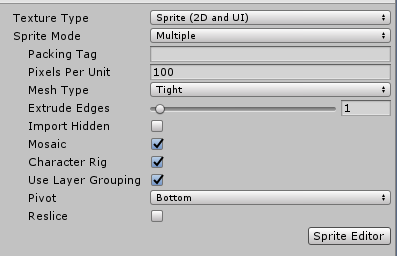
Click Apply to apply the settings when ready. Refer to the PSD Importer package documentation for more information about these settings.
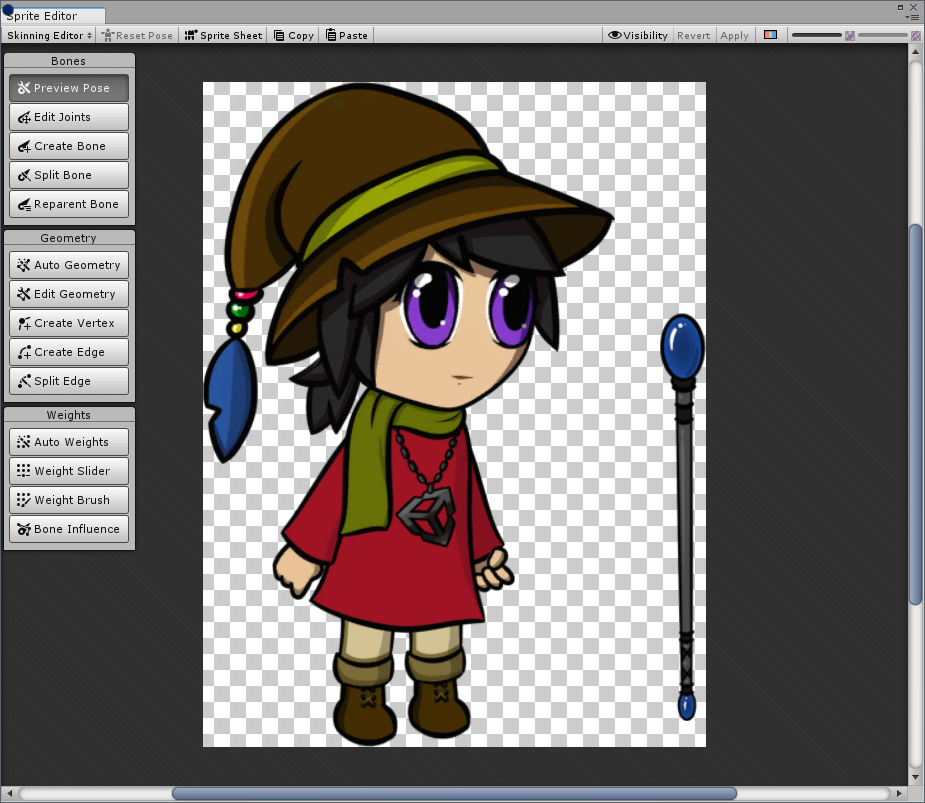
Skinning Editor module
- Select the imported Asset and select the Sprite Editor.
- Select the Skinning Editor module from the dropdown menu in the Sprite Editor window. The following options and tools then appear.
| Tool | Default Shortcut | Function |
|---|---|---|
| Shift + Q | Preview character poses after rigging. | |
| Shift + W | Reposition the bones into a new positions. These changes are automatically saved as the default bind pose for the Restore Bind Pose tool. Sprite geometry does not deform with the bones in this mode, even if the bones are attached as influencers. |
|
| Shift + E | Click and drag to create bones. | |
| Shift + R | Splits the selected bone. | |
| Shift + T | Reparents a child bone to a different parent bone, changing the bone hierarchy. | |
| Shift + A | Autogenerate meshes for Sprites. | |
| Shift + S | Edit generated meshes by repositioning vertices. | |
| Shift + D | Create new vertices to create geometry. | |
| Shift + G | Create new edges to create geometry. | |
| Shift + H | Split an existing edge into two. | |
| Shift + Z | Autogenerate weights for geometry. | |
| Shift + X | Adjust weights via slider control. | |
| Shift + C | Adjust weights by painting with a brush. | |
| Shift + V | Select which bones influence a Sprite. | |
| Shift + 1 | Restore a character’s bones and joints to their original positions. | |
| Shift + 2 | Switch between the Character and Sprite Sheet view | |
| Ctrl + C | Copy the data from the current selection. | |
| Ctrl + V | Pastes the copied data. | |
| Shift + B | Show additional pasting options. | |
| Shift + P | Toggle visibility of selected Sprites or bones. | |
| Toggle Tool Text | Shift + ` | Show or hide text on tool buttons |
Sprite selection
- Double-click a Sprite to select it.
- If there are multiple Sprites that overlay each other, double-click to cycle through all Sprites at the cursor location.
- Double-click on a blank area to deselect all Sprites.
Bone and mesh vertex selection
- Click a bone or mesh vertex to select it.
- Click and drag a selection box over multiple bones or vertices to select them at once.
- Right click to deselect any selected bone or mesh vertices.
Tool Preferences
The Unity 2D Animation preferences menu is found in the Preferences menu by going to Edit > Preferences > 2D > Animation. It provides several options to customize aspects of the animation tool.
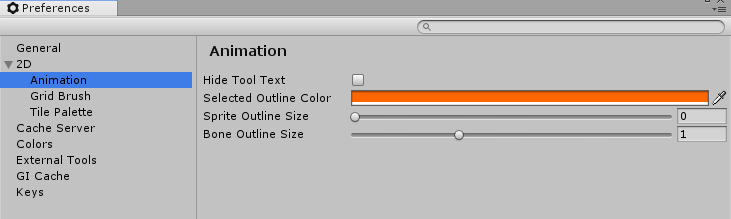
| Setting | Function |
|---|---|
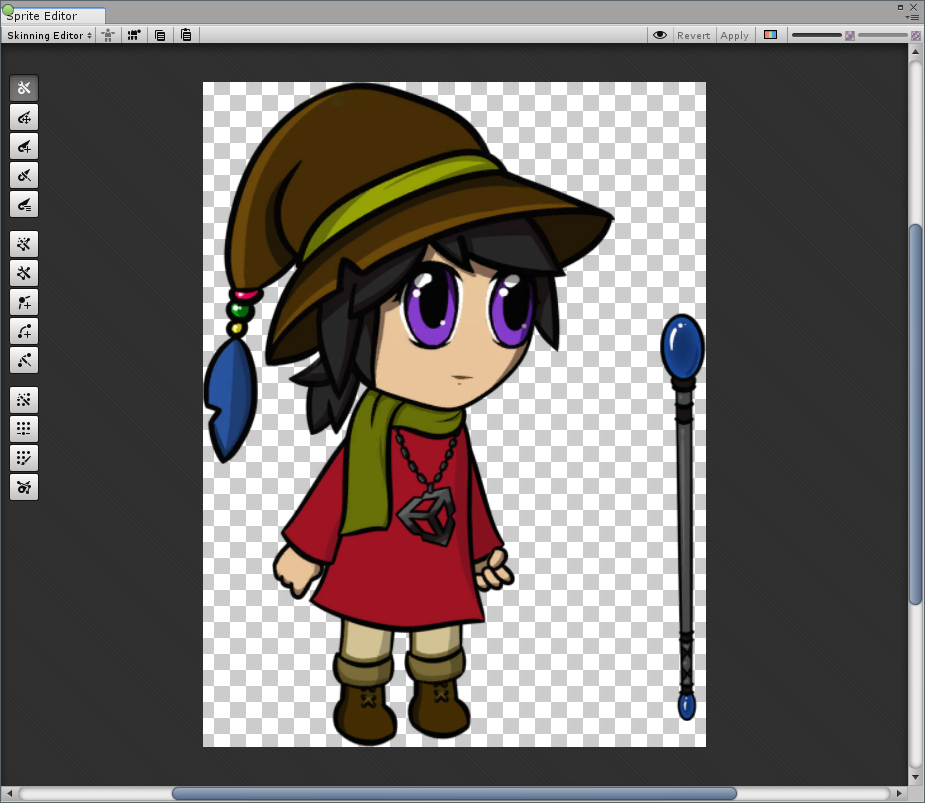
| Hide Tool Text | Enable this option to hide tool text to have a compact view (see example below). |
| Selected Outline Color | Customize the outline color of selected Sprite and bone. |
| Sprite Outline Size | Use the slider to adjust the outline thickness of a selected Sprite. |
| Bone Outline Size | Use the slider to adjust the outline thickness of a selected bone. |
Character rigging
Select the
 Create Bone tool to begin creating the bones of the character skeleton.
With the tool selected, click in the **Sprite Editor **window to define the start-point of the bone. Move the cursor to where the bone should end, and click again to set the bone’s end-point.
To create a continuous chain of bones, select the
Create Bone tool and click the end-point of an existing bone. The new bone is started from the end-point, creating a chain.Once all bones are created, generate the mesh geometry for the Sprites. It is recommended to use the
 Auto Geometry tool to autogenerate the Sprites’s geometry mesh. Then refine the geometry with the
  Create Vertex and
  Create Edge tools.
To edit the bones that influence a Sprite, select the
 Bone Influence tool and double-click a Sprite to select it. A list of bones currently influencing the Sprite appears.
 To remove any of the listed bones, select it in the list and click '-' to remove them.
To add a bone, select it in the Sprite Window and click + to add it to the list.
The weight attached to vertices affects the influence between bones and the Sprites' geometry. Select the
 Auto Weights tool to autogenerate the weight of a selected Sprites. To generate weights for all Sprites at once, deselect all Sprites before selecting the tool. Refine the weights of the vertices with the
  Weight Brush and
  Weight Slider tools.
Test the skeleton rig previewing poses with the
 Preview Pose tool. Move and rotate the different bones to check their influence on the geometry mesh. Previewing poses can also be done while using the following tools: the
  Reparent Bone, Weight Brush, Weight Slider, Bone Influence,
  Auto Weights, and
  Visibility tools.
- To restore a skeleton rig to its original pose, select
 Reset Pose. The default pose can be edited with the
  Edit Joints tool.
- To restore a skeleton rig to its original pose, select
Animating
To begin animating, drag the Asset into the Scene. This creates a GameObject that reassembles the imported character as it originally appeared in the PSB file. The GameObject contains multiple child GameObjects in the order that represents the bone hierarchy.
With the new GameObject in the scene, begin animating it with the usual Unity animation workflow and tools.