How do I import Models from my 3D app?
To import a 3D model into Unity you can drag a file into the project window.
In the inspector > Model tab Unity supports importing models from most popular 3D applications.
For pages on importing specifically from 3D packages see these pages:
Textures
- Store textures in a folder called Textures next to the exported mesh within your unity project. This will enable Unity to find the Texture and automatically connect the Texture to the generated Material. For more information, see the Textures reference.
3D formats
Importing meshes into Unity can be achieved from two main types of files:
- Exported 3D file formats, such as .FBX or .OBJ
-
Proprietary 3D application files, such as
.Maxand.Blendfile formats from 3D Studio Max or Blender for example.
Either should enable you to get your meshes into Unity, but there are considerations as to which type you choose:
Exported 3D files
Unity can read .FBX, .dae (Collada), .3DS, .dxf and .obj files, FBX exporters can be found here and obj or Collada exporters can also be found for many applications
Advantages:
- Only export the data you need
- Verifiable data (re-import into 3D package before Unity)
- Generally smaller files
- Encourages modular approach - e.g different components for collision types or interactivity
- Supports other 3D packages whose Proprietary formats we don’t have direct support for
Disadvantages:
- Can be a slower pipeline for prototyping and iterations
- Easier to lose track of versions between source(working file) and game data (exported FBX for example)
Proprietary 3D application files
Unity can also import, through conversion: Max, Maya, Blender, Cinema4D, Modo, Lightwave & Cheetah3D files, e.g. .MAX, .MB, .MA etc.
Advantages:
- Quick iteration process (save the source file and Unity reimports)
- Simple initially
Disadvantages:
- A licensed copy of that software must be installed on all machines using the Unity project
- Files can become bloated with unnecessary data
- Big files can slow Unity updates
- Less validation, so it is harder to troubleshoot problems
Models
Model files that are placed in the Assets folder in your Unity project are automatically imported and stored as Unity assets.
A model file may contain a 3D model, such as a character, a building, or a piece of furniture. The model is imported as multiple assets. In the Project view the main imported object is a Model Prefab. Usually there are also up to several Mesh objects that are referenced by the Model Prefab.
A model file may also contain animation data which can be used to animate this model or other models. The animation data is imported as one or more Animation Clips.
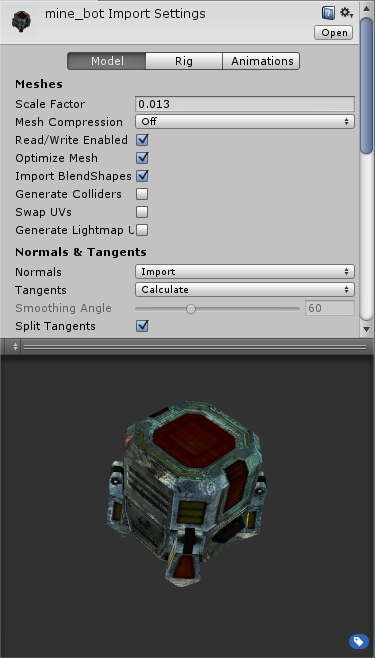
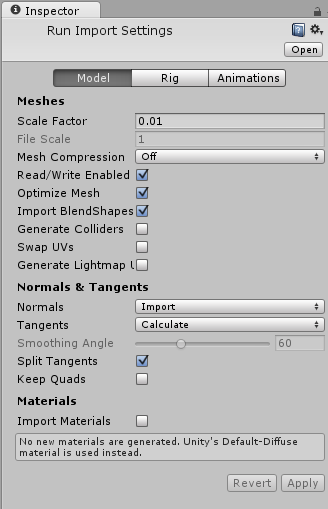
Import settings for Meshes
The Import Settings for a model file will be displayed in the Model tab of the FBX importer inspector when the model is selected. These affect the mesh, it’s normals and imported materials. Settings are applied per asset on disk so if you need assets with different settings make (and rename accordingly) a duplicate file.
Although defaults can suffice initially, it is worth studying the settings glossary below, as they can determine what you wish to do with the game object.
Some general adjustments to be made for example might be:
- Scale - this scale factor is used for compensating difference in units between Unity and 3d modeling tool - it rescales whole file. Normally you can simply set it to 1. Note that Unity’s Physics Engine is scaled as 1 unit equals 1 metre. It is important that if you want to have correct physical behaviour you should have the model correctly scaled in the original modeling application. If this cannot be done, or you do not have control over the modification of the mesh, the scale of the model can be adjusted here.
- Generate colliders - this will generate a collison mesh to allow your model to collide with other objects.
- Material Naming and Search - this will help you automatically setup your materials and locate textures
| Property: | Function: | |
|---|---|---|
| Meshes | ||
| Scale Factor | Unity’s physics system expects 1 meter in the game world to be 1 unit in the imported file. If you prefer to model at a different scale then you can compensate for it here. Defaults for different 3D packages are as follows .fbx, .max, .jas, .c4d = 0.01, .mb, .ma, .lxo, .dxf, .blend, .dae = 1 .3ds = 0.1 | |
| Mesh Compression | Increasing this value will reduce the file size of the mesh, but might introduce irregularities. It’s best to turn it up as high as possible without the mesh looking too different from the uncompressed version. This is useful for optimizing game size. | |
| Read/Write Enabled | Enables the mesh to be written at runtime so you can modify the data; it makes a copy in memory. When this option is turned off, it saves memory since Unity can unload a copy of mesh data in the game. However, if you are scaling or instantiating meshes at runtime with a non-uniform scale, you may have to enable “Read/Write Enabled” in their import settings. The reason is that non-uniform scaling requires the mesh data to be kept in memory. Normally this is detected at build time, but when meshes are scaled or instantiated at runtime you need to set this manually. Otherwise they might not be rendered in game builds correctly. The same applies if you need to create MeshColliders at runtime. | |
| Optimize Mesh | This option determines the order in which triangles will be listed in the mesh. | |
| Import Blendshapes | This option allows BlendShapes to be imported with your mesh. | |
| Generate Colliders | If this is enabled, your meshes will be imported with Mesh Colliders automatically attached. This is useful for quickly generating a collision mesh for environment geometry, but should be avoided for geometry you will be moving. | |
| Swap UVs | Use this if lightmapped objects pick up the wrong UV channels. This will swap your primary and secondary UV channels. | |
| Generate Lightmap UVs | Use this to create the second UV channel to be used for Lightmapping. See Lightmapping document. | |
| Normals & Tangents | ||
| Normals | Defines if and how normals should be calculated. This is useful for optimizing game size. | |
| Import | Default option. Imports normals from the file. | |
| Calculate | Calculates normals based on Smoothing angle. If selected, the Smoothing Angle becomes enabled. | |
| None | Disables normals. Use this option if the mesh is neither normal mapped nor affected by realtime lighting. | |
| Tangents | Defines if and how tangents and binormals should be calculated. This is useful for optimizing game size. | |
| Import | Imports tangents and binormals from the file. This option is available only for FBX, Maya and 3dsMax files and only when normals are imported from the file. | |
| Calculate | Default option. Calculates tangents and binormals. This option is available only when normals are either imported or calculated. | |
| None | Disables tangents and binormals. The mesh will have no Tangents, so won’t work with normal-mapped shaders. | |
| Smoothing Angle | Sets how sharp an edge has to be in order to be treated as a hard edge. It is also used to split normal map tangents. | |
| Split Tangents | Enable this if normal map lighting is broken by seams on your mesh. This usually only applies to characters. | |
| Materials | ||
| Import Materials | Disable this if you don’t want materials to be generated. Default-Diffuse material will be used instead. | |
| Material Naming | Controls how Unity materials are named: | |
| By Base Texture Name | The name of the diffuse texture of the imported material that will be used to name the material in Unity. When a diffuse texture is not assigned to the material, Unity will use the name of the imported material. | |
| From Model’s Material | The name of the imported material will be used for naming the Unity material. | |
| Model Name + Model’s Material | The name of the model file in combination with the name of the imported material will be used for naming the Unity material. | |
| Material Search | Controls where Unity will try to locate existing materials using the name defined by the Material Naming option: | |
| Local | Unity will try to find existing materials only in the “local” Materials folder, ie, the Materials subfolder which is the same folder as the model file. | |
| Recursive-Up | Unity will try to find existing materials in all Materials subfolders in all parent folders up to the Assets folder. | |
| Everywhere | Unity will try to find existing materials in all Unity project folders. | |